

 Français
 Deutsch
 Español
 Italiano
A Comprehensive Guide to Laser Engraving Photos on Wood
Oct
Estimated reading time: 7 minutes
Key Takeaways
- Material Selection is Crucial: The success of a photo engraving starts with choosing the right wood. Opt for light-colored woods with a tight, uniform grain like Basswood, Maple, or Cherry for high-contrast, detailed results.
- Photo Quality is Paramount: Use a high-resolution, sharply focused photograph with strong contrast and balanced lighting. An uncluttered background helps the main subject stand out.
- Digital Preparation is Non-Negotiable: Before engraving, you must process your image. This includes cropping, resizing to the physical dimensions at 250-300 DPI, converting to grayscale, adjusting brightness/contrast, and sharpening.
- Master Dithering and Settings: Dithering (e.g., Jarvis, Stucki) is essential for converting grayscale tones into a dot pattern the laser can engrave. Always perform a material test on a scrap piece to perfectly balance Power, Speed, and Resolution (DPI/LPI) for your specific wood and laser.
Table of Contents
- Choosing the Best Wood and Photograph
- Digital Photo Preparation and Software
- Perfecting Your Laser Engraver Settings
- Conclusions
- Frequently Asked Questions
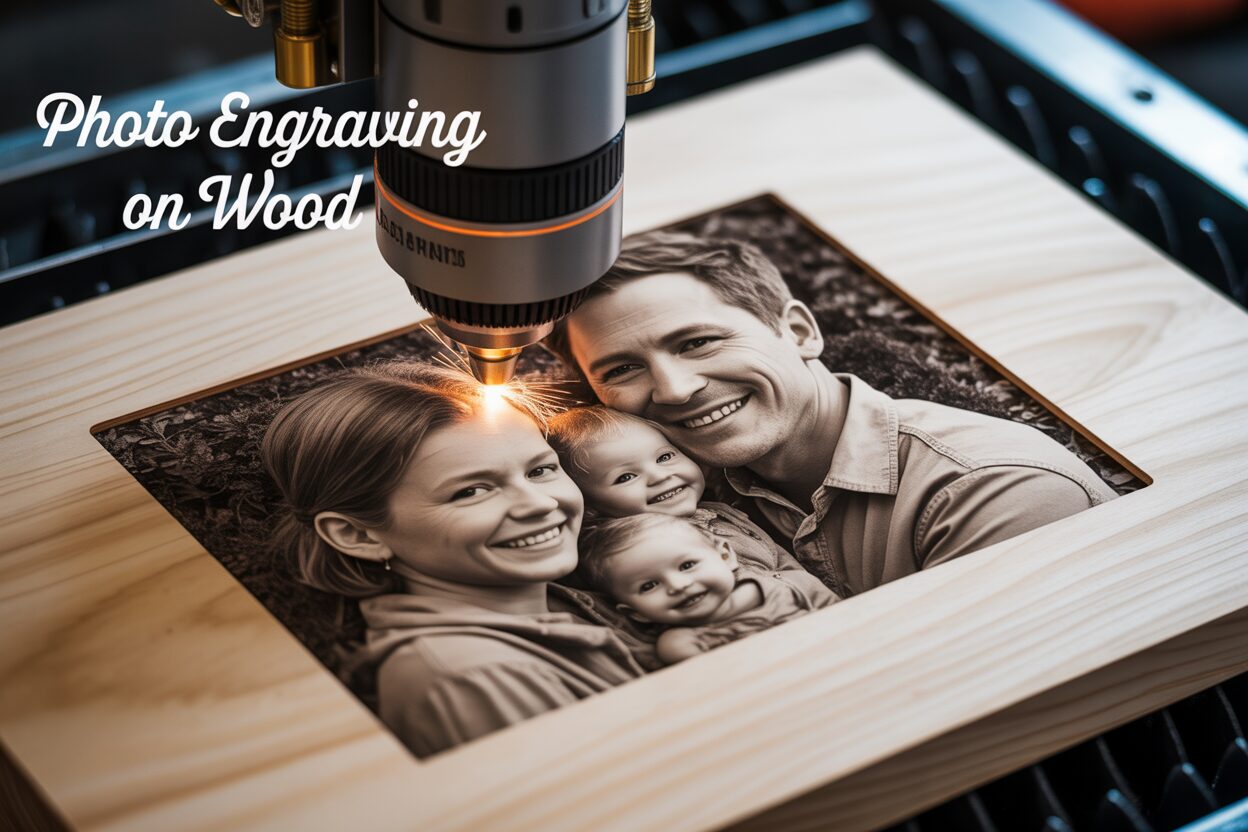
Discover the art of photo engraving on wood, a unique way to immortalize images. This guide will walk you through the essential steps, from selecting the perfect materials to fine-tuning your laser for a professional-quality laser engraved picture on wood. Unlock the secrets to creating stunning, personalized pieces that capture memories with incredible detail and warmth.
Choosing the Best Wood and Photograph
The foundation of a breathtaking laser engraved photo lies in two critical choices made before the laser even warms up: the wood you select as your canvas and the photograph you choose to immortalize. Getting these two elements right is more than half the battle, setting the stage for a result that is either a masterpiece or a muddled mess.
The Canvas: Selecting the Right Wood
Not all woods are created equal when it comes to holding the fine detail of a photograph. The ideal wood for photo engraving has a light, consistent color and a tight, uniform grain structure. The light color provides a high-contrast backdrop, allowing the dark, burned-in details of the engraving to pop. A tight and uniform grain ensures that the laser burns evenly across the surface, preventing the wood’s natural pattern from interfering with the delicate shading of your image. For these reasons, several woods stand out as top contenders:
- Basswood: Often considered the go-to choice, especially for beginners. Basswood is very light in color, has an almost invisible grain, and is relatively soft. This combination allows the laser to create a wide range of tones, from light tans to deep browns, capturing subtle details with exceptional clarity. Its affordability and consistency make it perfect for practice and for creating highly detailed portraits.
- Maple: A harder, more durable option, Maple boasts a light color and a smooth, dense grain. This density allows for incredibly sharp and precise engraving. The final result on Maple is often a very high-contrast image with crisp lines, making it an excellent choice for photos where sharpness is key. Its premium feel and durability make it ideal for high-end gifts and keepsakes.
- Cherry: For a warmer, richer aesthetic, Cherry is an outstanding choice. While not as light as Basswood or Maple, its fine, straight grain and smooth texture are perfect for photo engraving. The laser brings out deep, reddish-brown tones that give the final piece a luxurious, aged look. The engraving on Cherry is often more subtle and elegant, blending beautifully with the wood’s natural color.
Conversely, some woods are notoriously difficult for photo engraving. Oak, for example, has a very heavy and porous grain pattern. The laser’s energy is absorbed unevenly between the hard and soft parts of the grain, resulting in an engraving that looks blotchy and striped. The wood’s powerful pattern competes with the photo, often overpowering it completely. Similarly, woods like pine, with their distinct soft and hard growth rings and high sap content, can lead to inconsistent and unpredictable results. For the best laser engraved picture on wood, always stick to woods with minimal grain.
The Subject: Choosing the Perfect Photograph
The quality of your source material is paramount. A low-quality photo will always produce a low-quality engraving, no matter how perfect your wood or laser settings are. The first and most important step in the digital process is selecting a suitable photograph. Look for images with these key characteristics:
- High Contrast: Laser engraving is a monochromatic process. It translates the colors and shades of your photo into varying degrees of burn intensity. A photograph with strong contrast—clear distinctions between the light and dark areas—will translate far more effectively than a photo that is flat or composed mostly of mid-tones. Think of a subject in a light shirt against a dark background, or a well-lit face with defined shadows.
- Good, Balanced Lighting: Avoid photos with extreme lighting conditions. Harsh, direct sunlight can create deep, dark shadows that will simply become black voids in the engraving, losing all detail. Similarly, overexposed or “blown-out” areas will be left un-engraved, resulting in blank white patches. Look for photos with soft, even lighting that illuminates the subject clearly without creating harsh extremes.
- Sharp Focus and an Uncluttered Background: The laser will only engrave the detail that is present in the file. A blurry, out-of-focus, or low-resolution image will result in a muddy and indistinct engraving. Ensure your main subject is in sharp focus. Furthermore, a simple, uncluttered background is highly preferable. A busy background can distract from the main subject, making the final engraving look chaotic. If necessary, you can often edit the photo to blur or remove a distracting background before you begin the engraving process.
Ultimately, a well-chosen photo with good lighting, sharp focus, and strong contrast is the true starting point for a stunning wooden keepsake. Taking the time to select the right image will save you immense frustration and ensure your final product is a cherished piece of art.
Digital Photo Preparation and Software
Once you have selected a high-quality photograph and the perfect piece of wood, the next phase moves from the physical to the digital. Properly preparing your image file is a non-negotiable step that directly dictates the detail, clarity, and overall success of the final engraving. This process involves using image editing software to optimize your photo specifically for the laser, translating its nuances into a language the machine can understand and execute flawlessly. While the specific clicks may vary between programs like Adobe Photoshop, GIMP, or the image processing tools within photo laser engraving software like LightBurn, the core principles remain the same.
Step 1: Sizing, Cropping, and Resolution
Your first action is to prepare the digital canvas. Begin by cropping the photograph to focus on the most important elements and to remove any distracting background details. A tight crop on a portrait, for example, will yield a much more impactful and detailed result than a distant shot. Next, resize the image to the exact physical dimensions of the wooden piece you plan to engrave. If your wood is 10cm by 15cm, your digital canvas must be set to those dimensions. Pay close attention to the resolution, measured in DPI (Dots Per Inch). For photo engraving, a resolution between 250 and 300 DPI is generally ideal. This value ensures there is enough image data for a detailed engraving without making the file unnecessarily large. This DPI setting will later correspond to the “Line Interval” or “Lines Per Inch” setting in your laser software, ensuring a 1:1 translation from pixel to laser burn.
Step 2: Grayscale Conversion and Tonal Adjustment
Since a laser engraves in shades of a single color (the burn), your color photo must be converted to grayscale. This is a simple one-click process in most software (e.g., Image > Mode > Grayscale in Photoshop). However, the default conversion is rarely optimal. The most critical part of how to prepare photo for laser engraving is the manual adjustment of brightness and contrast. Your goal is to create an image with a full range of tones, from pure white (which will not be engraved) to solid black (which will receive the most laser power).
- Brightness: Use this to lighten the overall image, especially to bring out details hidden in shadows. A photo that looks good on a backlit screen is often too dark for engraving.
- Contrast: Increasing the contrast pushes the light tones lighter and the dark tones darker, making the image “pop.” This is vital for ensuring the subject stands out from the background.
- Levels and Curves: For more advanced control, use the Levels or Curves tools. These allow you to precisely manipulate the shadows, mid-tones, and highlights independently, giving you the power to fine-tune the tonal range for a perfect engraving.
After these adjustments, you should apply a subtle sharpening filter. A tool like “Unsharp Mask” works best. This enhances the edges and fine details in the image, like strands of hair or the texture of fabric, making them crisper and more defined in the final engraving. Be careful not to over-sharpen, as this can create unnatural halos and artifacts.
Step 3: Understanding and Applying Dithering
This final step is perhaps the most important for achieving a photorealistic result. A laser is a binary device; for any given point, it is either firing (on) or not firing (off). It cannot natively produce the smooth gray gradients you see on your screen. This is where dithering comes in. Dithering is a process that converts a grayscale image into a black-and-white pattern of dots or lines. It simulates shades of gray by varying the density and spacing of these tiny black dots. An area with sparsely spaced dots will appear as a light gray, while a dense cluster of dots will appear dark gray or black. Most laser control software, like LightBurn, has built-in dithering algorithms. The most common types for photo engraving are:
- Jarvis: This algorithm produces a very smooth, diffused dot pattern that is excellent at reproducing subtle tonal transitions. It is often the preferred choice for portraits and images with soft gradients.
- Stucki: This algorithm creates a slightly sharper and higher-contrast pattern than Jarvis. It is a great alternative for images that need a bit more definition and clarity.
Experimenting with different dithering modes is key to finding what works best for your specific image and wood type. This process effectively translates your carefully edited grayscale image into a precise set of instructions for the laser, ready to transform a simple piece of wood into a permanent, detailed memory.
Perfecting Your Laser Engraver Settings
With your photograph digitally optimized, you are now ready to translate it into a physical object. This is where you interface with the laser itself, and success hinges on dialing in the correct wood photo engraving settings. The interplay between three key parameters—Power, Speed, and Resolution (DPI/LPI)—determines the final look of your engraving. Mastering this balance is the difference between a scorched piece of wood and a beautifully nuanced work of art. Think of it as controlling a paintbrush made of heat; each setting adjusts the nature of your “stroke.”
- Power: This setting, usually expressed as a percentage, dictates the output intensity of the laser beam. Higher power results in a deeper, darker burn. For photo engraving, you rarely use 100% power. The goal is to achieve a range of brown tones, not just black char. Using excessive power will obliterate fine details and create a dark, muddy image.
- Speed: This setting controls how fast the laser head moves across the wood’s surface. A slower speed allows the laser to dwell on a single spot for longer, depositing more heat and resulting in a darker burn. Conversely, a higher speed results in a lighter burn. Speed and power have an inverse relationship; you must balance them to achieve the desired effect.
- Resolution (DPI/LPI): This stands for Dots Per Inch or Lines Per Inch and determines the spacing between the engraved lines. A higher DPI (e.g., 300) means the lines are packed closer together, allowing for greater detail but also concentrating more heat into the wood. A lower DPI (e.g., 200) will engrave faster with less risk of scorching but may appear less detailed. It’s crucial to match this setting to the resolution you used when preparing your image file.
Finding Your Starting Point and the Material Test Grid
Every laser is different, and every piece of wood reacts uniquely to heat. Therefore, there is no single “magic number” for settings. You must test and dial them in. However, you can begin with a solid starting point. For a diode laser (5-20W), a lower power (15-30%) and a moderate speed (3000-5000 mm/min) is often a good place to start a test. For a CO2 laser (40-60W), you might begin with a much lower power percentage (10-18%) but a higher speed in different units (250-400 mm/s). These are merely starting points. The most critical tool in your arsenal for perfecting your photo engraving on wood is the material test grid. This is a small file, often built into software like LightBurn, that engraves a matrix of squares on a scrap piece of your project wood. Each square is engraved with a unique combination of power and speed. By examining the grid, you can visually identify which combination produces the best range of tones, from a light tan to a rich dark brown, without creating excessive char. One square might be too light, another might be pure black, but one will be the “sweet spot.” Running a test grid on a scrap of the exact same wood you’ll use for your final project is the single most effective way to guarantee predictable, high-quality results.
Remember to also consider the “Scan Angle” or direction of the engraving lines. For most wood grains, setting the angle to 0 or 90 degrees (horizontally or vertically) works well. However, engraving diagonally (at a 45-degree angle) can sometimes help minimize the effect of a prominent wood grain. By methodically testing these variables, you move from guessing to knowing, taking full control over the laser to achieve the depth, contrast, and stunning detail that makes an engraved photo truly come to life.
Conclusions
You now have the foundational knowledge for successful photo engraving on wood. By carefully preparing your images, selecting the right materials, and dialing in your laser settings, you can produce breathtaking results. Embrace this technique to create personalized gifts, art, and decor. Experiment with different woods and photos to perfect your craft and bring your cherished memories to life.
Frequently Asked Questions
Q: What is the best wood for a beginner to use for photo engraving?
A: Basswood is often considered the go-to choice for beginners. Its light color, minimal grain, and softness allow for a wide range of tones and exceptional detail, making it very forgiving and perfect for practice.
Q: My photo looked good on my computer screen but came out too dark when engraved. Why?
A: Photos on a backlit screen often appear brighter than they really are. For engraving, you usually need to manually increase the brightness and contrast in an image editor to ensure details in shadowy areas are not lost and the subject “pops” on the wood.
Q: What is dithering and do I have to use it?
A: Dithering is a crucial process that converts a grayscale image into a pattern of black and white dots. Since a laser is either on or off, dithering simulates shades of gray by varying the density of these dots. Using a dithering algorithm like Jarvis or Stucki is essential for achieving a photorealistic result.
Q: Can I use any high-resolution photo for engraving?
A: While high resolution is important, the photo must also have good contrast and balanced lighting. An image with flat lighting or harsh shadows will not translate well, even if it’s high resolution. Look for photos with a clear distinction between light and dark areas and an uncluttered background.

Subscribe to Our Newsletter
And enjoy FREE Download Files, SALE Alerts and Inspiring TIPS
Pricing Your Laser Engraving Work for Profitability
A Comprehensive Guide to Pricing Your Laser Engraving Services
A Comprehensive Guide on How to Price Laser Engraving Services
Charcuterie Board Engraving File – Wine & Grapes 3D Illusion…
$4.00Original price was: $4.00.$3.00Current price is: $3.00.(25% off)
Bee and Honey Jar Charcuterie Board Engraving File | PNG Download #007…
$4.00Original price was: $4.00.$3.20Current price is: $3.20.(20% off)
Valentine Love Captions: 6 Charcuterie Board Engraving Files…
$8.00Original price was: $8.00.$5.60Current price is: $5.60.(30% off)
American Eagle Flag Laser Engraving File for Charcuterie & Cutting…
$4.00Original price was: $4.00.$2.80Current price is: $2.80.(30% off)