

 Français
 Deutsch
 Español
 Italiano
Mastering the Art of Slate Engraving for Unique Creations
Jul
Estimated reading time: 9 minutes
Key Takeaways
- Slate engraving creates permanent, high-contrast designs by using a laser to ablate the stone’s surface, revealing lighter layers underneath.
- Each engraved piece is unique due to slate’s natural texture, subtle layers, and varied colors, including shades from charcoal grey to elegant slate blue.
- Both CO2 and diode lasers (5W+) are suitable for slate. Essential tools include design software, proper cleaning materials, and safety equipment like appropriate laser glasses.
- Achieving professional results involves precise laser focusing, careful testing of settings (e.g., 20-30% power, 3000-5000 mm/min speed for diode lasers), and a crucial final step of applying food-safe mineral oil to enhance contrast.
- Beyond simple coasters, slate’s versatility allows for a wide range of creative projects, from functional home items like cheese boards and house number plaques to personalized gifts and outdoor accents.
Table of Contents
Discover the beauty and versatility of slate engraving. This article offers a deep dive into the techniques and creative possibilities of working with this unique material. We’ll guide you through everything you need to know to start creating beautiful, personalized items that are perfect for gifts, home décor, or to sell in your own business. Let’s explore the world of slate engraving together.
The Beauty of Slate Engraving
The enduring appeal of slate engraving lies in the beautiful paradox of the material itself. Each piece begins its journey as slate rock, a fine-grained, foliated metamorphic rock formed over millions of years from shale or mudstone. This ancient origin story is etched into its very being, giving every slate stone a unique character long before a laser ever touches its surface. Unlike uniform, manufactured materials, slate boasts an organic authenticity. Its surface, often described by its distinctive slate texture, is naturally riven, meaning it has subtle layers and a cleft finish that provides a tactile connection to the earth it came from. This texture isn’t a flaw; it’s a feature, catching the light in different ways and ensuring that no two engraved items are ever truly identical.
The visual allure is further enhanced by the nuances of slate color. While dark charcoal grey is the most common perception, slate exists on a beautiful spectrum. You’ll find pieces with undertones of green, hints of rich brown, and the famously elegant slate blue, a deep, cool tone that exudes sophistication. These natural color variations, sometimes appearing as subtle veining or cloud-like patterns within the stone, add a layer of depth and individuality. This inherent uniqueness is the perfect canvas for personalization. When you choose a piece of slate, you are not just selecting a blank surface; you are choosing a slice of geological history, a one-of-a-kind foundation for your creative vision.
The Fusion of Nature and Precision
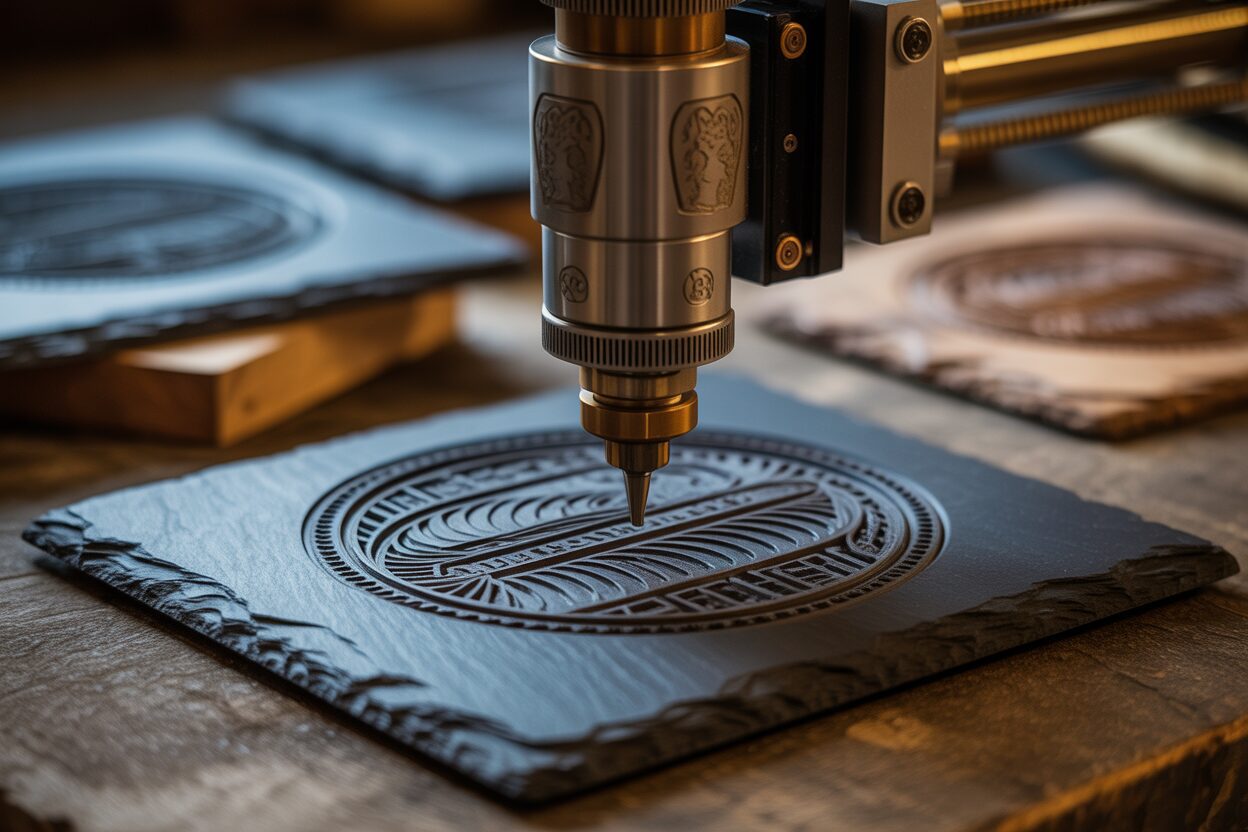
The true magic happens when the precision of technology meets the raw beauty of nature. The process of slate engraving is a fascinating interaction between light and stone. A focused laser beam doesn’t simply burn the surface; it delivers a concentrated burst of thermal energy that causes the minerals in the slate to fracture and ablate on a microscopic level. This reaction reveals a lighter-colored layer of the stone underneath, creating a striking, high-contrast mark. The result is a crisp, permanent engraving that appears almost white or light grey against the darker slate background. This brilliant contrast makes even the most intricate designs and finest text pop with stunning clarity and elegance. The mark is not an additive layer of ink or paint that can chip or fade; it is physically etched into the slate stone, becoming an inseparable part of the piece, destined to last as long as the stone itself.
This unique combination of rustic charm and refined detail makes slate engraving incredibly versatile. It lends itself to a wide range of creations that feel both grounded and sophisticated. The possibilities are limited only by your imagination:
- Functional Art for the Home: Personalized coasters, elegant cheese boards, durable placemats, and custom house number plaques merge everyday utility with natural beauty.
- Meaningful Gifts and Decor: Engraved photo slates capture memories on a timeless medium, while memorial plaques and custom wall art serve as lasting tributes and stunning decorative pieces.
- Garden and Outdoor Accents: Weather-resistant garden markers for herbs and plants, or welcome signs for a porch, bring a touch of personalized, natural elegance to any outdoor space.
Essential Tools and Materials for Slate Engraving
Transitioning from appreciating the aesthetic of slate to creating it yourself requires gathering the right set of tools and materials. Your success in slate engraving hinges on a few key components, the most important of which is your laser engraver. Both CO2 lasers and diode lasers are highly effective for this application. While CO2 lasers often offer higher speeds and power, slate is remarkably forgiving, making it an ideal material for those with entry-level or hobbyist diode lasers. A diode laser with an output power of 5W or more is perfectly capable of producing sharp, brilliant engravings on slate. When selecting a machine, prioritize a few key features: an adjustable Z-axis is crucial for focusing the laser accurately on slate pieces of varying thickness, a common characteristic of this natural slate rock. A sturdy frame will minimize vibrations, ensuring crisp lines, and a work area that matches the size of the projects you envision is a practical consideration.
Choosing Your Stone and Essential Supplies
Equally important as the laser is the slate stone itself. You can source slate from various places, including craft stores that sell pre-cut coasters and plaques, home improvement centers offering tiles, or even specialty quarries for more unique pieces. When selecting your slate, look for pieces that are relatively flat and free of deep cracks or significant flaking. Run your hand over the surface; the ideal piece will have a fine, consistent slate texture. While a completely smooth surface isn’t necessary—the natural cleft is part of its charm—an overly rough or uneven texture can diffuse the laser beam and soften the detail of your engraving. The slate color is a primary factor in the final outcome. Dark charcoal grey and the coveted slate blue varieties provide the most dramatic contrast, as the laser ablation creates a bright, almost white mark against the dark background. Lighter colored slates can still be engraved, but the contrast will be more subtle.
To complete your setup, you’ll need a few ancillary items that are just as vital for achieving a professional finish:
- Design and Control Software: Software like LightBurn (a paid, powerful option) or LaserGRBL (a free alternative) is used to control your laser’s movements and settings. For creating your designs from scratch, vector graphics programs like the free Inkscape or the professional Adobe Illustrator are indispensable.
- Cleaning and Preparation Materials: Before engraving, it’s essential to clean the slate surface thoroughly with isopropyl alcohol and a lint-free cloth to remove any dust, oils, or residue. A soft-bristled brush is also useful for clearing away dust after the engraving is complete.
- Finishing Products: This is the secret to making your engravings truly stand out. Applying a thin coat of food-safe mineral oil after cleaning will dramatically darken the slate and make the engraved areas pop with brilliant contrast. For items intended for outdoor use, a clear matte or gloss lacquer spray will provide a protective seal against the elements.
- Safety Equipment: Never operate a laser without the appropriate safety glasses rated for your specific laser’s wavelength. This is non-negotiable for protecting your eyesight.
Step-by-Step Guide to Engraving on Slate
With your design ready and materials at hand, you are now prepared for the exciting process of slate engraving. This walkthrough will guide you through each critical step, from preparing your workspace to applying the final finish that makes your creation pop.
Step 1: Design and Material Preparation
The first step is to finalize your design and prepare the slate stone. High-contrast designs, such as bold text, logos, or vector-style silhouettes, yield the most dramatic results. For photographic images, use your software’s dithering function (like Jarvis or Stucki) to convert the grayscale into a pattern of dots the laser can replicate. The natural slate texture can obscure very fine details, so simpler, bolder designs are often more effective. Once your design is loaded into your laser control software (like LightBurn), thoroughly clean your piece of slate. Wipe it down with isopropyl alcohol on a lint-free cloth to remove any dust or oils that could interfere with the engraving. This ensures the laser makes clean contact with the raw slate rock for a uniform result.
Step 2: Machine Setup and Focusing
Position the cleaned slate on your laser’s workbed. Because slate pieces can vary in thickness, ensure the piece is as level as possible. If it wobbles, use small shims or scrap material to stabilize it. Next, and most critically, is focusing the laser. The distance between the laser lens and the slate surface must be precise. Use your machine’s focusing tool or gauge to set the Z-height. For a surface with a noticeable slate texture, it’s best to focus on the average height of the area you intend to engrave. Once focused, use your software’s “Frame” function. This will run the laser head (with the beam off) around the outer perimeter of your design, allowing you to perfectly center the engraving on your coaster, plaque, or tile before you commit to the final burn.
Step 3: Laser Settings and Engraving
Setting the correct laser parameters is key. Slate doesn’t require immense power; the goal is to ablate the top layer, not cut through it. For most diode lasers (10-20W), a good starting point is:
- Power: 20-30%
- Speed: 3000-5000 mm/min
- Line Interval: 0.1 mm (or 254 DPI)
Always run a test on a spare piece of slate or on the back of your project piece first. A slight variation in slate color—for instance, a deep slate blue versus a lighter grey—may require a minor adjustment to power or speed for optimal contrast. Once your settings are dialed in, put on your safety glasses, ensure proper ventilation, and begin the engraving process. You will see a fine powder of stone being kicked up, which is normal.
Step 4: Cleaning and Finishing
After the laser finishes, your design will be obscured by a layer of light grey dust. Your engraving is done, but the magic is in this final step. Take the slate from the engraver and use a soft brush to gently sweep away the loose debris. Follow this with a thorough wipe-down using a clean cloth and isopropyl alcohol to remove any remaining fine powder. The design will now be clearly visible. To create that stunning, professional contrast, apply a thin coat of food-safe mineral oil. Drizzle a small amount onto the slate and use a clean cloth or paper towel to rub it evenly across the entire surface, including the engraved area. You will immediately see the slate darken to a rich, deep color, making the light-grey engraving stand out brilliantly. Let the oil absorb for a few minutes, then buff off any excess with a dry cloth. Your beautiful, custom-engraved slate piece is now complete.
Beyond Coasters Creative Slate Engraving Project Ideas
While coasters are a fantastic introduction to the world of slate, they are merely the first step on a much longer creative journey. The true potential of slate engraving unfolds when you begin to envision the stone not just as a small, functional item, but as a versatile medium for art, decor, and personal expression. The techniques you’ve learned can be applied to a vast array of projects that elevate the natural beauty of slate into something truly unique. Let’s explore some inspiring ideas that will push your creativity beyond the tabletop.
For the Culinary Enthusiast and Host
One of the most popular and impressive applications is the creation of custom slate cheese boards or charcuterie platters. These larger pieces offer a magnificent canvas for detailed work. Imagine a long serving board engraved with a family name and an “established” date, making for an unforgettable wedding or housewarming gift. You could engrave elegant labels for different types of cheese directly onto the board (“Brie,” “Gouda,” “Chèvre”) or add intricate design elements like a scrolling grapevine pattern along the edges. The key here is placement; design the engraving to frame the food, not be completely covered by it. The rich slate color, especially a dark charcoal or deep slate blue, enhanced with mineral oil, provides a stunning backdrop that makes both the food and the engraving look more vibrant. Trivets engraved with kitchen conversions, family recipes in a loved one’s handwriting, or beautiful geometric patterns also make for highly personal and functional kitchen art.
Architectural Accents and Garden Decor
Slate’s durability makes it perfect for projects both inside and outside the home. Create a sophisticated set of house numbers using a bold, modern font on a thick piece of slate. A welcome sign for a front porch, engraved with a pineapple (a symbol of hospitality) or a simple “Welcome,” adds immediate curb appeal. For more advanced projects, consider creating a set of decorative tiles. By engraving a continuous pattern—like a geometric honeycomb or a flowing floral design—across several tiles, you can create a stunning custom backsplash for a kitchen or a unique piece of wall art. The natural slate texture adds incredible depth to these installations, ensuring the light catches each tile slightly differently. In the garden, slate’s natural look is right at home. Engrave durable markers for your herbs and vegetables, or create a memorial plaque for a beloved pet to place under a favorite tree. For these outdoor items, be sure to finish with a UV-resistant clear coat to protect the stone and the engraving from the elements.
Personalized Gifts and Wearable Art
Don’t overlook the potential of smaller pieces of slate stone. Thin, small slate pieces, often sold as ornament blanks, can be transformed into beautiful and rustic jewelry. Engrave a delicate constellation, a meaningful symbol, or a single initial onto a small slate disc to create a one-of-a-kind pendant. Tiny squares can become unique earrings. These smaller projects require a delicate touch and lower power settings, but the results are incredibly charming. Photo engraving on slate stands is another heartfelt gift idea, turning a favorite photograph into a timeless keepsake with a permanent, statuesque quality. These projects demonstrate that no piece of slate is too small to become a canvas for your creativity. Experiment with different shapes, sizes, and designs—the world of slate engraving is rich with possibility.
Conclusions
Now that you’re equipped with the knowledge and techniques for successful slate engraving, it’s time to unleash your creativity. From personalized coasters to intricate signs, the possibilities are endless. Remember to practice, experiment with different settings, and have fun. We hope this guide has inspired you to start your own slate engraving projects and create something truly unique and beautiful.
Frequently Asked Questions
Q: What is slate engraving?
A: Slate engraving involves using a focused laser beam to ablate the top layer of slate stone, revealing a lighter-colored layer underneath. This process creates a crisp, permanent, and high-contrast design that is etched directly into the stone, making it durable and long-lasting.
Q: What type of laser engraver is best for slate?
A: Both CO2 and diode lasers are highly effective for slate engraving. While CO2 lasers often offer higher speeds and power, slate is forgiving, making entry-level or hobbyist diode lasers with an output power of 5W or more perfectly capable of producing sharp, brilliant engravings.
Q: What are the recommended laser settings for slate engraving?
A: For most diode lasers (10-20W), a good starting point for settings is typically 20-30% power, 3000-5000 mm/min speed, and a line interval of 0.1 mm (or 254 DPI). It is crucial to always run a test on a spare piece of slate or on the back of your project piece first to fine-tune settings for optimal contrast, as slate color can vary.
Q: How can I make the engraved design on slate stand out more?
A: The secret to making engravings truly pop is in the finishing. After engraving and cleaning the slate thoroughly with isopropyl alcohol, apply a thin coat of food-safe mineral oil. This will dramatically darken the unengraved slate, creating a brilliant contrast with the lighter, engraved areas. For outdoor items, a clear matte or gloss lacquer spray can provide additional protection.

Subscribe to Our Newsletter
And enjoy FREE Download Files, SALE Alerts and Inspiring TIPS
A Comprehensive Guide on How to Price Laser Engraving Jobs
Pricing Your Laser Engraving Work for Profitability
A Comprehensive Guide to Pricing Your Laser Engraving Services
Charcuterie Board Engraving File – Wine & Grapes 3D Illusion…
$4.00Original price was: $4.00.$3.00Current price is: $3.00.(25% off)
Bee and Honey Jar Charcuterie Board Engraving File | PNG Download #007…
$4.00Original price was: $4.00.$3.20Current price is: $3.20.(20% off)
Valentine Love Captions: 6 Charcuterie Board Engraving Files…
$8.00Original price was: $8.00.$5.60Current price is: $5.60.(30% off)
American Eagle Flag Laser Engraving File for Charcuterie & Cutting…
$4.00Original price was: $4.00.$2.80Current price is: $2.80.(30% off)