

 Français
 Deutsch
 Español
 Italiano
Creating Stunning 3D Illusion Art with Your Laser Cutter
Aug
Dive into the fascinating world of 3D illusion laser engraving. This article offers a comprehensive guide for enthusiasts and professionals alike, exploring techniques to create breathtaking three-dimensional effects on various materials. We’ll cover everything from the basics of the illusion to finding the perfect digital files, empowering you to bring your most creative projects to life with depth and realism.
Interested in more 3D illusion? Check out our 3D illusion laser file designs: Click here!
Estimated reading time: 8 minutes
Key Takeaways
- 3D laser engraving creates the illusion of depth by using grayscale depth maps, where different shades of gray instruct the laser to vary its power or dot density, simulating highlights and shadows on a flat surface.
- Material selection is critical for high-quality results. Light-colored, uniform woods like basswood and cherry are excellent for detailed charring, while slate provides a sharp, high-contrast effect by ablating the dark surface to reveal the lighter stone beneath.
- Success depends on using high-quality digital files. Look for designs with high resolution (at least 300 DPI) and a well-sculpted depth map that features a full range of tones from pure white to pure black.
- Precise software setup and laser settings are paramount. You must set the image mode to “Grayscale” in your software and conduct material tests to find the optimal speed, power range, and DPI for your specific laser and material.
Table of Contents
- The Magic Behind 3D Illusion Laser Engraving
- Choosing the Right Materials and Designs for Depth
- A Step-by-Step Guide to Your First 3D Engraving Project
- Conclusions
- Frequently Asked Questions
The Magic Behind 3D Illusion Laser Engraving
At first glance, a piece of 3d illusion laser engraving seems impossible. How can a laser, which operates on a 2D plane, carve what appears to be a fully three-dimensional object into a flat piece of wood or slate? The secret isn’t true 3D carving, but a masterful deception—an intricate dance of light, shadow, and digital precision that tricks your brain into perceiving depth where none exists. The process starts not with the laser, but with a special kind of digital image. Unlike standard vector or raster images, these designs are essentially grayscale depth maps. In these specialized 3d illusion laser files, every shade of gray carries a specific instruction for the laser. Pure white represents the highest point of the “sculpture” (minimal laser energy), while pure black signifies the deepest point (maximum laser energy). The infinite shades of gray in between create the subtle slopes, curves, and textures that form the illusion.
From Grayscale to Perceived Depth
The true magic happens when the laser software interprets these 3d illusion laser files and translates them into machine commands using two primary techniques: power modulation and dithering patterns.
Power modulation, often called grayscale engraving, is the most common method for achieving this effect, especially with CO2 lasers. The laser’s software reads the grayscale value of each pixel in the design and adjusts the laser’s power output in real-time.
- Dark Pixels: When the laser encounters a dark or black pixel in the file, it fires at a higher power, burning deeper into the material or creating a darker char.
- Light Pixels: For light gray or white pixels, the laser’s power is reduced significantly, barely marking the surface or leaving it untouched.
This continuous variation in power creates microscopic differences in depth and color across the material’s surface. These subtle physical gradients catch the light from different angles, producing the highlights and shadows our brains instinctively interpret as a three-dimensional form. This is the core principle of high-fidelity 3d illusion laser engraving.
Alternatively, or sometimes in conjunction, the software can use dithering patterns. Dithering is a technique where the illusion of grayscale tones is created by arranging black dots in specific patterns. Instead of modulating power, the laser fires at a consistent power but varies the spacing of the dots. Dense clusters of dots create the perception of dark shadows, while sparsely placed dots appear as light highlights. This method is particularly effective for diode lasers, which may have more limited power modulation capabilities, or on materials that don’t produce a consistent color gradient when burned at different power levels. The resulting texture, while not creating as much physical depth as power modulation, is highly effective at tricking the eye into seeing smooth, contoured surfaces.
The explosive popularity of 3d illusion laser engraving stems from its ability to transform mundane, flat objects into breathtaking works of art with a tangible sense of presence. It elevates personalized gifts, such as a family portrait engraved on slate or a company logo on a wooden plaque, from simple etchings to stunning keepsakes. For artists and makers, it unlocks a new medium for expression, allowing them to produce intricate and visually complex pieces that command attention. The growing availability of professionally designed 3d illusion laser files has democratized this advanced technique, enabling hobbyists and small businesses to create premium, high-impact products that were once the exclusive domain of highly skilled artists.
Choosing the Right Materials and Designs for Depth
The stunning illusion we discussed in the previous chapter is not created in a vacuum; it’s a partnership between the laser, the digital design, and the physical canvas. The material you choose is arguably the most critical variable in this equation, as its unique properties—its color, density, and grain—will dictate how it reacts to the laser’s energy and ultimately determines the clarity and contrast of the final piece. For wood projects, the ideal canvas is one that provides a uniform, light-colored surface with minimal grain interference. This is why certain woods are consistently favored by seasoned laser artists.
- Basswood: Often considered the gold standard for 3d illusion laser engraving. It’s a softwood with a very fine, straight grain and a pale, even color. It engraves with a consistent, rich brown char, creating superb contrast without the wood’s own pattern distracting from the engraved design.
- Cherry: A fantastic hardwood choice. While slightly darker than basswood, it has a beautiful, fine grain and darkens to a deep, rich color when engraved. This creates a high-end, luxurious look with excellent detail definition.
- Maple: Another light-colored hardwood with a dense grain structure. It allows for incredibly fine detail, but may require more laser power to achieve a dark char compared to other woods.
Conversely, woods with prominent, open grains like oak or woods with inconsistent density and sap pockets like pine can be challenging. The dense grain lines in oak can resist the laser differently than the surrounding wood, creating unwanted lines through your engraving, while sap in pine can cause flare-ups and uneven results.
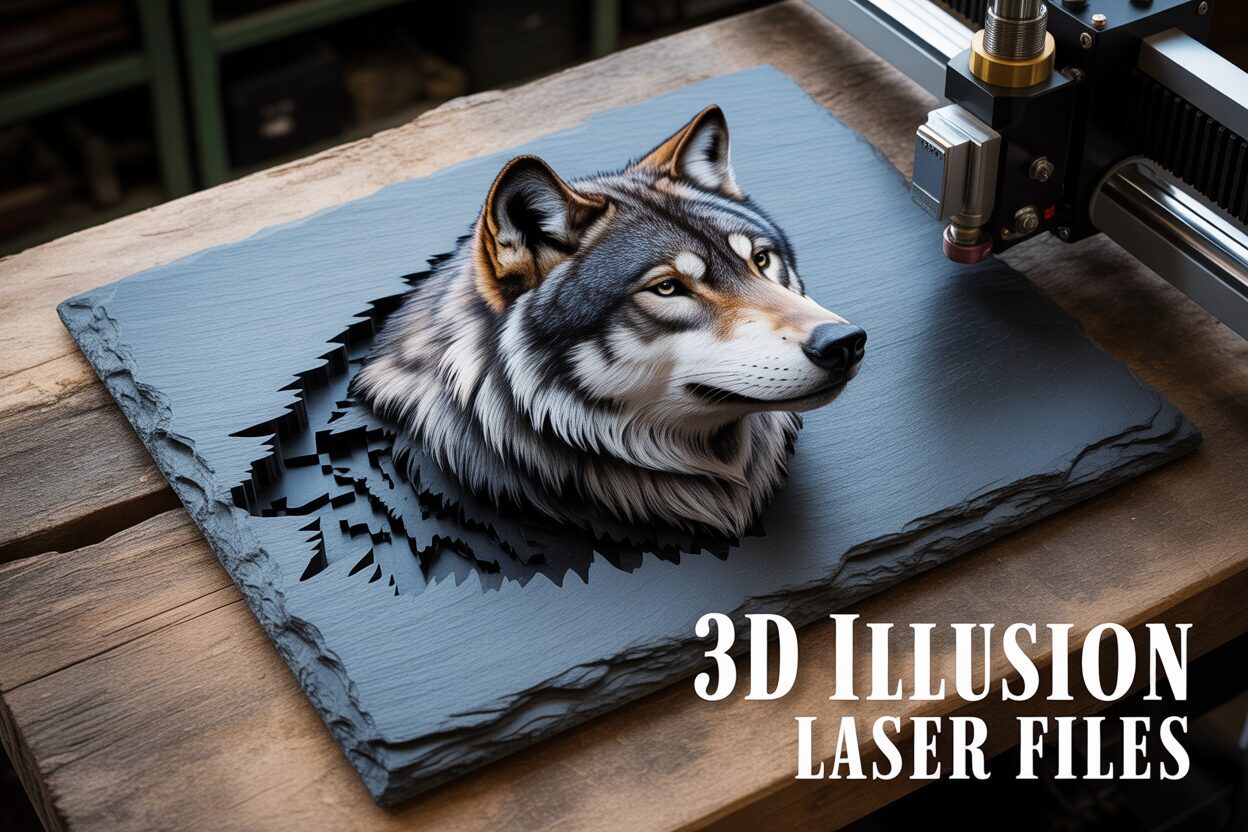
Beyond Wood: The Unique Properties of Slate
While wood offers a warm, organic feel, natural slate provides a completely different and equally stunning medium. The magic of engraving on slate lies in a different process. Instead of charring organic material, the laser ablates, or flakes off, the dark top surface of the slate to reveal the lighter gray stone beneath. This creates an immediate, crisp, and high-contrast effect without any burning. The result is a sharp, photo-realistic quality that is difficult to replicate on wood. This makes slate an exceptional choice for highly detailed images, portraits, and intricate patterns. When searching for designs, you’ll often find specific 3d illusion laser files for slate. These are typically optimized with sharper contrast and less reliance on subtle, dark shading, playing directly to the strengths of the material’s binary (dark surface/light core) nature.
Selecting a High-Quality Digital File
Your choice of material must be paired with an equally high-quality digital design. Not all 3d laser cut files are created equal, and a phenomenal piece of cherry wood can be wasted on a poorly designed file. When evaluating a 3d wood design laser cut file, the first thing to check is its resolution. A low-resolution image will produce a pixelated, blurry mess. Look for files that are at least 300 DPI (dots per inch) to ensure smooth gradients and sharp details. Beyond resolution, examine the depth map itself. A professionally made file is more than just a grayscale conversion of a photograph; it is digitally sculpted. The artist has carefully controlled the shades of gray to create clean transitions, defined edges, and a full tonal range from pure black to pure white. Avoid files that look “muddy,” with a limited range of mid-tones, as they will produce flat, uninspired engravings. While many versatile 3d laser cut files can be adapted for different materials, the best results come from matching the design’s characteristics to the material’s properties, ensuring the final product is a perfect fusion of digital art and physical form.
A Step-by-Step Guide to Your First 3D Engraving Project
With your chosen material and design in hand, it’s time to bridge the gap between digital potential and physical reality. This guide will walk you through the essential steps, from software setup to final polish, to ensure your first project is a success. Remember, precision at every stage is key to achieving a breathtaking 3d illusion laser engraving.
1. Software Preparation: Setting the Stage
The foundation of a great engraving is laid in your laser control software. We’ll use LightBurn as an example, but the principles apply to other software like RDWorks.
- Import Your Design: Start by importing your chosen 3d illusion laser files. These are typically high-resolution raster images (like PNG, JPG, or BMP), not vector files.
- Set the Image Mode: This is the most critical software step. Select the image layer and navigate to the “Shape Properties” or “Cut Settings” window. You must change the “Image Mode” to Grayscale. This setting instructs the software to use power modulation, varying the laser’s output based on the black, white, and gray values of the image, which is the core technique for this type of engraving.
- Adjust Image Properties: Within the same settings window, you can fine-tune the output. You might see options for “Contrast,” “Brightness,” and “Gamma.” For your first project, it’s best to leave these at their default values. The key is to trust the professionally made depth map in your file.
- Size and Position: Resize the image to fit your material and position it on the workspace. Ensure the DPI (Dots Per Inch) of the layer is set to at least 300 to capture all the fine detail from your high-quality laser engraving files.
2. Laser Settings: Dialing in the Depth
Your laser settings are where the magic truly happens. These will vary based on your laser’s wattage and your specific material, so always run a small test on a scrap piece first. A material test grid is invaluable for this. Here are some solid starting points:
For Wood (e.g., Basswood on a 60W CO2 Laser):
- Speed: ~200-300 mm/s. A moderate speed allows enough time for the laser to burn to the required depth without being excessively slow.
- Power: This is a range. Set “Min Power” to a very low value (0-2%) so white areas are barely touched. Set “Max Power” to achieve a deep, dark char without excessive scorching (start around 55-70%).
- DPI/Interval: 300-400 DPI (or an interval of ~0.08mm). This high resolution is crucial for creating smooth gradients.
- Scan Angle: Set to 0 or 90 degrees. If you notice vertical banding, try rotating the scan angle to run parallel with the wood grain.
For Slate (on a 10W Diode or 60W CO2 Laser):
- Speed: ~300-500 mm/s. You can often go faster on slate as you are only ablating the surface.
- Power: The power range is much narrower and lower. Too much power will melt or fracture the slate. Start with a “Min Power” of ~10% and a “Max Power” of ~25-35%. The goal is a clean, light gray mark, not a deep crater.
- DPI/Interval: High DPI (300+) is still essential for sharp detail.
3. Execution and Finishing
With your settings dialed in, double-check your laser’s focus—an out-of-focus beam will kill the fine detail. Secure your material to the bed and run the job. Be patient; high-resolution 3d illusion laser engraving can take a significant amount of time. Once the machine finishes, the work isn’t quite done. Post-processing is what makes the piece truly pop. For a wood engraving, let it cool, then use a soft brush (like a toothbrush) and a small amount of isopropyl alcohol to gently scrub away the surface soot. Work carefully to avoid smudging the dark char into the light, unengraved areas. For slate, simply wipe the surface with a damp cloth to remove the dust. To achieve a stunning, high-contrast finish on slate, apply a thin coat of mineral oil, which will deepen the black of the slate and make the gray engraving stand out dramatically.
Conclusions
You now have the knowledge to master the art of 3D illusion engraving. By understanding the techniques, selecting the right materials like wood and slate, and using high-quality 3d illusion laser files, you can produce stunning pieces that captivate and impress. Embrace these skills, start experimenting with your designs, and elevate your laser cutting and engraving projects to a new dimension.
Frequently Asked Questions
Q: What exactly is 3D illusion laser engraving? A: It’s a technique that uses a special grayscale image, called a depth map, to trick the eye into seeing a 3D object on a 2D surface. The laser interprets shades of gray as different power levels, burning darker areas deeper and lighter areas shallower, which creates physical depth and shadows that simulate a three-dimensional form.
Q: What is the best material for 3D wood engraving projects? A: Basswood is often considered the best choice due to its light, uniform color and very fine grain, which allows for excellent contrast and detail. Cherry and Maple are also fantastic hardwood options that provide a premium finish.
Q: What is the most important setting in my laser software for this technique? A: The single most critical setting is the “Image Mode” for your design layer. You must set it to “Grayscale” (or a similar power modulation setting). This tells the software to vary the laser’s power based on the pixel values in your image, which is the core mechanism behind the 3D illusion.
Q: How do I clean my project after engraving? A: For wood, let it cool completely and then gently scrub the surface soot with a soft brush and a small amount of isopropyl alcohol. For slate, simply wipe the dust away with a damp cloth. Applying a thin coat of mineral oil to the slate afterward will dramatically enhance the contrast.

Subscribe to Our Newsletter
And enjoy FREE Download Files, SALE Alerts and Inspiring TIPS
A Comprehensive Guide on How to Price Laser Engraving Jobs
Pricing Your Laser Engraving Work for Profitability
A Comprehensive Guide to Pricing Your Laser Engraving Services
Charcuterie Board Engraving File – Wine & Grapes 3D Illusion…
$4.00Original price was: $4.00.$3.00Current price is: $3.00.(25% off)
Bee and Honey Jar Charcuterie Board Engraving File | PNG Download #007…
$4.00Original price was: $4.00.$3.20Current price is: $3.20.(20% off)
Valentine Love Captions: 6 Charcuterie Board Engraving Files…
$8.00Original price was: $8.00.$5.60Current price is: $5.60.(30% off)
American Eagle Flag Laser Engraving File for Charcuterie & Cutting…
$4.00Original price was: $4.00.$2.80Current price is: $2.80.(30% off)