

 Français
 Deutsch
 Español
 Italiano
Personalized Charcuterie Boards with Laser Engraving
Jul
Estimated reading time: 7 minutes
Key Takeaways
- Selecting the right food-safe wood (Maple, Cherry, Acacia, Bamboo) and inspecting its quality are crucial for successful laser engraving and durability.
- Digital design (preferably vector files) and physical board preparation (cleaning, sanding, masking) are essential for achieving crisp, clean engravings.
- Precise laser calibration, including power and speed settings tailored to wood type, is vital to prevent scorching and ensure optimal contrast.
- Post-engraving finishing, like masking removal, cleaning, and applying food-safe oil/conditioner, enhances the design’s appearance and the board’s longevity.
- Laser engraving charcuterie boards offers both creative satisfaction and a profitable business opportunity for unique, personalized items.
Table of Contents
- Selecting the Perfect Charcuterie Board for Engraving
- Design and Preparation for Laser Engraving
- The Laser Engraving Process and Finishing Touches
- Conclusions
- Frequently Asked Questions
Discover the art of transforming a simple charcuterie board into a personalized masterpiece. This article explores how to laser engrave these popular serving platters, from selecting the right materials to creating intricate designs. Learn the techniques to craft unique, memorable items for personal use or as a profitable addition to your creative business.
Selecting the Perfect Charcuterie Board for Engraving
The foundation of a truly memorable personalized charcuterie board lies in the raw material you begin with. The choice of wood is paramount, as it dictates not only the aesthetic appeal and durability of the finished piece but also the quality and clarity of the laser engraving itself. A carefully selected board serves as the perfect canvas, ensuring your design engraves beautifully and the board remains a safe, functional item in the kitchen for years to come. When making your selection, you must balance the wood’s natural characteristics with its performance under the laser and its suitability for serving food. This involves examining the wood species, inspecting the physical quality of the individual board, and understanding the implications of any pre-existing finishes.
Comparing the Best Woods for Engraving
The type of wood you choose will have the most significant impact on the final look. Different woods react differently to the heat of the laser, producing varying levels of contrast and detail. Here are some of the most popular and effective options for a personalized charcuterie board:
- Maple: Often considered the gold standard for engraving, maple—particularly hard maple—offers a light, uniform color and a very fine, tight grain. This clean slate allows for exceptional contrast, making laser engravings appear crisp, dark, and highly detailed. It is also extremely durable, dense, and has natural antimicrobial properties, making it an ideal and safe surface for food preparation and presentation.
- Cherry: Known for its rich, warm reddish tones that darken beautifully with age, cherry wood provides an elegant and premium feel. It engraves with a deep, dark color, offering good contrast against its reddish-brown surface. While slightly softer than hard maple, it is still very durable and its smooth, straight grain makes it a joy to work with. A design engraved on cherry will look sophisticated and timeless.
- Acacia: This wood is prized for its dramatic and varied grain patterns, which can range from light blonde to deep brown within a single piece. This natural variation means no two acacia boards are alike. However, this can also be a challenge for engraving. The laser will react differently to the light and dark sections, resulting in an engraving with varying contrast. This can create a wonderfully rustic and organic look, but it may obscure very fine details. Acacia is very hard, durable, and naturally water-resistant.
- Bamboo: Technically a grass, bamboo is a popular, sustainable, and budget-friendly option. It is harder than most woods and produces a nice, dark burn when engraved, creating excellent contrast. The main consideration with bamboo is its construction. Most boards are made of laminated strips, and the laser can react differently across glue lines or the natural nodes of the bamboo stalks, sometimes leading to an inconsistent finish. It’s best for bold designs rather than intricate, delicate patterns.
Inspecting Your Board for Quality
Once you’ve settled on a wood type, you must inspect the specific board you plan to purchase. Not all boards are created equal, and a poor-quality piece will ruin your project. First, check for flatness. Lay the board on a perfectly flat surface, like a countertop or the bed of your laser engraver. Press on all corners and sides. If it rocks or wobbles, it’s warped. A warped board will cause the laser to go in and out of focus, resulting in an engraving that is uneven in depth and sharpness. Next, carefully examine the surface for defects. Look for deep knots, cracks, chips, or large glue spots from the lamination process, especially in the area you intend to engrave. These imperfections can disrupt the laser beam, cause flare-ups, and may compromise the structural integrity of the board over time.
Food-Safe Finishes and Considerations
Since the board will be used to serve food, safety is non-negotiable. Many boards sold in stores come pre-finished. It is critical to know what finish was used. Avoid any board finished with varnish, lacquer, or any sealant not explicitly labeled as “food-safe” or “food-grade.” These chemicals can release toxic fumes when vaporized by the laser and can contaminate the board’s surface. The safest option is to purchase an unfinished board or one finished with a simple, known food-safe oil like mineral oil. This gives you full control. If you buy a board with an unknown finish, the best practice is to sand it down completely before engraving and then season it yourself afterward with a food-safe mineral oil and board butter. This final step not only restores the wood’s luster but also seals the freshly engraved area, making your beautiful, personalized charcuterie board ready and safe for its delicious debut.
Design and Preparation for Laser Engraving
With your perfect board selected, the next stage is transforming it from a blank slate into a personalized masterpiece. This phase involves two critical, intertwined processes: creating a compelling digital design and meticulously preparing the physical board’s surface. A thoughtful design gives the board its character, while proper preparation is the secret to a professional-quality, crisp, and clean engraving. Skipping these steps can lead to disappointing results, such as scorched wood or a design that doesn’t fit the piece’s aesthetic. By dedicating attention to both the digital and physical prep work, you ensure the final engraving is as flawless as the board you chose.
Finding Inspiration: Charcuterie Board Engraving Ideas
The beauty of a custom project is the infinite possibility for design. The key is to match the design to the occasion and the recipient’s personality. Here are some popular charcuterie board engraving ideas to get you started:
- Monograms and Names: A timeless and elegant choice. You can opt for a single-letter initial for a modern look, a classic three-letter monogram for a traditional feel, or a full family name paired with an “established” date for a meaningful wedding or housewarming gift.
- Meaningful Text: Consider engraving a favorite quote, a short family saying, or even the coordinates of a special place. A particularly cherished idea is scanning a loved one’s handwritten family recipe and engraving it directly onto the board, preserving it forever.
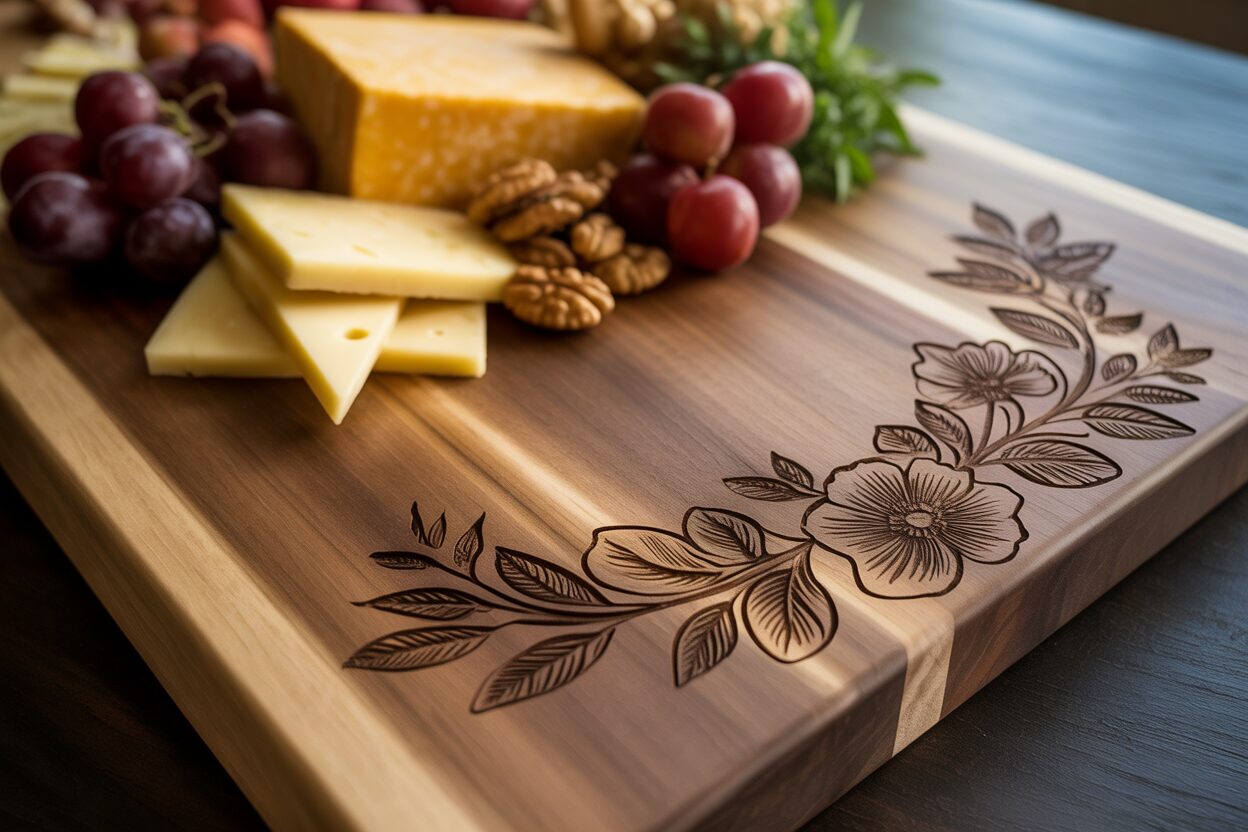
- Intricate Patterns and Art: For a more decorative piece, consider engraving a damask pattern around the edge, a floral wreath in a corner, or a geometric design. You could also engrave a line drawing of a significant landmark, like a mountain range or a coastal map.
- Logos and Branding: For corporate gifts or real estate closing presents, a professionally engraved company logo adds a touch of class and personalization that makes a lasting impression.
When choosing your design, consider the wood’s grain. A simple, bold design like a monogram works beautifully on visually busy woods like acacia, while a clean canvas like maple is perfect for showcasing highly intricate patterns or delicate script.
Creating Your Digital Blueprint
Once you have an idea, you need to translate it into a digital file that the laser engraver can read. The gold standard for this is a vector file (formats like SVG, AI, or DXF). Unlike pixel-based images (like JPEGs), vectors are made of mathematical paths and lines. This means they can be resized to any dimension without losing sharpness—a critical feature for ensuring clean, crisp lines in your engraving. You can create vectors using software like Adobe Illustrator, CorelDRAW, or the free and powerful Inkscape. If your design is a more complex image or a photograph, it will need to be converted and processed as a raster engraving, but for text and line art, vectors are superior. When setting up your file, measure your board precisely and create an artboard in your software of the exact same size. This allows you to place and size your design with perfect accuracy before sending it to the laser.
Prepping Your Canvas for a Flawless Engraving
Proper surface preparation is one of the most important steps in determining how to laser engrave a charcuterie board successfully. The goal is to create the ideal surface for the laser to interact with. First, ensure the board is clean. Wipe it down with a tack cloth or a lint-free cloth to remove any dust or debris. If you’ve purchased an unfinished board or need to remove a questionable factory finish, a light sanding may be necessary. Use a fine-grit sandpaper (220 or higher) and always sand with the grain to avoid creating visible scratches. After sanding, clean it again. The final, and perhaps most crucial, preparation step is applying a masking agent. This is typically a wide, low-tack paper tape that you apply smoothly over the entire engraving area. Use a plastic scraper or credit card to press the mask down firmly, eliminating any air bubbles. This mask acts as a protective layer, preventing the smoke and resin residue produced during engraving from staining and scorching the wood around your design. When the engraving is finished, you simply peel off the mask, revealing a perfectly clean, sharp design with high contrast, turning your board into a truly professional custom laser engraved cutting board.
The Laser Engraving Process and Finishing Touches
With your design finalized and your board perfectly prepped and masked, you’ve arrived at the most exciting stage: the moment the laser brings your digital vision to life on wood. This process marries technology with craftsmanship, but success hinges on precision and a methodical approach. Setting up the laser correctly is just as important as the design itself, and the final finishing touches are what elevate a simple engraved item into a durable, beautiful, and professional-quality piece. Pay close attention to these steps, as they are the final gatekeepers to creating a stunning personalized charcuterie board.
Calibrating Your Laser for a Perfect Burn
Before you press the ‘start’ button, proper setup within the laser machine is essential. First, securely place your board on the laser bed. Use honeycomb pins, a custom jig, or heavy weights along the edges (outside the engraving area) to ensure the board cannot shift even slightly during the process. Any movement will ruin the alignment of the engraving. Next, you must set the laser’s focus. The laser beam is cone-shaped, and its point of maximum power is at the very tip; an out-of-focus laser will produce a weak, blurry engraving. Use your machine’s specific focusing tool or auto-focus feature to set the correct distance between the laser lens and the surface of the masked board.
The most critical settings are power and speed. These will vary based on your laser’s wattage and the type of wood you are using.
- Hardwoods (Maple, Acacia): These dense woods require more power or a slower speed to achieve a deep, dark burn. A setting that is too fast or too low in power will result in a faint, light-brown mark.
- Medium-Hardwoods (Cherry): Cherry engraves beautifully but is slightly softer, so it may require a bit less power or a slightly faster speed than maple to avoid excessive charring.
- Bamboo: Being very hard, bamboo generally needs settings similar to hard maple but can sometimes be more sensitive to scorching.
Crucially, never guess your settings. It is always best practice to run a small test grid on a scrap piece of the exact same material or on an inconspicuous area on the back of the board. This allows you to dial in the perfect combination of power and speed to get the rich, dark contrast you desire without creating a burnt, overly deep channel in the wood.
From Engraving to Finishing
Once your settings are dialed in, send the file to the laser and begin the job. Always stay with the machine and monitor the engraving process. Ensure your ventilation system is running properly to extract the smoke. While the smell of burning wood is normal, watch for any excessive flare-ups, which could indicate a problem with your settings or the material. When the engraving is complete, let the board cool for a minute before removing it from the machine. Now, the finishing process begins. Carefully peel away the transfer mask. A weeding tool can be helpful for lifting small, intricate pieces of the mask from within the design. As you peel it back, you will reveal the crisp, clean engraving beneath, free from the smoke stains and resin residue that would have otherwise marred the surface.
While the mask removes most of the residue, a final cleaning is recommended. Use a soft brush or a cloth lightly dampened with a high-percentage isopropyl alcohol to gently wipe down the engraved area. This will remove any remaining particulates without damaging the wood. The final step is to bring the wood to life. Liberally apply a generous coat of food-safe mineral oil to the entire board, front and back. Let it soak into the wood for at least 20-30 minutes—or even overnight. The oil will rehydrate the wood fibers, especially in the engraved area, which has been dried out by the laser’s heat. This will dramatically deepen the wood’s natural color and make the engraved design “pop” with a rich, dark contrast. After the oil has soaked in, wipe away any excess. For an even more protective and luxurious finish, follow up with a coat of a food-safe board conditioner, often a blend of mineral oil and beeswax. This final touch not only seals and protects the wood but also gives your personalized charcuterie board a beautiful, professional sheen, making it ready for gifting or its first use.
Conclusions
Laser engraving charcuterie boards is a rewarding process that combines creativity with functionality. By choosing the best wood, preparing your design, and following the correct engraving and finishing steps, you can create high-quality, personalized pieces. These boards are not only a stylish addition to any home but also represent a significant opportunity for creative entrepreneurs.
Frequently Asked Questions
Q: What are the best wood types for laser engraving charcuterie boards, and why?
A: Maple, Cherry, Acacia, and Bamboo are highly recommended. Maple offers excellent contrast and durability, Cherry provides a rich, dark engraving and elegant feel, Acacia gives a rustic look with varied grain, and Bamboo is sustainable and produces good contrast. Each has unique characteristics regarding grain, hardness, and how they react to the laser.
Q: Why is proper board preparation important before laser engraving?
A: Proper preparation, including cleaning, light sanding (if needed), and applying a masking agent, is crucial for a flawless engraving. It prevents smoke and resin residue from staining the surrounding wood, ensures crisp lines, and helps the laser interact effectively with the surface, resulting in a professional-quality finish.
Q: How do I ensure my laser engraving is dark and crisp, not faint or scorched?
A: The key is precise calibration of laser power and speed settings, which vary by wood type and laser wattage. Hardwoods generally need more power or slower speed. Always perform a small test grid on a scrap piece of the same material to dial in the perfect settings that achieve rich, dark contrast without over-burning the wood.
Q: What kind of finish should I use on a personalized charcuterie board after engraving?
A: Since the board will be used for food, it’s critical to use only food-safe finishes. Mineral oil is a safe and common choice. After engraving and cleaning, liberally apply mineral oil to rehydrate the wood and deepen the engraving’s color. For added protection and luster, follow up with a food-safe board conditioner (e.g., mineral oil and beeswax blend).

Subscribe to Our Newsletter
And enjoy FREE Download Files, SALE Alerts and Inspiring TIPS
Pricing Your Laser Engraving Work for Profitability
A Comprehensive Guide to Pricing Your Laser Engraving Services
A Comprehensive Guide on How to Price Laser Engraving Services
Charcuterie Board Engraving File – Wine & Grapes 3D Illusion…
$4.00Original price was: $4.00.$3.00Current price is: $3.00.(25% off)
Bee and Honey Jar Charcuterie Board Engraving File | PNG Download #007…
$4.00Original price was: $4.00.$3.20Current price is: $3.20.(20% off)
Valentine Love Captions: 6 Charcuterie Board Engraving Files…
$8.00Original price was: $8.00.$5.60Current price is: $5.60.(30% off)
American Eagle Flag Laser Engraving File for Charcuterie & Cutting…
$4.00Original price was: $4.00.$2.80Current price is: $2.80.(30% off)