
-
×
 Halloween Charcuterie Board Laser File, Jack O Lantern Engraving, Party Decor 1 × Original price was: $4.00.$3.00Current price is: $3.00.
(25% off)
 Halloween Charcuterie Board Laser File, Jack O Lantern Engraving, Party Decor
 Français
 Deutsch
 Español
 Italiano
Mastering Slate Laser Engraving: Techniques for Stunning Results
06
Jul
Jul
Estimated reading time
13 minutes
Key Takeaways
- Material Understanding is Crucial: Slate’s variable hardness, layered structure, and surface textures (natural cleft vs. honed) demand careful consideration for optimal engraving and contrast.
- Preparation and Settings are Key: Thorough cleaning, proper surface selection, and strategic pre-treatments (like masking) are as vital as fine-tuning laser power, speed, and frequency through rigorous testing.
- Design for Contrast and Legibility: High-contrast designs (silhouettes, bold text), appropriate dithering for photos, and legible fonts are essential to overcome slate’s natural variations and achieve clear, impactful engravings.
- Post-Engraving Finishing Enhances Durability & Aesthetics: Cleaning, applying mineral oil for contrast, and selecting suitable sealants (topical or impregnating) protect the engraved slate and ensure its longevity and visual appeal.
Table of Contents
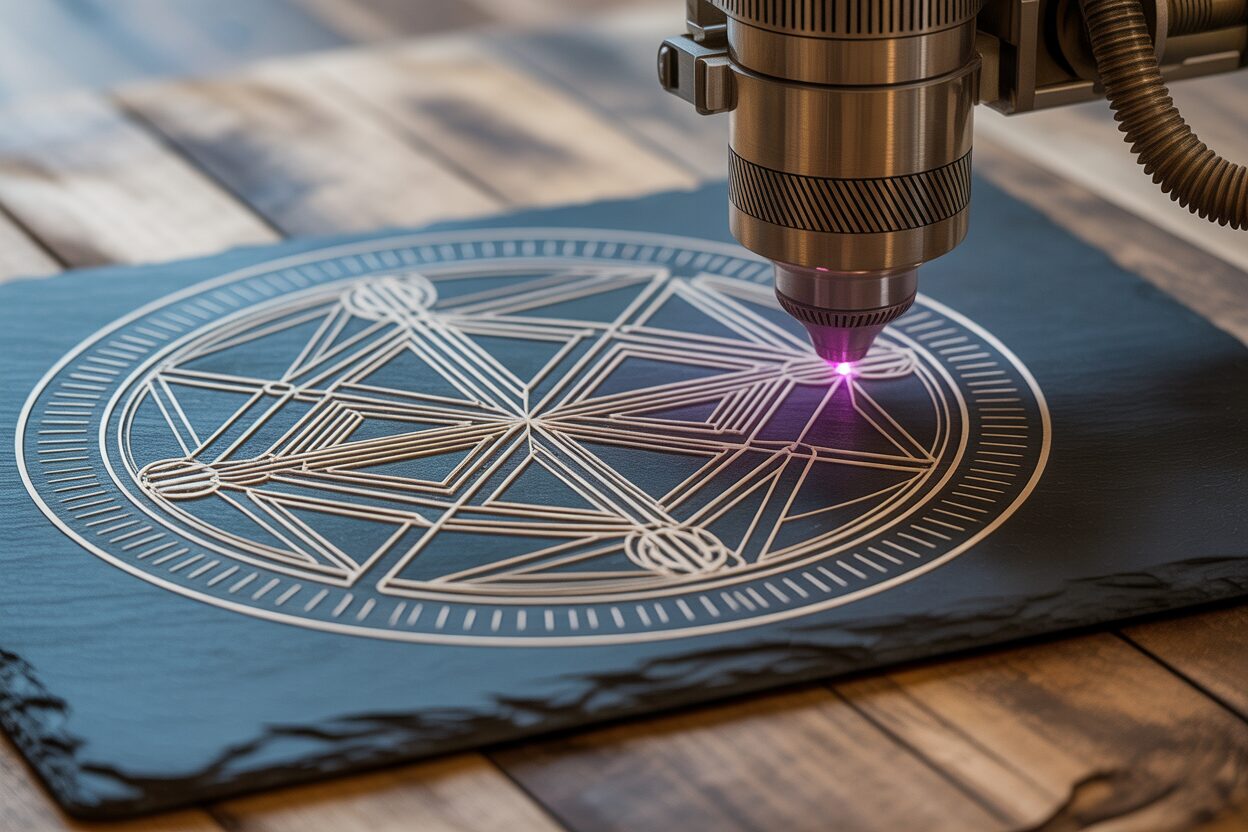
Laser engraving on slate offers a unique way to create personalized and durable designs. This article explores the intricacies of laser engraving slate, providing tips and techniques to achieve professional results. We will delve into preparing slate, optimizing laser settings, and adding finishing touches, enabling you to transform plain slate into stunning art pieces and marketable products like slate coasters and tiles.
Understanding Slate as a Material for Laser Engraving
Slate, a fine-grained, foliated metamorphic rock, presents a unique and appealing canvas for the art of laser engraving slate. Formed over millions of years from sedimentary shale subjected to intense heat and pressure, slate possesses distinct characteristics that make it both a rewarding and sometimes challenging material to work with. Its inherent qualities, when understood, can be leveraged to create stunning, high-contrast designs that exude a natural, rustic elegance.
The composition of slate is primarily quartz, muscovite, illite, and chlorite, with accessory minerals like feldspar, calcite, pyrite, and hematite. Its hardness typically ranges from 2.5 to 5.5 on the Mohs scale, depending on its specific mineral makeup and degree of metamorphism. This variability means some slates are relatively soft and easy to engrave, while others are harder and may require more laser power or slower speeds. Slate’s most defining physical characteristic is its perfect basal cleavage, or fissility, allowing it to be easily split into thin, smooth, flat sheets. While advantageous for producing tiles and flat stock, this layered structure means engravers must be mindful of potential flaking or chipping, especially on edges or with deeply engraved designs. The surface, if not honed or polished, is often a “natural cleft” surface, possessing a charming, slightly uneven texture that adds to its organic appeal but can also present a variable focal point for the laser if not accounted for.
The Allure of Slate: Color, Texture, and Durability
Color variations in slate are considerable, though most commonly associated with shades of grey, from light to very dark, almost black. However, slate can also naturally occur in greens, reds, purples, and even mottled varieties, depending on its mineral and organic content. For laser engraving slate, darker slates are generally preferred as they provide the best contrast when engraved, typically revealing a lighter grey or whitish mark where the laser ablates or alters the material. The texture of the slate surface significantly influences the final engraved appearance. Natural cleft slate offers a rustic, uneven surface, which can diffuse the laser slightly and may require careful focusing. Honed slate, which has been ground to a smooth, matte finish, provides a more consistent surface for engraving intricate details. Polished slate, while less common for engraving due to its reflectivity and tendency to show fingerprints, can also be used. The choice between these textures often depends on the desired aesthetic and the complexity of the design.
The popularity of slate for engraving applications stems from a combination of its natural beauty and remarkable durability. The subtle variations in tone and texture mean that no two pieces of slate are exactly alike, lending an air of uniqueness to every engraved item. When laser engraved, the contrast achieved is often striking, making text and graphics stand out clearly. Slate is also incredibly durable; it is weather-resistant, fireproof, and does not easily stain or absorb water, making it an excellent choice for both indoor and outdoor items. This resilience ensures that engraved slate products, such as memorial plaques or outdoor signage, will endure for many years with minimal degradation.
Selecting the Right Slate for Your Project
When embarking on laser engraving slate projects, particularly for items like slate coasters laser engraving or laser engraving slate tile, the type and quality of the slate are crucial. While many geographical varieties exist, such as Welsh, Spanish, or Vermont slate, their suitability for engraving depends more on specific characteristics than origin alone. Ideal slate for engraving is fine-grained, with minimal visible layering or fractures on the surface. It should be relatively free from impurities, especially metallic inclusions like pyrite (fool’s gold). Pyrite can cause issues during engraving, such as sparking, uneven ablation, or creating small pits, and its golden flecks might visually interfere with the engraved design. Some “craft” slates are specifically selected or processed for consistency and smoothness, sometimes even pre-coated with a lacquer to enhance contrast upon engraving, though many prefer the natural, uncoated look. For projects like slate coasters laser engraving, thinner, more uniform pieces are often preferred. For laser engraving slate tile, larger, sturdier pieces are necessary, and consistency across multiple tiles is important for a cohesive look. Always inspect slate for cracks or significant blemishes before engraving, as the laser process can sometimes exacerbate existing weaknesses in the material.
Preparing Slate for Optimal Engraving Results
The journey to achieving breathtaking results with laser engraving slate begins not with intricate designs or powerful laser settings, but with meticulous preparation of the material itself. Slate, with its natural variations and layered structure, demands careful attention before it even reaches the laser bed. Neglecting this crucial stage can lead to inconsistent engravings, reduced contrast, and potential damage to the slate piece. Understanding how to laser engrave slate effectively is fundamentally rooted in these preparatory steps, ensuring the laser interacts optimally with the surface for the clearest, most durable markings.
The first, indispensable step is thorough cleaning. Slate, whether freshly quarried or sourced from a supplier, will invariably have dust, dirt, oily residues from handling, or even remnants of cutting fluids. These contaminants can interfere with the laser beam, absorbing energy, causing uneven etching, or producing undesirable fumes and residue. For most pieces, a gentle wipe with a clean, lint-free cloth, slightly dampened with distilled water, is sufficient. For more stubborn grime, a mild pH-neutral detergent diluted in water can be used, followed by a thorough rinse with clean water to remove any soap residue. It is paramount that the slate is completely dry before engraving. Any residual moisture can turn to steam when hit by the laser, potentially causing micro-fractures, uneven coloration in the engraving, or even affecting the laser optics. Air drying is preferred, or gently patting dry with a soft cloth. Avoid harsh chemical cleaners or abrasives, as these can alter the slate’s surface color or texture, or leave residues that react poorly with the laser.
Selecting the Optimal Surface and Strategic Pre-Treatments
Once clean and dry, carefully inspect your slate piece to choose the best side for engraving. Most slate, especially natural cleft tiles or coasters, will have subtle differences between sides. Look for the surface that is flattest and has the fewest natural imperfections such as deep fissures, prominent mineral veins (like pyrite, which can spark or engrave erratically), or areas where the layers are visibly separating or flaking. A flatter surface ensures a more consistent focal distance for the laser, which is critical for achieving sharp, uniform engraving. While the rustic charm of an uneven surface is appealing, significant height variations can lead to parts of the design being out of focus, resulting in blurry or faint engraving in those areas. Rotating the slate under good lighting can help reveal these subtle imperfections and undulations.
While laser engraving slate typically produces excellent natural contrast, some pre-treatment methods can refine the process and results. The most common and beneficial pre-treatment is the application of transfer tape or medium-tack paper application mask. This masking serves multiple purposes: it significantly reduces soot and debris from settling back onto the unengraved slate surface, leading to a cleaner finished product and minimizing post-engraving cleanup. It can also help to achieve slightly crisper edges on the engraved design by preventing micro-chipping or “fuzziness” along the engraved lines. Apply the mask smoothly, ensuring good adhesion without air bubbles. After engraving, the mask is simply peeled away, taking most of the residue with it. While some materials benefit from specific chemical pre-coats to enhance contrast, for slate, the inherent beauty of the material is best preserved. Elaborate chemical pre-treatments are generally unnecessary and can detract from the natural stone aesthetic desired in most slate projects. The key is a pristine, and optionally masked, surface.
Finally, an essential aspect of preparation is handling the slate with care. Slate is relatively robust but also brittle, especially at its edges and corners. Chipping can easily occur if the slate is dropped, knocked, or handled roughly. Always lift and support slate pieces, particularly larger tiles, from underneath rather than just by their edges. When placing slate on the laser bed, ensure it is lying flat and is well-supported to prevent any movement during the engraving process. Handling with clean hands or cotton gloves can prevent oils from your skin from transferring to the surface, which, even if not immediately visible, could affect the engraving in subtle ways. Careful handling not only prevents damage but also preserves the pristine surface you’ve worked to prepare, setting the stage for a flawless engraving.
Optimizing Laser Settings for Slate Engraving
Achieving consistently striking results in laser engraving slate hinges critically on mastering the interplay of laser power, speed, and frequency. Unlike more uniform materials, slate’s natural variations in density, color, and composition mean that a one-size-fits-all approach to laser engraving slate settings is rarely effective. Each piece of slate, and indeed each laser system, can respond differently, making the ability to fine-tune these parameters paramount for transforming a raw slate surface into a beautifully detailed product, whether it’s intricate slate coasters laser engraving or robust, decorative laser engraving slate tile.
Laser power is the primary determinant of how much energy is delivered to the slate’s surface. For slate, the goal is typically to ablate or vaporize a very thin top layer, revealing a lighter-colored substrate underneath, which creates the desired contrast. Generally, slate does not require excessively high power settings compared to harder materials like some metals or dense woods. Too much power can lead to undesirable outcomes: it can cause excessive melting and create a glassy, uneven surface instead of a clean etch; it might induce micro-fractures or lead to chipping, especially with more friable types of slate; or it can produce excessive dust and debris. Start with lower power settings and incrementally increase if necessary. The aim is a clean, bright mark, not deep excavation.
Speed, conversely, dictates how quickly the laser head moves across the slate. It works in an inverse relationship with power: higher speeds deliver less energy to any given point, resulting in a lighter mark, while slower speeds allow more energy to be concentrated, producing a deeper or more pronounced engraving. For fine details or very light slates where achieving contrast is challenging, slower speeds combined with appropriately moderated power might be necessary. Conversely, for broader engraved areas or when a very light “kiss” engraving is desired, faster speeds are preferable. Finding the sweet spot between power and speed is crucial; too slow for the power setting can cause the same issues as excessive power.
The Nuances of Frequency/PPI and Conducting Essential Tests
Frequency, often expressed in Pulses Per Inch (PPI) or Hertz (Hz), refers to how many laser pulses are fired over a given distance or time. Resolution, often measured in Dots Per Inch (DPI), relates to the density of engraved lines or dots. For laser engraving slate, a moderate to high DPI (typically 300-600 DPI) is usually preferred for good image quality and smooth fills. The PPI setting’s impact can be more subtle but is still important. A very high PPI can sometimes lead to overheating or a slightly melted appearance on certain slates, as the pulses are very close together. Conversely, too low a PPI might result in a dotty or less cohesive engraving. The interaction is complex: lower power might be compensated by higher PPI for a good mark, or higher power might work well with lower PPI to avoid over-processing. The best laser for engraving slate often allows fine control over these parameters. For example, CO2 lasers are overwhelmingly the standard for slate; their wavelength interacts well with the material. The wattage of your CO2 laser (e.g., 40W vs. 80W) will significantly influence the absolute power percentages you use. A 40W laser might need 20-30% power for a good mark, whereas an 80W laser might achieve the same result at 10-15% power at similar speeds.
Given these variables, conducting test engravings is not just recommended—it’s essential. Before committing a valuable piece of slate or a batch of products, create a test matrix or a series of small sample engravings on a scrap piece of the exact same type and batch of slate you plan to use. A common method is to create a grid with varying power settings on one axis and varying speed settings on the other. Engrave small squares or identical small graphics at each intersection of power and speed. Also, test different DPI/PPI settings with what appears to be the most promising power/speed combinations. Observe the results critically: look for clarity of detail, the brightness and evenness of the engraved color (typically a light grey or whitish tone), the crispness of edges, and the absence of chipping, excessive melting, or undue surface roughness within the engraved area. For slate coasters laser engraving, you’ll likely aim for a crisp, clear mark that isn’t too deep. For decorative laser engraving slate tile, a slightly deeper or more pronounced engraving might be desirable for visual impact. Keep meticulous notes of the settings that produce the best results for each specific type or batch of slate. This log will become an invaluable resource, saving you time and material in future projects and truly helping you master laser engraving slate settings.
Design Considerations for Slate Engraving
The success of any laser engraving slate project is not solely dependent on the material preparation or laser settings; the design itself plays an equally vital role. Slate, with its inherent rustic charm and often dark canvas, demands thoughtful design choices to maximize visual impact and legibility. Unlike paper or smoother, more homogenous materials, slate interacts with designs in a unique way, making some artistic approaches more effective than others. Understanding these nuances is key to transforming a simple piece of stone into a striking work of art or a high-quality product.
When selecting or creating images for slate, high contrast is paramount. The engraving process on slate typically lightens the surface, creating a mark that stands out against the darker, unengraved stone. Therefore, designs that inherently possess strong black-and-white elements, such as silhouettes, bold line art, tribal patterns, or well-defined logos, translate exceptionally well. Photorealistic images can be more challenging. Slate does not naturally lend itself to subtle grayscale gradations in the same way that printing on paper does. To engrave photographs successfully, they usually need to be converted into a dithered bitmap. Dithering uses patterns of dots or lines to simulate shades of gray, and the choice of dithering algorithm (e.g., Floyd-Steinberg, Jarvis, Stucki) can significantly affect the outcome. Experimentation with different algorithms and image pre-processing in graphic software to enhance contrast and simplify tonal ranges is often necessary. Simpler photos with clear subjects and good separation from the background tend to work best.
Choosing Fonts, Patterns, and Understanding Resolution
Font selection is critical for engraved text on slate. Opt for clear, legible fonts, particularly if the text is small. Bold, sans-serif fonts often yield cleaner and more impactful results than very thin or ornate serif fonts, whose delicate strokes can get lost in the slate’s texture or become prone to chipping. If using script fonts, ensure the thinnest parts of the strokes are robust enough to engrave clearly. For patterns, geometric designs, Celtic knots, mandalas, and other intricate line work can look spectacular, provided the lines are not excessively fine or too densely packed, which can lead to a muddy appearance or loss of detail. Negative space designs, where the unengraved slate forms the main subject and the engraved area acts as the background, can be particularly effective, leveraging the slate’s natural beauty.
Image resolution for raster engraving slate should typically be between 300 and 600 DPI (Dots Per Inch). While a higher DPI might seem intuitively better, on slate, excessively high resolutions can sometimes lead to over-processing of the material, causing a slightly melted or less crisp appearance, and will significantly increase engraving time. Conversely, too low a DPI will result in pixelation or visible lines in the engraving. The ideal DPI can depend on the complexity of the design and the specific texture of the slate. When learning how to laser engrave slate, especially with photographic content, understanding the interplay between your chosen DPI and the dithering method used for image preparation is crucial for sharp, recognizable results. For vector engraving, which follows lines directly (often used for text outlines or precise geometric shapes), resolution is less of an issue, as the laser path is defined by mathematical vectors. Vector engraving is excellent for crisp lines and outlines, while raster engraving is typically used for filling areas or rendering photographic detail. Many designs will benefit from a combination of both techniques: vector for sharp outlines and text, and raster for shaded fills or images.
Finally, always consider the natural variations inherent in slate. No two pieces are identical; color tones can vary, and natural cleft surfaces will have unique textures, veins, or mineral inclusions. These characteristics are part of slate’s appeal but can influence the final engraved design. A light-colored vein running through the engraving area might cause a slight inconsistency in the engraved mark. A particularly rough patch of texture might diffuse the laser beam slightly, softening detail in that area. It’s wise to inspect each piece of slate and, if possible, orient your design to either avoid prominent imperfections or incorporate them thoughtfully into the overall aesthetic. This adaptability is part of the skill in mastering laser engraving slate, turning potential challenges into unique features.
Post-Engraving Finishing and Sealing Techniques
Once the laser has worked its magic and your design is etched into the stone, the journey of creating stunning laser engraving slate pieces is not quite complete. The post-engraving phase, involving cleaning, enhancing, and potentially sealing the slate, is crucial for elevating the final appearance, improving durability, and truly making your craftsmanship shine. These finishing touches transform a freshly engraved item into a polished, professional-quality product, whether it’s a set of slate coasters laser engraving or a large decorative laser engraving slate tile.
The immediate task after engraving is cleaning. The laser ablation process, while precise, invariably generates fine stone dust and residue. If a protective mask (transfer tape) was used during engraving, the majority of this debris will be removed when the mask is carefully peeled off. However, even with masking, some fine particles might remain, particularly within intricate parts of the design or along the edges. If no mask was used, a more thorough cleaning will be necessary. The simplest and often most effective method is to use a soft brush (like a painter’s brush or an old toothbrush with soft bristles) to gently sweep away loose dust from the engraved areas and the surrounding surface. For more persistent residue, a slightly damp, lint-free cloth can be used to wipe the entire surface. Avoid using excessive water, especially if the slate has not been sealed, as it can sometimes temporarily alter the appearance of the engraved mark or leave water spots if not dried quickly and evenly. For very stubborn residue, a quick wipe with isopropyl alcohol on a cloth can be effective, but test on a small, inconspicuous area first, as it can occasionally affect the coloration of some slates or coatings present on certain pre-treated craft slates.
Enhancing Contrast and Protecting Your Work
After cleaning, you may consider options to enhance the engraved design’s contrast and the overall richness of the slate. One popular and highly effective method is applying a light coat of food-grade mineral oil. This is particularly beneficial for darker slates, as the oil deepens the natural color of the unengraved stone, making the lighter engraved areas “pop” with significantly increased contrast. Apply a small amount of mineral oil to a clean, soft cloth and wipe it evenly over the entire surface, including the engraved portions. Let it sit for a few minutes to allow the oil to penetrate, then buff off any excess with a fresh, clean cloth. The slate will absorb what it needs, and the result is often a dramatically richer, more vibrant appearance. This technique is excellent for slate coasters laser engraving, as it not only enhances aesthetics but also provides a degree of moisture resistance, though it’s not a permanent sealant against heavy soiling. Other natural oils like tung oil or specialized stone color enhancers can also be used, each offering slightly different finishes and levels of protection.
For items that will be handled frequently, exposed to moisture, or placed outdoors, applying a sealant is highly recommended. Sealants provide a protective barrier against stains, water damage, fading from UV exposure, and general wear and tear, thus extending the life and maintaining the appearance of your laser engraving slate project. There are various types of sealants suitable for stone:
- Topical Sealers: These form a protective film on the surface of the slate. Acrylic sealers are common and available in matte, satin, or gloss finishes. They are relatively easy to apply (usually sprayed or brushed on) and can enhance color. However, they can wear off over time, especially in high-traffic applications, and may require reapplication.
- Impregnating Sealers: These penetrate into the pores of the slate without forming a surface film, offering more natural looking protection. They are often silicone or siloxane-based. While they might not alter the appearance as much as topical sealers, they provide excellent water and oil repellency. They are particularly good for maintaining the natural look of laser engraving slate tile used for flooring or wall cladding.
When choosing a sealant, consider the end-use of the item. For food-contact items like coasters or serving platters, ensure the sealant is food-safe once cured. Always apply sealants in a well-ventilated area and follow the manufacturer’s instructions for application and curing times. A properly sealed piece of engraved slate will retain its beauty and intricacy for years to come, offering a lasting testament to your craftsmanship.
Conclusions
Laser engraving slate can elevate your craft projects and product offerings. By understanding the material’s properties, mastering laser engraving slate settings, and applying the correct techniques for preparation and finishing, you can consistently produce beautiful and intricate designs. Experiment with different types of slate and designs to unlock the full potential of this versatile material and find the best laser for engraving slate for your needs.

Subscribe to Our Newsletter
And enjoy FREE Download Files, SALE Alerts and Inspiring TIPS
Pricing Your Laser Engraving Work for Profitability
A Comprehensive Guide to Pricing Your Laser Engraving Services
A Comprehensive Guide on How to Price Laser Engraving Services
Charcuterie Board Engraving File – Wine & Grapes 3D Illusion…
$4.00Original price was: $4.00.$3.00Current price is: $3.00.(25% off)
Bee and Honey Jar Charcuterie Board Engraving File | PNG Download #007…
$4.00Original price was: $4.00.$3.20Current price is: $3.20.(20% off)
Valentine Love Captions: 6 Charcuterie Board Engraving Files…
$8.00Original price was: $8.00.$5.60Current price is: $5.60.(30% off)
American Eagle Flag Laser Engraving File for Charcuterie & Cutting…
$4.00Original price was: $4.00.$2.80Current price is: $2.80.(30% off)