

 Français
 Deutsch
 Español
 Italiano
How to Create Stunning Engraved Slate Coasters
Sep
Estimated reading time: 8 minutes
Key Takeaways
- Slate is an ideal material for laser engraving due to its natural ability to produce high-contrast, permanent marks without fillers or paint.
- Proper preparation is critical for a professional finish. Always start with unsealed, flat slate coasters and clean them with isopropyl alcohol before engraving.
- Perfect focus is paramount for sharp results. Use a digital caliper to measure the thickness of each individual coaster and adjust your laser’s focus accordingly.
- Design choice matters. High-contrast vector designs and properly prepared (dithered and inverted) raster photos will yield the most striking results on slate.
- Post-engraving finishing with mineral oil or a sealant is a non-negotiable final step that dramatically deepens the slate’s color and makes the engraved design pop.
Table of Contents
- Getting Started: Materials and Tools
- Perfecting Your Laser Engraving Designs
- The Engraving Process: Step-by-Step
- Conclusions
- Frequently Asked Questions
Discover the art of creating beautifully engraved slate coasters. This guide offers everything you need to know, from selecting the right materials to mastering engraving techniques. Whether for personal use, as a unique gift, or for your business, this is one of the most rewarding laser cut projects you can undertake. Let’s start crafting your own custom slate coaster set.
Interested in more Coaster? Check out our Coaster laser file designs: Click here!
Getting Started: Materials and Tools
Choosing the right materials and tools is the foundational step in your coaster engraving journey. While the laser does the heavy lifting, the quality of your slate and the preparation you put in will make the difference between a good result and a truly stunning one.
Why Slate is a Perfect Match for Laser Engraving
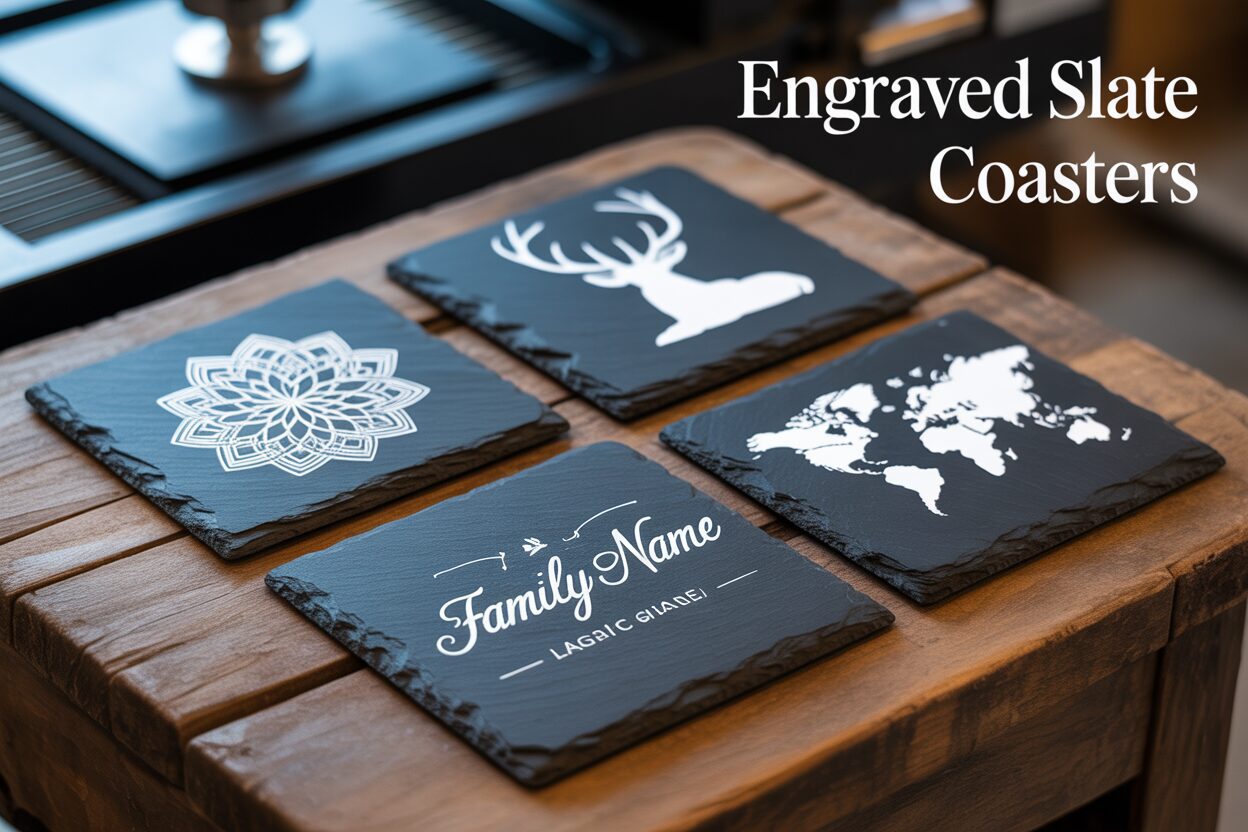
Slate isn’t just a popular choice for coasters; it’s practically made for laser engraving. Its unique properties create a result that is difficult to achieve with other materials. The primary reason is the exceptional contrast it produces. Slate is a dark, typically charcoal-grey stone. When a laser beam hits its surface, it doesn’t burn it in the traditional sense like it would with wood. Instead, it ablates, or vaporizes, the thin top layer of the slate, exposing a lighter grey layer of stone underneath. This creates a crisp, permanent, light-grey mark that stands out brilliantly against the dark background without any need for paint or fillers. Furthermore, slate is incredibly durable and heat-resistant, making it a perfectly functional and long-lasting material for coasters. Its natural, rustic texture adds a touch of organic elegance that complements a wide range of designs, from intricate logos to simple monograms.
Selecting the Ideal Slate Coasters
Not all slate is created equal, and your selection will directly impact your final product. Look for coasters specifically sold for crafting or engraving. These are typically more uniform in size and thickness. When you’re choosing, pay close attention to a few key details:
- Finish and Surface: Most slate coasters have a natural, riven finish, meaning the surface has a slightly uneven, textured feel. This is ideal for a rustic look. You may also find polished or honed slate, which is smooth. While engravable, the results can be less consistent. For the best results, start with unsealed, natural slate. Any sealant or coating applied before engraving can produce unpleasant fumes and interfere with the laser’s ability to mark the stone cleanly. You will apply a sealant after the engraving is complete.
- Thickness and Flatness: Aim for coasters that are between 4mm and 7mm thick. This gives them a satisfying weight without being overly bulky. More importantly, check for flatness. Because slate is a natural, layered rock, some pieces can be slightly warped. An uneven surface will cause inconsistent focus for the laser, resulting in blurry or faint patches in your design.
- Consistency: If you’re buying a pack, inspect a few coasters. Note any significant variations in color or thickness. Minor differences are part of slate’s natural charm, but major inconsistencies will require you to adjust your laser settings for each piece, slowing down your workflow.
Essential Tools and Supplies
With your slate selected, it’s time to gather your tools. Having everything ready will make the process smooth and safe.
- A Laser Engraver: Both diode and CO2 lasers work exceptionally well on slate. You don’t need a high-power machine for this material; even a 5W diode laser can produce fantastic, high-contrast results because the process relies on surface ablation rather than cutting power.
- Cleaning Supplies: You will need Isopropyl Alcohol (90% or higher) and a soft, lint-free microfiber cloth. Cleaning the slate surface before engraving is a critical step to remove any dust, oils from fingerprints, or factory residue, ensuring a clean and even engraving.
- Safety Gear: This is non-negotiable. Always wear laser safety glasses specifically rated for the wavelength of your laser. Proper ventilation or a fume extraction system is also essential to remove any dust and fumes generated during the process.
Optional but Highly Recommended Items
These tools aren’t strictly necessary, but they elevate your process from a hobby to a craft, ensuring precision and a professional finish.
- Digital Caliper: This is perhaps the most valuable optional tool. The natural variance in slate means that even in the same pack, coasters can differ in thickness by a millimeter or more. A caliper allows you to measure each coaster precisely, so you can adjust your laser’s focus for every single piece. Perfect focus is the key to a sharp, high-quality engraving.
- Mineral Oil or Food-Safe Sealant: While this is for the final step, you should have it on hand. Wiping the finished coaster with a light coat of mineral oil dramatically deepens the black of the slate and makes the light-grey engraving pop with incredible contrast. For a more permanent, water-resistant finish, a food-safe clear sealant is an excellent alternative.
Perfecting Your Laser Engraving Designs
The design is the heart and soul of your project; it’s what transforms a simple stone disc into a personalized piece of art. A thoughtfully chosen and properly prepared design will leverage slate’s unique properties to create a truly breathtaking result. Whether you’re using pre-made graphics or engraving a cherished memory, this is where your creativity truly shines.
Finding and Choosing Your Designs
The possibilities for coaster designs are virtually limitless. The key is to select artwork that complements the medium. Here’s where to look:
- Online Marketplaces: Websites like Etsy, Creative Fabrica, and Design Bundles are treasure troves of high-quality SVG (Scalable Vector Graphics) and PNG files perfect for engraving. Search for terms like “laser cut files,” “mandala SVG,” “geometric patterns,” or “monogram frames.”
- Stock Image Sites: Platforms like Adobe Stock or Vecteezy offer professional vector graphics. These are excellent for business logos or sophisticated, clean-lined artwork.
- Create Your Own: For a truly custom slate coaster, designing your own artwork is the ultimate choice. Free software like Inkscape or paid programs like Adobe Illustrator are perfect for creating vector designs. You can craft custom monograms, family crests, or designs featuring inside jokes or special dates—anything that makes the coaster uniquely yours.
Regardless of where you source your design, remember the golden rule for slate: high contrast is king. The laser engraving process on slate is essentially binary—the laser is either on (creating a light mark) or off (leaving the dark slate). Designs with clear distinctions between light and dark areas, such as bold text, silhouettes, and strong geometric patterns, will always produce the most striking and legible results. Avoid designs with extremely fine, delicate lines or tiny, intricate details, as the natural texture and layers of the slate can cause them to become lost or appear indistinct.
Preparing Your Files for Flawless Engraving
Once you have a design, a few preparation steps are necessary to ensure it translates perfectly to the stone. The process differs slightly depending on whether you’re using a vector graphic or a photograph.
For Vector Graphics (Logos, Text, and Patterns):
Vector files (like SVG, AI, or DXF) are ideal for clean, sharp engravings. Before sending the file to your laser software, follow these simple checks:
- Convert Text to Paths: If your design includes text, always convert it to paths or outlines. This turns the letters into shapes, ensuring the font doesn’t change or cause errors if the laser software doesn’t have it installed.
- Unite and Simplify: If you have overlapping shapes, use a “Weld” or “Unite” function to merge them into a single, clean object. This prevents the laser from making unnecessary passes and creating strange artifacts.
- Set for Engraving: For the cleanest result, set your design to have a solid black fill and no stroke (outline). Your laser software will interpret this black area as the part to be engraved.
For Engraving Photo Slate Coasters (Raster Images):
Engraving photos on slate can produce stunning, heirloom-quality results, but it requires more preparation than vector art. A raw photo file will not engrave well.
- Prepare the Image: Open your photo in an editor like GIMP (free) or Adobe Photoshop. First, crop the image to a square or circle to match your coaster shape. Convert the image to grayscale (black and white).
- Boost Contrast: Significantly increase the contrast and adjust the brightness. You want to make the darks very dark and the lights very light, almost to the point where it looks slightly unnatural on screen. This exaggeration is crucial for a good result on stone.
- Sharpen the Details: Apply a sharpening filter (like an Unsharp Mask) to make the edges and details more defined.
- Dither and Invert: This is the most critical step. Your laser software will need to dither the image, which is a process of converting the grayscale image into a pattern of black and white dots that the laser can engrave. Algorithms like ‘Jarvis’ or ‘Stucki’ often produce the best results for photos. Crucially, because the laser makes a light mark on dark slate, you must engrave the negative of the image. Most laser software has an “Invert Image” or “Negative” toggle. When enabled, the laser will fire on the dark parts of your original photo, creating the light parts of your engraving, resulting in a recognizable positive image on the coaster.
The Engraving Process: Step-by-Step
With your design finalized and your materials at the ready, you’ve reached the most exciting stage: the engraving itself. This step-by-step process will guide you from a blank slate to a finished masterpiece. Mastering this technique not only ensures beautiful coasters but also builds a foundational skill applicable to a wide range of other laser cut projects on different materials.
Step 1: Preparation and Cleaning
Before the laser touches the stone, the surface must be impeccably clean. Any oils from your fingerprints, dust, or residue from manufacturing can interfere with the engraving, leading to inconsistent or splotchy results. Moisten a soft, lint-free microfiber cloth with a small amount of isopropyl alcohol (90% or higher is best) and wipe the entire surface of the slate coaster. The alcohol will evaporate quickly, leaving a pristine surface ready for engraving.
Step 2: Focus and Alignment
Proper focus is the single most important factor for achieving a sharp, high-contrast engraving. A blurry focus will produce a blurry result.
- Measure the Thickness: Use your digital caliper to measure the exact thickness of the specific coaster you are about to engrave. Natural slate varies, so don’t assume every coaster in a pack is identical. Input this material thickness into your laser software if it has an autofocus feature, or use it for your manual focus.
- Set the Focus Height: Place the coaster on the laser bed. Using your machine’s focusing tool (a focus block, an automated probe, or manual adjustment), set the laser head to the perfect height for the measured thickness of your slate. Taking the time to do this for every single coaster guarantees consistently crisp results.
- Position the Design: In your laser software, like LightBurn, place your design onto the virtual workspace. A helpful trick for perfect centering is to draw a circle the exact size of your coaster (e.g., 100mm) and center your design within it. Then, select both the design and the circle and position them over your coaster’s location in the laser bed. Before you engrave, set the outer circle to a tool layer that will not burn, so it’s only used for alignment.
- Frame Your Work: Use your software’s “Frame” or “Preview” function. This will move the laser head (with a low-power beam or just the red dot pointer) to trace the outer boundary of your design. Watch this trace carefully to ensure it falls exactly where you want it on the coaster. Adjust the position in the software and re-frame until it is perfectly aligned.
Step 3: Laser Settings and the All-Important Test
Never engrave a final piece without first testing your settings. Every laser is different, and every batch of slate can vary. A small test will save you from ruining a perfectly good coaster. Use a spare piece or the back of one of your coasters for this.
- Baseline Settings for Diode Lasers (5W-10W): A good starting point is around 3000 mm/min speed at 85% power. For the fill, use a Line Interval of 0.1mm.
- Baseline Settings for CO2 Lasers (40W+): Start with a much faster speed, around 300 mm/s, at a lower power of about 15-20%. Use a similar Line Interval of 0.1mm.
Engrave a small part of your design or a simple test square. The goal is a light-grey, almost white mark with no chipping or flaking. If the mark is too faint, either decrease the speed or increase the power slightly. If it’s too aggressive and causing the slate to flake, increase the speed or lower the power.
Step 4: Engrave and Finish
Once you’ve framed your design and are confident in your settings, put on your safety glasses, ensure your ventilation is running, and start the engraving job. After the laser has finished, the engraved area will look dusty and muted. The final step is what makes it truly pop.
- Clean the Residue: Gently wipe the coaster with a damp cloth or a soft brush to remove all the slate dust from the engraved area.
- Enhance the Contrast: This is the magic touch. Apply a few drops of food-safe mineral oil onto the coaster. Using a clean cloth, rub it across the entire surface. You will immediately see the dark grey of the slate deepen into a rich, near-black color, while the light grey engraving becomes exceptionally bright and clear by contrast. Wipe off any excess oil, and your stunning custom coaster is complete. For a more permanent, water-resistant finish, you can opt for a spray-on clear coat or food-safe sealant instead of oil.
Conclusions
You now have the knowledge to create professional-quality engraved slate coasters. This versatile project allows for endless creativity, from intricate patterns to cherished memories on photo slate coasters. Don’t hesitate to experiment with different laser engraving designs and settings. Start crafting these elegant and durable pieces to impress your friends, family, or customers with your unique creations.
Frequently Asked Questions
Q: What kind of laser do I need for slate coasters?
A: Both diode and CO2 lasers work well. Even a low-power 5W diode laser can produce excellent results because slate engraving is a surface ablation process, not a cutting process that requires high power.
Q: Why do I need to clean the slate before engraving?
A: Cleaning the slate with isopropyl alcohol removes dust, oils from fingerprints, and any factory residue. This ensures a clean, even surface for the laser to work on, preventing splotchy or inconsistent results.
Q: My engraving looks blurry. What’s the problem?
A: The most common cause of a blurry engraving is improper focus. Slate coasters can vary in thickness, even within the same pack. Use a digital caliper to measure each coaster and adjust your laser’s focus for every piece to ensure sharpness.
Q: How do I make the engraving “pop” after it’s done?
A: After cleaning off the engraving dust, apply a thin coat of food-safe mineral oil. This will deepen the dark grey of the slate to a near-black color and make the light-grey engraved mark appear much brighter, dramatically enhancing the contrast. A clear sealant can also be used for a more permanent finish.
Q: How do I engrave a photo on slate?
A: Photo engraving requires special preparation. You need to convert the image to grayscale, increase the contrast and sharpness significantly, dither the image (using an algorithm like Jarvis or Stucki), and most importantly, invert the image. You engrave the negative so it appears as a positive on the dark slate.

Subscribe to Our Newsletter
And enjoy FREE Download Files, SALE Alerts and Inspiring TIPS
Pricing Your Laser Engraving Work for Profitability
A Comprehensive Guide to Pricing Your Laser Engraving Services
A Comprehensive Guide on How to Price Laser Engraving Services
Charcuterie Board Engraving File – Wine & Grapes 3D Illusion…
$4.00Original price was: $4.00.$3.00Current price is: $3.00.(25% off)
Bee and Honey Jar Charcuterie Board Engraving File | PNG Download #007…
$4.00Original price was: $4.00.$3.20Current price is: $3.20.(20% off)
Valentine Love Captions: 6 Charcuterie Board Engraving Files…
$8.00Original price was: $8.00.$5.60Current price is: $5.60.(30% off)
American Eagle Flag Laser Engraving File for Charcuterie & Cutting…
$4.00Original price was: $4.00.$2.80Current price is: $2.80.(30% off)