

 Français
 Deutsch
 Español
 Italiano
Creating Personalized Laser Engraved Wood Coasters: A Step-by-Step Guide
Jul
Estimated reading time: Approximately 12 minutes
Key Takeaways
- Wood Selection is Crucial: Different woods like Birch, Cherry, Maple, and Bamboo offer distinct aesthetics and engraving characteristics, requiring specific laser settings for optimal contrast and detail.
- Preparation and Flatness are Paramount: Ensuring your wood is properly sanded and perfectly flat before engraving is fundamental for achieving consistent, high-quality results and preventing issues like uneven depth or blurry details.
- Laser Settings are Iterative: Mastering power, speed, DPI/LPI, and effective air assist through meticulous testing on scrap material is essential to dial in the perfect engraving depth, contrast, and minimize charring for each wood type.
- Prioritize Safety and Monitoring: Always operate your laser engraver with proper ventilation, appropriate eye protection, and constant supervision to ensure safety and immediately address potential issues like excessive smoke or flame-ups.
- Post-Engraving Finishing Elevates Quality: Thorough cleaning to remove soot and applying a suitable protective finish (such as oils, varnishes, or epoxy) are vital steps that enhance the coasters’ aesthetics, durability, and functional lifespan.
Table of Contents
- Material Selection and Preparation for Wood Coasters
- Designing Your Coaster and Setting Up the Laser Engraver
- Engraving Process and Fine-Tuning Settings
- Post-Engraving Cleaning and Finishing Touches
- Conclusions
- FAQ
Dive into the art of laser engraving wood with this comprehensive tutorial on creating personalized wood coasters. We’ll guide you through selecting the best wood for laser engraving, perfecting your laser engraving wood settings, and applying finishing touches for a professional result. This project is ideal for hobbyists and small business owners alike.
Material Selection and Preparation for Wood Coasters
Choosing the right wood is a foundational step in creating high-quality, beautiful laser engraved coasters. The material you select not only dictates the aesthetic appeal of your final product but also significantly influences the engraving process itself, including the required laser engraving wood settings and the ease of achieving clean, crisp details. Different woods react uniquely to the laser, producing varying levels of contrast, charring, and depth.
Common Wood Types for Laser Engraved Coasters
Several types of wood are popular for laser cutter wood projects like coasters, each with its own set of characteristics:
- Birch Plywood: Often available as Baltic Birch, this is a very popular choice.
Pros: It’s relatively inexpensive, has a light, uniform color that provides excellent contrast when engraved, and its layered construction offers good stability, resisting warping. The surface is typically smooth and takes engraving well.
Cons: The quality can vary. Cheaper birch plywood might contain internal voids or inconsistencies in the glue layers, which can lead to uneven engraving or spots where the laser doesn’t cut through cleanly. Always opt for high-quality, laser-grade birch plywood if possible. Charring can be more noticeable on the light surface if settings aren’t optimized.
- Cherry: A beautiful hardwood known for its warm, reddish-brown hue that deepens with age.
Pros: Cherry engraves beautifully, producing a rich, dark burn that contrasts nicely with its natural color. It has a fine, straight grain, which contributes to clean engraving lines. It has a luxurious feel, making it great for premium gifts.
Cons: It’s more expensive than birch or bamboo. Being a hardwood, it might require slightly more laser power or slower speeds compared to softer woods.
- Maple: A very hard, dense wood with a light, creamy color and a fine, uniform grain.
Pros: Its hardness allows for exceptionally crisp and detailed engravings with minimal charring if settings are correct. The light color provides excellent contrast. Maple is very durable, making it ideal for functional items like coasters.
Cons: Like cherry, maple is on the pricier side. Its density means it requires more laser power or slower engraving speeds than softer woods. The very light color can show smoke residue more easily if air assist isn’t optimal.
- Bamboo: Technically a grass, bamboo is processed into sheets and planks, making it a sustainable and popular option.
Pros: Bamboo is hard, durable, and relatively inexpensive. It offers good contrast when engraved, and its unique grain pattern can add an interesting visual element. It’s an eco-friendly choice.
Cons: The quality of bamboo can be inconsistent. Because it’s often made of laminated strips, engraving across these strips can sometimes result in an uneven look or depth. It can also be prone to splintering along the grain lines during engraving or cutting if settings are too aggressive. Its fibrous nature means you might need to experiment with settings to get the cleanest result.
When selecting your wood, consider the desired final look. Darker woods like walnut can also be used, though the engraving will be more subtle, creating a tone-on-tone effect. The key is the contrast between the engraved area (the burn) and the natural wood surface.
Sourcing Your Wood and Pre-Engraving Checks
You can find wood suitable for coasters at various places: local lumberyards, woodworking stores, craft stores (which often sell small pre-cut basswood or birch panels), and online suppliers specializing in laser-safe materials. For plywood, specifically look for “laser-grade” or “interior-grade” options to avoid glues that release harmful fumes when lasered (like those with formaldehyde). Common coaster thicknesses are 1/8 inch (approx. 3mm) or 1/4 inch (approx. 6mm).
Before you even think about placing wood in your laser engraver, quality checks are paramount. The most critical aspect is flatness. Lay the wood on a known flat surface or use a straight edge across it. Any warping or bowing will cause inconsistencies in the laser’s focus, leading to uneven engraving depth, blurry details, or even areas where the laser doesn’t mark the wood at all. If a piece is slightly warped, you might be able to flatten it by using strong magnets or hold-down clamps in your laser bed, but severely warped pieces are best rejected.
Surface Preparation for Optimal Engraving
Proper surface preparation is key to achieving professional-looking laser engraved wood. Even if the wood looks smooth, a little prep work goes a long way.
Start by sanding the surface. For most woods, begin with a medium grit sandpaper (around 120-150 grit) to remove any minor imperfections or mill marks. Always sand with the grain of the wood to avoid scratching. Follow up with a fine grit sandpaper (180-220 grit) to achieve a silky-smooth finish. This smoothness helps the laser engrave more consistently and also makes post-engraving cleaning easier. If you plan to apply a finish later, a smooth surface ensures even absorption.
After sanding, cleaning is essential. Remove all sanding dust thoroughly. A tack cloth is excellent for this. Alternatively, you can use a brush followed by compressed air (wear eye protection) or a slightly damp cloth. If using a damp cloth, ensure the wood is completely dry before it goes into the laser, as moisture can interfere with the engraving process and potentially warp thin wood.
Finally, remember that your choice of wood directly impacts your laser engraving wood settings. Softer woods like basswood or alder will engrave deeper and darker with less power or faster speeds compared to hard, dense woods like maple or oak, which will require more power or slower speeds to achieve a similar effect. The resin content and grain density also play a role. For example, pine, with its higher resin content, can char more easily and produce more smoke. Always perform a test grid on a scrap piece of your chosen material to dial in the perfect power, speed, and frequency/PPI settings for your specific wood and desired outcome before committing to your final coaster blanks. This testing is crucial for all laser cutter wood projects, ensuring the final look aligns with your vision.
Designing Your Coaster and Setting Up the Laser Engraver
With your carefully selected and prepared wood ready, the next exciting phase is bringing your coaster design to life. This involves both creating or choosing an appropriate design and meticulously setting up your laser engraver for optimal results. The choices made here will heavily influence the final quality and appearance of your laser engraved wood coasters.
Creating or Choosing Your Design
The beauty of laser engraving is its ability to reproduce intricate details, but for small items like coasters, clarity and impact are key.
Design Software Options:
Several software packages can be used to create or manipulate designs.
- Vector Graphics Software: Adobe Illustrator, CorelDRAW, and the free alternative Inkscape are excellent for creating designs from scratch or editing existing vector files (like SVG, AI, DXF). Vector files define paths and are ideal for cutting outlines or engraving sharp lines.
- Raster Graphics Software: Adobe Photoshop or GIMP (free) can be used for photo engraving or creating designs with gradients and textures. These are saved as raster files (like JPG, PNG, BMP, TIFF).
- Laser Control Software: Many laser engravers come with their own software (e.g., LightBurn, RDWorks, LaserGRBL), which often includes basic design capabilities and is essential for sending the job to the laser. LightBurn is particularly popular as it supports both vector and raster operations and offers robust control.
Considerations for Laser Engraved Wood Designs:
When designing for wood coasters, keep these points in mind:
- Contrast is King: Engraving on wood essentially creates a “burn.” Designs with good contrast between engraved and unengraved areas will be the most striking. Very light engraving on light wood, or very dark engraving on already dark wood, might lack visual impact.
- Level of Detail: While lasers can be precise, extremely fine details or tiny text might get lost or become illegible, especially on woods with a prominent grain. Test your design’s thinnest lines. Simplify complex images where possible. Bold designs often work best.
- Line Thickness: For vector engravings, ensure lines are thick enough to be clearly visible after engraving. Hairline or very thin vector lines might engrave too faintly or inconsistently. Conversely, if vector lines are intended for cutting the coaster shape, they should typically be a specific stroke weight (e.g., 0.001 inches or 0.01mm) recognized by your laser software as a cut line.
- Raster vs. Vector:
Raster engraving is like printing with dots; the laser head moves back and forth, firing to create shaded areas or images. This is good for photos or filled shapes.
Vector engraving (or scoring) follows lines defined in your design file. It’s faster than raster engraving for outlines or line art and produces very sharp lines. Cutting is always a vector operation.
Many coaster designs will involve raster engraving for the main artwork and vector cutting for the outer shape.
Preparing the Design File:
Convert text to paths/curves to ensure fonts are not an issue. Ensure your design is sized correctly for your coaster blank (e.g., 3.5×3.5 inches or 4×4 inches). If you’re engraving multiple coasters from a larger sheet, arrange your designs efficiently to minimize material waste.
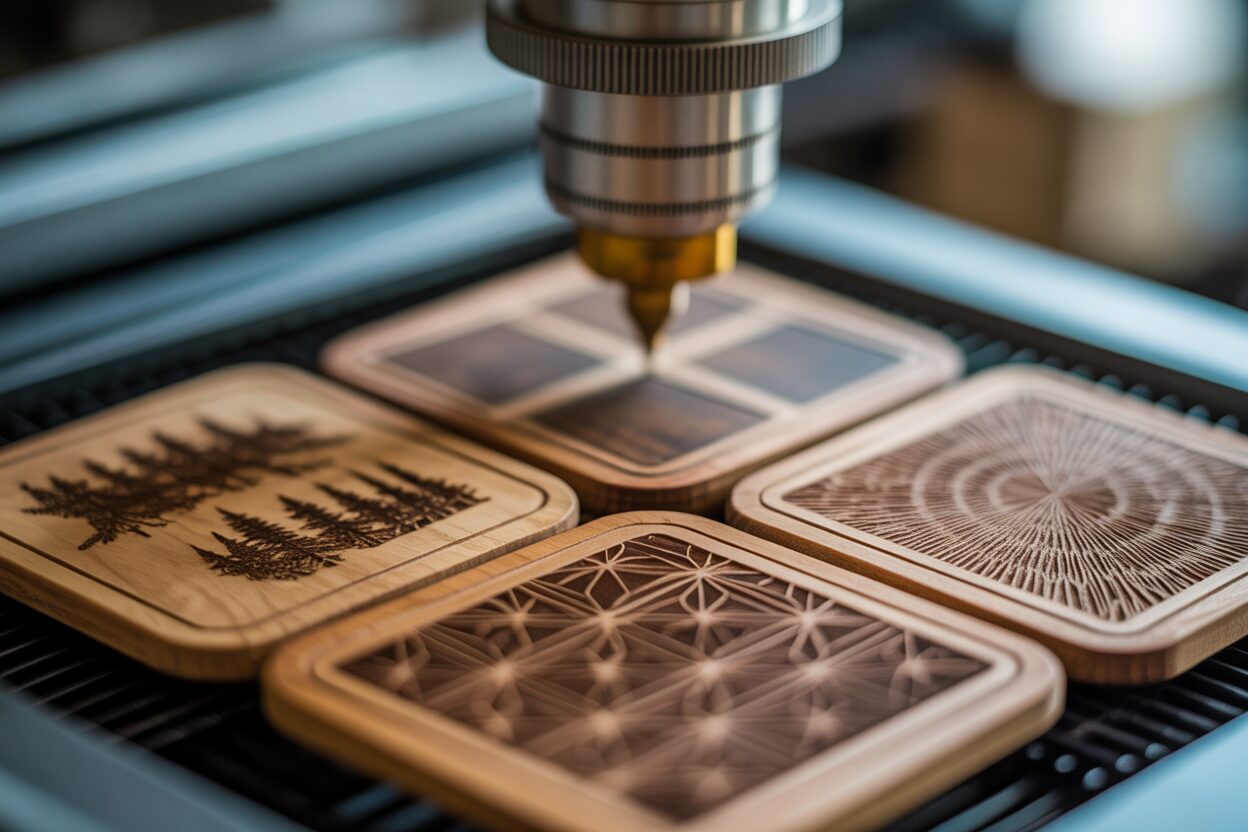
Some popular wood engraver ideas for coasters include: monograms, personalized names or dates, quotes, geometric patterns, mandalas, silhouettes of animals or local landmarks, funny sayings, or even intricate patterns that showcase the wood’s grain through negative space.
Setting Up the Laser Engraver
Always prioritize safety! Ensure your laser engraver’s lid is closed during operation, your ventilation system is running effectively to extract smoke and fumes, and you have appropriate fire safety equipment nearby (e.g., a CO2 fire extinguisher suitable for electrical fires). Never leave a laser engraver unattended while it is operating. Wear laser safety glasses appropriate for your laser’s wavelength if your machine’s viewing window doesn’t offer full protection or if you need to open the lid while the beam is off for setup.
Material Placement and Alignment:
Securely place your wood blank(s) on the laser bed. For single coasters, ensure it’s flat and won’t move during engraving. If you’re doing a batch, a simple jig made from cardboard or MDF with cutouts for your coaster blanks can be invaluable for repeatable positioning. Align your material with the laser’s origin point (often top-left, but check your machine’s manual). Most laser software allows you to frame the job, which traces the outline of your engraving area with a low-power red dot pointer, allowing you to confirm precise placement.
Setting Focal Height:
The laser’s focal height is critical. An incorrect focal distance will result in a wide, unfocused beam, leading to blurry engravings, reduced power density, and inconsistent results. Most machines come with a focusing tool (a small block or an automated sensor). Use this tool to set the distance between the laser nozzle and the surface of your wood accurately. If your material is slightly warped, try to set the focus at an average height or, for critical jobs on slightly warped material, consider engraving in sections with adjusted focus.
Initial Laser Engraving Wood Settings for a Test Run:
Before engraving your final coasters, always perform a test run on a scrap piece of the exact same wood, prepared in the same way. Wood type significantly impacts settings.
- Power: This determines the intensity of the laser beam. Higher power means a deeper, darker engrave. Too much power can cause excessive charring or even burn through thin material.
Initial idea for light wood like Birch or Basswood: Start around 15-25% power for a diode laser, or 10-20% for a CO2 laser.
- Speed: This is how fast the laser head moves. Slower speeds allow more laser energy to be delivered to one spot, resulting in deeper, darker engraving. Faster speeds produce lighter engraving.
Initial idea: Start with a moderate speed, e.g., 1000-3000 mm/min for diode lasers, or 200-400 mm/s for CO2 lasers.
- DPI (Dots Per Inch) / LPI (Lines Per Inch): For raster engraving, this determines the resolution and how much overlap there is between engraved lines. Higher DPI/LPI means more detail but takes longer and can sometimes over-burn wood. A common range for wood is 250-600 DPI. For many wood projects, 300-400 DPI is a good starting point.
Create a small test grid with varying power and speed settings to find the combination that gives you the desired depth and color. Engrave a small sample of your actual design too. These initial laser engraving wood settings are just starting points; meticulous testing is the key to perfection.
Engraving Process and Fine-Tuning Settings
Once your design is finalized and your laser engraver is prepped with the chosen wood, it’s time for the main event: the engraving process. This stage requires attention to detail and a willingness to fine-tune settings to transform your wood engraver ideas into tangible, high-quality coasters.
The Engraving Process: Step-by-Step
Assuming you’ve already completed a successful test engrave on a scrap piece of the same wood, you should have a good baseline for your laser engraving wood settings.
- Load and Position: Open your final design file in your laser control software. Double-check that the coaster blank is securely positioned on the laser bed, flat, and correctly aligned with your design’s origin point using the software’s framing or positioning tools.
- Verify Focus: Confirm the focal height is accurately set for the thickness of your coaster material. Even a slight deviation can impact engraving quality.
- Safety Checks: Ensure your ventilation system (exhaust fan and/or air purifier) is running at full capacity. Close the laser engraver lid. If your machine’s viewing window isn’t rated for full eye protection, wear your laser safety glasses. Keep appropriate fire suppression tools (like a CO2 extinguisher) readily accessible.
- Final Settings Review: In your software, confirm the power, speed, DPI/LPI, and number of passes are set according to your test results or your best judgment for the specific wood and desired effect. If you are cutting the coaster shape out as well as engraving, ensure your cut lines have the correct parameters (typically much higher power, lower speed, and often a specific line color/weight designated for cutting).
- Start the Engraving: Initiate the job from your laser control software or the machine’s control panel.
Monitoring the Engraving and Troubleshooting
Never leave the laser engraver unattended while it is operating. Constant monitoring is crucial for both safety and quality.
Watch for:
- Smoke Extraction: Ensure smoke is being effectively drawn away. Excessive smoke buildup can obscure the laser beam, re-deposit soot on the wood, and is a fire hazard.
- Flame-Ups: Small, brief flare-ups are common with some resinous woods or when the laser hits a pocket of sap. However, if flames are sustained or large, immediately pause or stop the job. This usually indicates power is too high, speed is too slow, or air assist is insufficient.
- Consistency: Observe if the engraving depth and color appear consistent across the design.
Common Issues and Troubleshooting:
- Uneven Engraving: If parts of the design are deeper or lighter than others, check for material warping (ensure it’s held flat with magnets or clamps if necessary), an unlevel laser bed, or inconsistent focus across the engraving area.
- Excessive Charring or Soot: This is a common challenge with laser engraving wood.
Solutions:
- Reduce laser power.
- Increase engraving speed.
- Improve air assist: Ensure a strong, steady stream of air is directed precisely at the point where the laser meets the wood. A well-aimed air assist nozzle helps blow away debris and reduces charring significantly.
- Apply masking: Cover the wood surface with transfer tape or a low-tack painter’s tape before engraving. The laser engraves through the tape, and the tape protects the surrounding wood from smoke stains and resin residue. Peel it off carefully after engraving.
- Engraving is Too Light: Increase power, decrease speed, or check if your optics (lens and mirrors) need cleaning. A dirty lens can significantly reduce the laser’s effective power.
- Detail Loss or “Muddy” Engraving: This can happen if DPI/LPI is too high for the wood, causing lines to overburn and merge. Try a lower DPI/LPI. Also, very fine details in your laser engraved wood designs might naturally be harder to achieve on coarse-grained woods.
Fine-Tuning Settings for Optimal Results
Your initial test engrave provides a starting point. Fine-tuning is an iterative process. If your test piece shows the engraving is too dark, reduce power by 5-10% or increase speed by a similar margin. Conversely, if it’s too light, increase power or decrease speed. Keep records of settings that work well for specific wood types and thicknesses. The material itself is a huge variable; a change in wood supplier, or even a different batch of the same wood, can sometimes require slight adjustments to your established laser engraving wood settings.
Exploring Different Wood Engraving Techniques
Beyond a standard engrave, you can achieve various effects:
- Light Marking/Scoring: Using very low power and high speed will delicately mark the surface. This is great for subtle branding, elegant outlines, or even creating guidelines if you plan to hand-paint parts of the coaster later.
- Deep Engraving: To create a more tactile, three-dimensional effect, you’ll need to decrease speed significantly, increase power, or opt for multiple passes. Making two or three passes at a moderate power and speed setting often yields a cleaner deep engrave with less charring than one very slow, high-power pass. Masking is highly recommended for deep engraving to manage soot.
- Selective Focus: For an artistic effect on thicker materials (less common for coasters but a technique nonetheless), deliberately de-focusing the laser slightly can produce a softer, wider burn line.
- Raster vs. Vector Distinction: Remember, you can combine techniques. A logo might be raster engraved for a solid fill, while a delicate border around it could be vector scored for a crisp, fine line. This combination can elevate simple wood engraver ideas.
Bringing your creative coaster designs to life is a rewarding process. Meticulous execution during the engraving stage, coupled with a willingness to experiment and fine-tune your settings, is what truly unlocks the potential of your laser engraver and the beauty of the wood.
Post-Engraving Cleaning and Finishing Touches
After the satisfying hum of the laser engraver subsides and your design is etched into the wood, a couple of crucial steps remain to transform your coaster from a freshly engraved piece into a finished, professional-looking product. These post-engraving procedures—cleaning and finishing—are vital for the aesthetics, durability, and overall quality of your DIY wood engraving projects.
Cleaning the Engraved Coasters: Removing Soot and Residue
The laser engraving wood process, by its nature, vaporizes material, often leaving behind a fine layer of soot, resin residue, or smoke stains, especially around the engraved areas. Proper cleaning is essential to reveal the crispness of your design and prevent smudging.
- If You Used Masking: This is the easiest scenario. Carefully and slowly peel away the masking tape (such as painter’s tape or transfer tape) that you applied before engraving. The tape should lift most of the surface residue with it, leaving a clean surface around the engraving. Pull the tape back on itself at a low angle to minimize any splintering, especially on delicate woods or intricate cuts.
- No Masking or Remaining Residue:
- Gentle Brushing: Use a soft-bristled brush (a soft toothbrush, a dedicated cleaning brush for electronics, or an artist’s brush) to gently sweep away loose soot from the engraved lines and the surface. Brush with the grain of the wood where possible.
- Compressed Air: A can of compressed air or an air compressor with a fine nozzle can effectively blow away fine dust particles from intricate details without direct contact. Always wear eye protection when using compressed air.
- Slightly Damp Cloth/Sponge: For more stubborn residue, lightly dampen a soft, lint-free cloth or a melamine foam sponge (like a Magic Eraser, used very gently) with water. Wring it out thoroughly so it’s barely damp. Wipe the surface gently. Be cautious with this method, especially on unsealed, delicate woods, as too much moisture can raise the wood grain or cause swelling. If your engraving is very light, harsh wiping can also fade it.
- Isopropyl Alcohol (IPA): For persistent resinous residue, especially on woods like pine, a cloth lightly dampened with isopropyl alcohol (90% or higher is often recommended) can be effective. Test on a scrap piece or an inconspicuous area first, as IPA can sometimes affect certain wood finishes or discolor some woods. Wipe gently and allow it to evaporate quickly. Use in a well-ventilated area.
Avoid using abrasive cleaners or scrubbing too hard, as this can damage the fine details of your engraving or scratch the wood surface. The goal is to clean, not to alter the engraving itself.
Applying Finishing Touches: Protecting and Enhancing Your Coasters
Finishing laser engraved wood is not just about aesthetics; it’s crucial for protecting the coasters from moisture, stains, and general wear and tear. A good finish also enhances the wood’s natural beauty and makes the engraved design pop.
Several finishing options are suitable for wood coasters:
- Natural Oils (e.g., Mineral Oil, Tung Oil, Danish Oil): Food-grade mineral oil is a popular choice if quick food safety is a concern (though less critical for coasters than cutting boards). It brings out the wood’s color and grain but offers minimal long-term water protection and needs frequent reapplication. Polymerizing oils like tung oil or Danish oil penetrate the wood and then harden to provide better durability and water resistance. They give a natural, close-to-the-wood feel. Apply according to the product instructions, usually by wiping on, letting it soak in, and then wiping off the excess.
- Varnishes (e.g., Polyurethane, Acrylic Varnish): These create a durable, protective film on the surface. They are an excellent choice for coasters due to their superior water and scratch resistance.
Water-based varnishes dry clear, have low odor, and clean up with water. They are less likely to yellow over time.
Oil-based varnishes offer excellent durability and a slightly amber hue that can warm up the wood’s tone. They require mineral spirits for cleanup and have stronger odors.
Apply thin, even coats with a brush or by spraying, sanding lightly between coats (once fully cured) for the smoothest finish. Matte or satin sheens are often preferred for coasters to reduce glare and visible water spots.
- Lacquer: Provides a very durable, smooth, and often high-gloss finish. It dries quickly but typically requires spraying for best results and has strong fumes, necessitating good ventilation.
- Shellac: A natural, traditional finish that can provide a warm, attractive sheen. It’s a good sealer and can be food-safe if using pure varieties. However, it’s not very resistant to water, alcohol, or heat, making it less ideal as a standalone topcoat for coasters unless applied in many layers (French polish) or protected by a more durable topcoat like wax or varnish.
- Epoxy Resin (for a “bar top” finish): For maximum waterproofing and a glossy, thick coating, a flood coat of epoxy resin can be used. This is a more involved process, requiring careful mixing and application, but it creates an incredibly durable and fully waterproof surface.
Before applying any finish, ensure the coaster is impeccably clean and completely dry. Always test your chosen finish on a scrap piece of the same laser-engraved wood to see how it affects the color of the wood and the appearance of the engraving. Some finishes can darken the wood significantly or pool in very deep engravings if applied too heavily. Follow the manufacturer’s instructions for application, drying times, and curing times. Proper finishing laser engraved wood ensures your coaster is not only beautiful but also functional and long-lasting, elevating your DIY wood engraving projects to a professional standard.
Conclusions
You’ve now mastered creating stunning laser engraved wood coasters! By applying these techniques and exploring various laser cutter wood projects and wood engraving techniques, you can expand your creative portfolio or product line. Remember to experiment with different wood engraver ideas to make unique pieces.
FAQ
Q: What is the best wood for laser engraving coasters?
A: While several woods work well, popular choices include Birch Plywood (especially Baltic Birch), Cherry, Maple, and Bamboo. Each offers different aesthetics and reacts uniquely to the laser, so the “best” depends on your desired look and willingness to fine-tune settings.
Q: How do I prevent charring or excessive soot when laser engraving wood?
A: To minimize charring and soot, try reducing laser power, increasing engraving speed, ensuring strong and well-directed air assist, and applying masking tape (transfer or painter’s tape) to the wood surface before engraving. Masking protects the surrounding wood from smoke residue.
Q: Why is my laser engraving uneven or blurry?
A: Uneven or blurry engravings are often caused by material warping (ensure your wood is perfectly flat and secured), an unlevel laser bed, or incorrect focal height. Always check and set your laser’s focus precisely for the material thickness.
Q: Do I need to clean the wood after engraving?
A: Yes, post-engraving cleaning is essential. Laser engraving typically leaves soot and residue. If you used masking, peel it off carefully. Otherwise, use a soft brush, compressed air, or a slightly damp cloth/melamine foam sponge (very gently) to remove residue. For stubborn spots, isopropyl alcohol can be effective, but test it first.
Q: What kind of finish should I use for laser engraved wood coasters?
A: For coasters, durability and water resistance are key. Varnishes (water-based or oil-based polyurethane/acrylic) are excellent choices. Natural oils like Tung or Danish oil offer a natural feel but less protection. For maximum waterproofing and a glossy look, epoxy resin can be used. Always test your chosen finish on a scrap piece first.

Subscribe to Our Newsletter
And enjoy FREE Download Files, SALE Alerts and Inspiring TIPS
Pricing Your Laser Engraved Products for Profit
A Comprehensive Guide on How to Price Laser Engraving Jobs
Pricing Your Laser Engraving Work for Profitability
Charcuterie Board Engraving File – Wine & Grapes 3D Illusion…
$4.00Original price was: $4.00.$3.00Current price is: $3.00.(25% off)
Bee and Honey Jar Charcuterie Board Engraving File | PNG Download #007…
$4.00Original price was: $4.00.$3.20Current price is: $3.20.(20% off)
Valentine Love Captions: 6 Charcuterie Board Engraving Files…
$8.00Original price was: $8.00.$5.60Current price is: $5.60.(30% off)
American Eagle Flag Laser Engraving File for Charcuterie & Cutting…
$4.00Original price was: $4.00.$2.80Current price is: $2.80.(30% off)