

 Français
 Deutsch
 Español
 Italiano
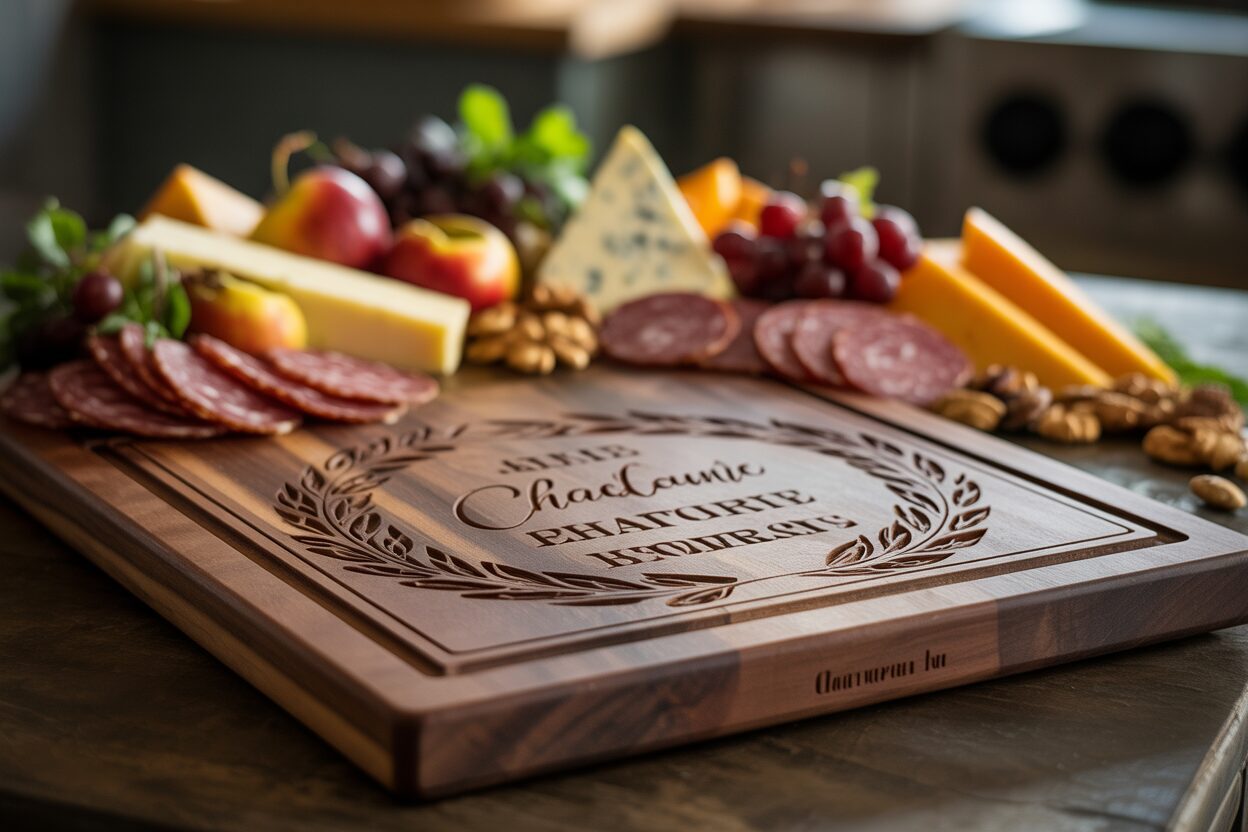
Crafting the Perfect Laser Engraved Charcuterie Board
Jul
Estimated Reading Time: Approximately 7 minutes
Key Takeaways
- Wood Selection is Crucial: Choose dense, closed-grain hardwoods like Maple, Cherry, Acacia, or Walnut for durability, food safety, and optimal engraving contrast.
- Design for Impact: Consider board shape, size, and grain when designing. Use vector graphics software for crisp lines, convert text to outlines, and prepare designs in pure black and white.
- Master Engraving Settings: Adjust laser power and speed to achieve desired depth and darkness, mimicking traditional wood burning. Always perform test runs on scrap wood.
- Precision and Finishing Touches Matter: Use masking tape for clean engravings, ensure proper focus, and apply food-safe finishes like mineral oil to protect the board and enhance its beauty.
- Safety First: Always use proper fume extraction and never leave the laser cutter unattended during operation.
Table of Contents
Discover the art of creating a personalized charcuterie board. This guide will walk you through selecting the right wood, designing your engraving, and the laser engraving process to craft a beautiful and functional custom cheese board that will impress your guests.
Selecting the Ideal Wood for Your Charcuterie Board
The foundation of any exceptional laser engraved charcuterie board is, quite literally, the wood itself. Your choice is more than an aesthetic one; it directly impacts the board’s longevity, food safety, and the final appearance of your engraved design. The ideal wood must be a hardwood, dense enough to resist knife marks and wear, yet receptive to the focused heat of a laser. It must also have a closed-grain structure, which means it has smaller pores that are less likely to trap food particles and bacteria, making it safer for direct food contact. When evaluating options, you are essentially choosing the canvas for your art, and the right canvas makes all the difference.
Popular Wood Choices for Engraved Serving Boards
Let’s explore the most popular and effective wood types for this purpose. Each offers a unique combination of color, grain, and engraving characteristics.
- Maple: Often considered the gold standard, Maple is a very hard, dense, and light-colored wood with a subtle, tight grain. Its hardness makes it incredibly durable and resistant to scratching. From a laser engraving perspective, Maple is a dream to work with. The light, creamy surface provides a high-contrast backdrop for the dark burn of the laser, making intricate designs and fine text pop with exceptional clarity. This makes it a premier choice when creating a detailed personalized charcuterie board where readability is key.
- Cherry: Known for its warm, reddish-brown hue that deepens beautifully over time, Cherry is slightly softer than maple but still very durable. Its grain is fine and straight, giving it a smooth, elegant appearance. When it comes to laser engraving wood, Cherry offers a rich, tone-on-tone effect. The engraved areas become a darker, deeper shade of the wood’s natural color, resulting in a sophisticated and subtle look rather than a stark contrast. This is perfect for monograms or classic designs that aim for an understated elegance.
- Acacia: Acacia has gained immense popularity for its striking and often dramatic grain patterns, which can range from light blonde to deep brown within a single piece. It is a very hard and naturally water-resistant wood, making it a robust choice for an engraved serving board. However, its variability is also a key consideration for engraving. The laser may react differently to the lighter and darker sections of the wood, potentially leading to slight inconsistencies in the depth and color of the burn. This can contribute to a rustic, organic charm, but may not be ideal for designs requiring perfect uniformity.
- Walnut: For a truly premium and luxurious feel, Walnut is an excellent choice. Its deep, rich chocolate-brown color and beautiful grain patterns create a stunning dark canvas. Engraving on Walnut produces a subtle, dark-on-dark effect that is incredibly classy. While the contrast is lower than on Maple, the result is a sophisticated mark that speaks to quality. It’s a fantastic option for high-end gifts or for designs that are bold and simple.
Tips for Purchasing a Blank Board
Once you’ve decided on a wood type, selecting the perfect blank is the final crucial step. Not all boards are created equal, and a few moments of inspection can save you from a disappointing result.
- Check for Flatness: Lay the board on a flat surface. It should not rock or wobble. A warped board will cause the laser to go in and out of focus, resulting in an uneven and inconsistent engraving.
- Examine the Grain: Look for a grain pattern that will complement, not compete with, your intended design. Avoid boards with large knots, cracks, or significant blemishes in the area you plan to engrave, as these imperfections can disrupt the laser and ruin the look.
- Consider the Construction: Many boards are made from a single solid piece of wood, while others are edge-glued from several smaller strips. Glued boards are perfectly fine, but be aware of how the seams might intersect with your design. A seam running through delicate text can be distracting.
- Assess the Finish: Ideally, you should purchase an unfinished, raw wood board. This gives the laser direct access to the wood fibers for the cleanest burn. If the board is pre-finished with oils or waxes, you may need to sand it down before engraving and then re-oil the entire board afterward to achieve a uniform, food-safe finish.
Designing for a Lasting Impression
With the perfect wooden canvas selected, the next step is to create the artwork that will transform it into a one-of-a-kind custom cheese board. A thoughtful design considers not just the graphic or text itself, but its relationship with the board’s shape, size, and grain. The goal is to achieve visual harmony. A small, delicate design might get lost on a large, rustic board, while a bold, oversized graphic could overwhelm a smaller, more elegant one. Consider the board’s primary function: will food cover the center? If so, placing your design in a corner, along an edge, or on the handle is often the most practical and aesthetically pleasing choice. This placement ensures the engraving remains visible and acts as a sophisticated accent rather hand a centerpiece that gets hidden. Use the principle of negative space to your advantage; the un-engraved areas are just as important as the engraved ones for creating a balanced and uncluttered final piece.
From Concept to Digital File
The possibilities for personalization are nearly endless. The key is to choose a design that reflects the occasion or the recipient’s personality.
- Classic Monograms and Initials: Timeless and elegant, a stylized monogram or a set of initials is perfect for wedding gifts, anniversaries, or housewarmings.
- Names and Dates: Commemorating a special day, like a wedding or the purchase of a new home, adds a deep personal touch. Consider elegant script fonts for a romantic feel or strong, clean serif fonts for a modern look.
- Family Recipes: Engraving a cherished family recipe, perhaps in a loved one’s actual handwriting, creates a beautiful and functional heirloom. This is a truly unique approach to a personalized charcuterie board.
- Logos and Branding: For corporate gifts or real estate closing presents, a company logo can be engraved with precision, creating a professional and memorable item.
- Intricate Patterns: A geometric border, a floral wreath encircling an initial, or a detailed mandala can turn the board into a true piece of art.
Once you have your design concept, it must be translated into a digital file that the laser can read. The best software for this is a vector graphics program like Adobe Illustrator, CorelDRAW, or the free alternative, Inkscape. Vector files (such as SVG, AI, or DXF) define designs using mathematical lines and curves, which allows them to be scaled to any size without losing quality. This is crucial for ensuring crisp, clean lines. If your design includes text, it is essential to convert the text to outlines or curves before saving. This turns the letters into vector shapes, preventing any font substitution issues when the file is opened on the laser engraver’s computer. For photographic or highly detailed, shaded images, you’ll use a raster file (like a high-resolution PNG or JPG), but for most text and line art, vector is superior. All designs should be prepared in pure black and white; the laser interprets black areas as “engrave” and white areas as “ignore.”
Achieving the Perfect “Wood Burned” Look
The laser gives you incredible control over the final aesthetic, allowing you to replicate the rich look of a traditional wood burning charcuterie board with digital precision. This is achieved by manipulating the laser’s settings. The two primary modes are Vector Engraving and Raster Engraving. Vector engraving traces the outlines of your design, which is fast and ideal for simple text and line art. Raster engraving moves back and forth like an inkjet printer, filling in solid shapes. This is how you achieve a filled-in, solid burn. By adjusting the laser’s power and speed, you can control the depth and darkness of the engraving. A lower power setting or a faster speed will result in a lighter, golden-brown mark. Increasing the power and slowing the speed creates a deeper, darker, and more dramatic burn, closely mimicking the classic hand-burned look. Experimenting with these settings on a scrap piece of the same wood is the best way to dial in the exact effect you desire for your final masterpiece.
The Engraving Process and Finishing Touches
This is the pivotal moment where your digital design is permanently etched into the wood, transforming a simple board into a personalized charcuterie board. Precision and preparation are key to a flawless result. The process involves more than just pressing a button; it’s a careful orchestration of machine settings, material preparation, and safety protocols. A successful engraving is clean, crisp, and free of unsightly smoke stains, and achieving this standard requires a methodical approach from start to finish. The final steps of cleaning and oiling are equally important, as they not only protect your creation but also bring the wood’s natural beauty to life, making the engraved details stand out.
Setting Up for a Perfect Engraving
Before you begin the actual laser engraving wood process, setting up your workspace and machine is critical. First, ensure your charcuterie board is perfectly clean and dry. For an exceptionally clean engraving with sharp edges and no smoke “halos” on the surrounding wood, apply a layer of medium-tack paper masking tape over the entire surface you intend to engrave. This simple step is a professional secret that catches the smoke and residue before it can stain the wood grain.
Next, place the board inside the laser cutter, ensuring it is level and secure. Use the laser’s focusing tool to set the correct distance between the laser nozzle and the surface of the board—proper focus is the single most important variable for a sharp, detailed engraving. Once focused, import your digital file. Use the laser software’s framing or trace function to project a harmless red-dot outline of your design onto the masked board. This allows you to perfectly position your artwork before committing to the burn.
Your power and speed settings will vary depending on the wood type.
- For hardwoods like Maple: You’ll need higher power and moderate speed to achieve a dark, contrasting mark.
- For softer woods like Cherry: You can use lower power or a faster speed to achieve a rich, tonal engraving without burning too deeply.
Always perform a test run on a scrap piece of the same wood to dial in your settings. Throughout the process, safety is paramount. Ensure your laser’s fume extraction system is running to vent smoke and particulates, and never leave a laser cutter unattended while it is operating.
The Finishing Process: From Engraved to Elegant
Once the engraving is complete, the board is not yet finished. The first step is to carefully peel away the masking tape, which will lift off the vast majority of the smoke residue with it, revealing your clean engraving underneath. Use a soft-bristled brush (like a toothbrush) to gently scrub out any remaining char or debris from within the engraved lines. If any stubborn residue remains on the surface, a cloth lightly dampened with isopropyl alcohol can be used to wipe it away. Be careful not to sand the face of the board after engraving, as this can soften the crisp edges of your design.
The final, crucial step is to apply a food-safe finish. This protects the wood from moisture and staining, prevents it from drying out and cracking, and dramatically enhances the color and grain, making your engraved serving board truly shine. The industry standard is food-grade mineral oil. It is inexpensive, readily available, and will not become rancid like cooking oils. Apply the oil liberally to all surfaces of the board—front, back, and sides. Let it soak into the wood for at least 20-30 minutes (or even overnight), then wipe away any excess with a clean, lint-free cloth. For an even more durable and water-resistant finish, you can follow the oil with a conditioning “board butter,” a blend of mineral oil and beeswax. This final touch creates a beautiful, low-sheen luster and a silky-smooth feel, readying your board for its debut.
Conclusions
You’re now equipped with the knowledge to create stunning laser engraved charcuterie boards. From selecting materials to applying the finishing touches, a personalized, engraved serving board is a rewarding project that combines creativity with functionality, perfect for gifts or your own gatherings.
Frequently Asked Questions (FAQs)
Q: What are the best wood types for laser engraving charcuterie boards?
A: The best woods are dense, closed-grain hardwoods like Maple (excellent contrast), Cherry (rich, tonal effect), Acacia (striking grain, water-resistant), and Walnut (premium dark canvas). These woods are durable, food-safe, and engrave well.
Q: Why is it important to choose a blank board carefully before engraving?
A: Proper selection ensures a flawless result. Check for flatness to avoid uneven engravings, examine the grain to ensure it complements your design, consider construction to avoid seams disrupting text, and ideally, choose an unfinished board for the cleanest burn.
Q: What type of digital file is best for laser engraving, and why?
A: Vector graphics files (like SVG, AI, DXF) are highly recommended because they define designs using mathematical lines and curves, allowing them to be scaled to any size without losing quality, ensuring crisp, clean lines. Remember to convert text to outlines before saving.
Q: How can I achieve a dark, “wood-burned” look with a laser engraver?
A: To achieve a darker, more dramatic burn that mimics traditional wood burning, you should increase the laser’s power and slow down its speed. Experimenting with these settings on a scrap piece of the same wood is crucial for dialing in the desired effect.
Q: What is the recommended food-safe finish for an engraved charcuterie board?
A: Food-grade mineral oil is the industry standard due to its safety, availability, and non-rancid nature. Apply it liberally and let it soak in, then wipe off the excess. For added durability, you can follow with a mineral oil and beeswax blend (“board butter”).

Subscribe to Our Newsletter
And enjoy FREE Download Files, SALE Alerts and Inspiring TIPS
Pricing Your Laser Engraving Work for Profitability
A Comprehensive Guide to Pricing Your Laser Engraving Services
A Comprehensive Guide on How to Price Laser Engraving Services
Charcuterie Board Engraving File – Wine & Grapes 3D Illusion…
$4.00Original price was: $4.00.$3.00Current price is: $3.00.(25% off)
Bee and Honey Jar Charcuterie Board Engraving File | PNG Download #007…
$4.00Original price was: $4.00.$3.20Current price is: $3.20.(20% off)
Valentine Love Captions: 6 Charcuterie Board Engraving Files…
$8.00Original price was: $8.00.$5.60Current price is: $5.60.(30% off)
American Eagle Flag Laser Engraving File for Charcuterie & Cutting…
$4.00Original price was: $4.00.$2.80Current price is: $2.80.(30% off)