

 Français
 Deutsch
 Español
 Italiano
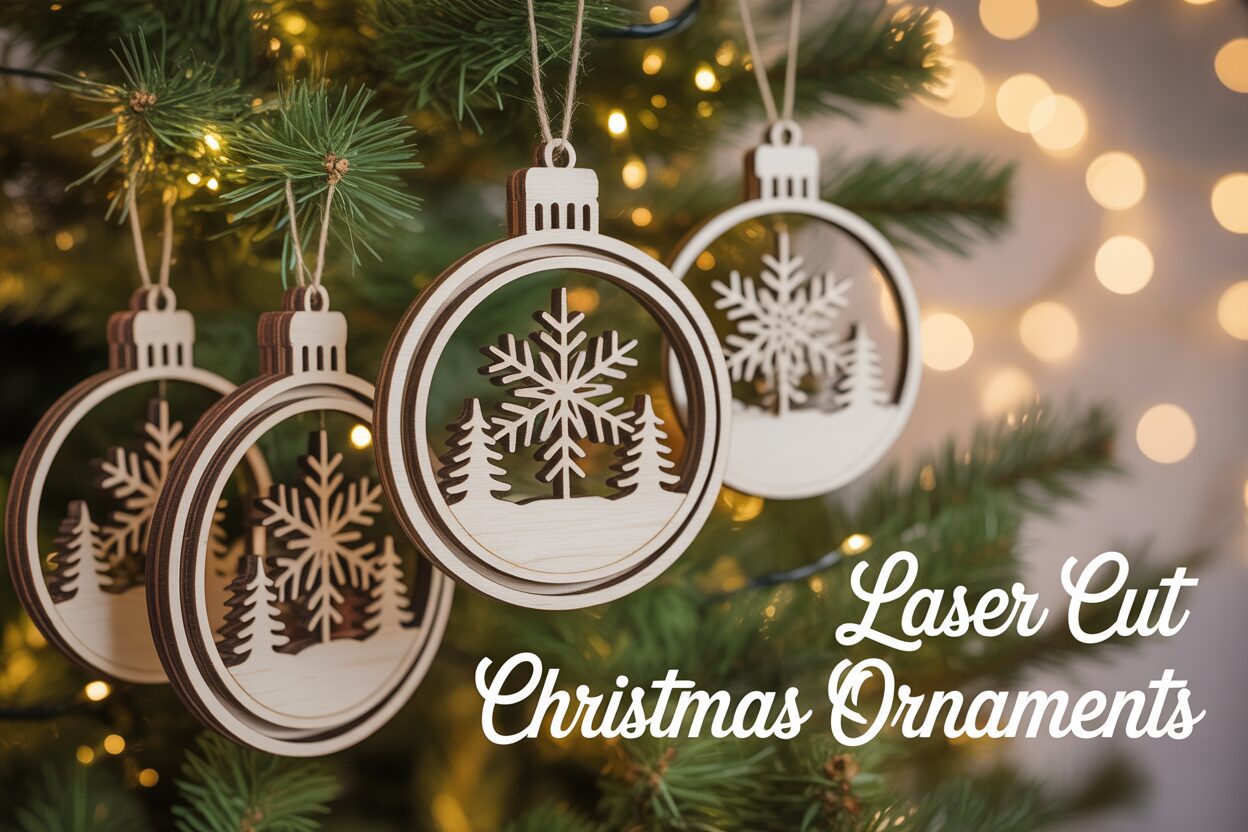
Crafting 3D Layered Christmas Ornaments with Your Laser Cutter
Oct
Estimated reading time: 6 minutes
Key Takeaways
- Material Matters: The choice between wood and acrylic fundamentally defines your ornament’s style. Wood offers a classic, rustic feel with unique grain patterns, while acrylic provides a modern, vibrant look with a polished finish.
- File Preparation is Crucial: A successful project starts with a well-prepared vector file (SVG, AI, DXF). Color-coding your lines for cut (red), engrave (black), and score (blue) operations is a critical step to instruct the laser cutter correctly.
- Protect Your Surfaces: To achieve a clean, professional finish, apply medium-tack paper masking tape to wood surfaces to prevent smoke stains and leave the protective film on acrylic to avoid scratches during cutting.
- Proper Assembly is Key: Use the right adhesive for your materials—wood glue for wood-to-wood and CA glue (super glue) for acrylic or mixed-material assemblies. Use the hanger hole as a registration point for perfect alignment between layers.
Table of Contents
- Choosing the Right Materials: Wood vs. Acrylic
- Finding and Preparing Your Ornament Design Files
- Laser Cutting and Assembly Best Practices
- Conclusions
- Frequently Asked Questions
Elevate your holiday decor by creating stunning 3D layered Christmas ornaments. This guide explores the entire process, from selecting the perfect design files and materials to the final assembly. Discover how your laser cutter can turn simple wood or acrylic sheets into cherished, personalized keepsakes for your tree, adding a unique touch to your festive celebrations.
Interested in more Ornaments? Check out our Ornaments laser file designs: Click here!
Choosing the Right Materials: Wood vs. Acrylic
The material you choose is the heart and soul of your ornament, defining its character before the laser even fires up. The two most popular choices for layered ornaments, wood and acrylic, offer wildly different aesthetics and practical considerations. Your final decision will hinge on whether you envision a cozy, rustic heirloom or a vibrant, modern statement piece.
The Timeless Warmth of Wood
Wood is the quintessential material for creating classic, heartfelt holiday decorations. It evokes a sense of tradition, warmth, and nature. The inherent grain in every piece ensures that no two personalized wood ornaments are ever completely identical, adding a unique, organic touch. For laser cutting, thin plywoods are ideal. Baltic Birch, typically available in 1/8 inch (3mm) sheets, is a crowd favorite due to its smooth surface, minimal voids, and consistent density, which allows for clean cuts and beautiful engraving. Other great options include maple, cherry, and alder plywoods, each offering a different color and grain pattern.
Wood’s main aesthetic appeal lies in its natural texture and the beautiful contrast achieved through engraving. The laser burns away the top surface, creating a darker, recessed area that stands out beautifully against the lighter wood. This makes it perfect for intricate designs like snowflakes, forest scenes, or personalized names. The characteristic dark, slightly smoky edge left by the laser is often considered a desirable feature, enhancing the ornament’s rustic charm. Wood is also very forgiving for designs with extremely fine details, as the fibrous material provides some structural integrity to delicate parts.
The Sleek Vibrancy of Acrylic
If you’re aiming for a modern, crisp, or even glamorous look, acrylic is your go-to material. Unlike the organic nature of wood, acrylic offers uniformity, precision, and a brilliant pop of color. It’s available in a staggering array of options: solid opaque colors, translucent jewel tones, shimmering glitter, and stunning mirrored finishes. These qualities make acrylic laser ornaments feel polished and contemporary. When cut with a laser, cast acrylic (as opposed to extruded) produces a perfect, flame-polished edge that looks glassy and professional.
Acrylic excels in designs that play with light, color, and reflection. A design cut from mirrored gold acrylic can add a touch of elegance and sparkle to a Christmas tree, while a translucent blue acrylic can create a beautiful, icy effect for a snowflake ornament. It’s the perfect material for bold silhouettes, geometric patterns, and modern typography. While engraving on colored acrylic creates a subtle frosted look, it truly shines when layered. For instance, placing a white acrylic snowflake layer over a dark blue acrylic backer creates a striking visual contrast that is clean and sharp.
Material Choice and Practical Impact
The thickness of your material directly impacts the final weight and sturdiness of your laser cut christmas ornaments. For both wood and acrylic, 1/8 inch (3mm) is the industry standard and the perfect starting point. It provides excellent rigidity for backer layers and enough substance for detailed top layers without becoming too heavy for a tree branch. In terms of durability, each material has its trade-offs. Wood is resilient but very fine, delicate pieces can snap if handled roughly. It may also require sealing if you want to protect it from moisture or discoloration over many years. Acrylic is more rigid and water-resistant, but it can be more brittle; a thin, protruding piece is more likely to snap clean off than to bend. It is also more susceptible to fine surface scratches. Ultimately, the best designs often come from combining the two, leveraging the rustic stability of a wood backer with the brilliant, clean pop of an acrylic top layer for a truly dynamic and professional-looking ornament.
Finding and Preparing Your Ornament Design Files
With your material chosen, the next step is to find or create the digital blueprint for your ornament. A well-prepared christmas ornaments laser file is the key to a smooth cutting process and a professional-looking final product. Whether you purchase a design or modify an existing one, understanding how to prepare it is a non-negotiable skill for any laser crafter.
The internet is a treasure trove of designs. Marketplaces like Etsy, Creative Fabrica, and Design Bundles are filled with thousands of incredible, ready-to-use laser cut files christmas ornaments created by talented artists. When searching, look for files specifically designed for layering. A high-quality file will typically come in a vector format like SVG, AI, DXF, or PDF. The product listing should show a picture of the finished, assembled ornament, and it will often display the individual layers separated so you can see how it’s constructed. Pay close attention to the design’s complexity. Look for clean, distinct layers that will stack logically. Avoid files with excessively thin or fragile connection points, as these may break easily, especially in wood.
Preparing and Customizing Your File in Design Software
Once you have your file, you’ll need to open it in a vector design program like Adobe Illustrator, Inkscape (a free alternative), or CorelDRAW to prepare it for your laser. The first step is to inspect the layers. A good file will have each layer grouped as a separate object. Ungroup them to work with each piece individually. This is your chance to add a personal touch. To add a name or year, use the text tool to type your desired text. Choose a font that is sturdy enough for laser cutting; delicate serifs can be problematic. Once you are happy with the placement, you must convert the text into an object. In Illustrator, this is done by selecting the text and choosing Type > Create Outlines. If you are adding the name to the edge of a layer, you must then use the Pathfinder or Shape Builder tool to “Unite” or “Weld” the text outlines to the main shape, creating a single, continuous path for the laser to follow.
Next comes the most critical step: color-coding your lines. Your laser cutter software interprets different colors as different instructions. While settings can be customized, a common convention is:
- Red Stroke: Cut. This tells the laser to cut completely through the material. This should be used for the outer perimeter of each layer and any internal cutouts. Set the stroke color to pure red (R:255, G:0, B:0) and the stroke weight to the thinnest possible setting (e.g., 0.001 inches or 0.01mm).
- Black Fill: Engrave. This is used for raster engraving, where the laser head moves back and forth to remove the surface of the material. Use this for adding names or dates onto a solid surface. The object should have a black fill and no stroke.
- Blue Stroke: Score. This is a low-power cut that simply marks the surface without going all the way through. It’s perfect for adding fine details like wood grain patterns or delicate snowflake veins. Like a cut line, it should have a very thin stroke weight.
Before exporting your file, do a final pre-flight check. Switch to an outline or wireframe view to ensure there are no overlapping or duplicate lines, as these will cause the laser to cut the same spot multiple times, leading to excessive burning. Confirm that all shapes are closed paths and that every element is color-coded for the correct operation. Finally, ensure you have a properly sized hole for hanging the ornament on each layer that requires one. This careful preparation ensures your time at the laser is efficient and the results are flawless.
Laser Cutting and Assembly Best Practices
With your design file perfected, it’s time for the exciting part: bringing your ornament to life. The transition from digital file to physical object requires precision both at the laser and on your assembly table. Mastering this process is what separates a homemade craft from a professional-quality keepsake.
The key to a perfect cut is dialing in your laser’s settings for your specific material. Never assume default settings will work; always perform a small test cut on a scrap piece of the exact same material before running your full project. For 1/8 inch (3mm) Baltic Birch plywood, a good starting point is often higher speed and moderate power. The goal is to cut cleanly through in a single pass without excessive charring. To dramatically reduce surface burn marks and smoke residue, apply a layer of medium-tack paper masking tape to the entire surface of the wood before you cut. A strong air assist is also crucial, as it blows away smoke and debris, preventing flames and resulting in a cleaner, sharper edge. For 1/8 inch cast acrylic, the approach is different. You’ll want to use a slower speed to allow the laser’s heat to melt the edges smoothly, creating a beautiful, flame-polished finish. Most acrylic sheets come with a protective paper or plastic film; leave this on during cutting to prevent scratches and surface marks.
Assembling Your Masterpiece
Once your layers are cut, careful assembly is what creates the stunning 3D effect. Begin by laying out all your pieces in the correct order. If you used masking tape on your wood, carefully peel it away. For any stubborn smoke stains on the edges, a gentle wipe with a baby wipe or a cloth lightly dampened with isopropyl alcohol works wonders. For acrylic, simply peel off the protective film. The right adhesive is critical for a lasting bond.
- For Wood-to-Wood Assembly: A high-quality wood glue like Titebond II provides a very strong, durable bond. For faster assembly, a medium-viscosity CA glue (super glue) with an activator spray works almost instantly, but be aware that it is far less forgiving if you misalign a piece.
- For Acrylic or Mixed Materials: Regular wood glue will not adhere to acrylic. For joining acrylic to wood or acrylic to acrylic, a gel-type CA glue is an excellent choice. It provides a strong bond and its thicker consistency prevents it from running.
Apply the glue sparingly. A few small dots are all you need. Use a toothpick or a fine-tipped bottle to apply adhesive to the back of each layer before placing it. The biggest challenge is perfect alignment. The hanger hole is your best friend here; use it as your primary registration point. For complex designs, you can create a simple assembly jig by cutting the outline of the backer layer into a piece of scrap material. You can then place the backer into this “nest” and stack the subsequent layers on top, ensuring they all line up perfectly. Once the glue is fully cured, your ornament is ready for the final touches. Thread a piece of ribbon, rustic twine, or a decorative metal hook through the hanger hole. These small details complete your beautiful, handcrafted laser xmas ornaments, making them ready to adorn a tree or be given as a cherished gift.
Conclusions
You now have the skills to create intricate, multi-layered laser cut Christmas ornaments that are sure to impress. This project not only enhances your holiday decor but also opens up a world of creative possibilities. Don’t hesitate to experiment with different materials and designs to produce truly unique laser xmas ornaments for yourself or as heartfelt, personalized gifts.
Frequently Asked Questions
Q: What is the best material for a beginner making laser-cut ornaments?
A: For beginners, 1/8 inch (3mm) Baltic Birch plywood is an excellent starting point. It’s cost-effective, relatively forgiving with laser settings, cuts cleanly, and engraves with beautiful contrast, making it ideal for learning the process.
Q: How do I add a personalized name to a pre-made design file?
A: In your vector design software (like Adobe Illustrator or Inkscape), use the text tool to add the name. After choosing a sturdy font and positioning the text, you must convert it to outlines (or paths). Finally, use the “Unite” or “Weld” function to merge the text shape with the ornament layer, creating a single, continuous cutting path.
Q: What is the best way to prevent burn marks on wooden ornaments?
A: The most effective method is to apply a layer of medium-tack paper masking tape over the entire surface of the wood before you begin cutting. This tape absorbs the smoke and residue, and you can simply peel it off after cutting for a clean surface. Using a strong air assist on your laser is also crucial.
Q: What kind of glue should I use to assemble layered ornaments?
A: The right glue depends on the materials. For wood-to-wood layers, a quality wood glue provides the strongest bond. For acrylic-to-acrylic or joining acrylic to wood, you must use a CA glue (super glue), preferably a gel type, as standard wood glue will not adhere to acrylic.

Subscribe to Our Newsletter
And enjoy FREE Download Files, SALE Alerts and Inspiring TIPS
Pricing Your Laser Engraving Work for Profitability
A Comprehensive Guide to Pricing Your Laser Engraving Services
A Comprehensive Guide on How to Price Laser Engraving Services
Charcuterie Board Engraving File – Wine & Grapes 3D Illusion…
$4.00Original price was: $4.00.$3.00Current price is: $3.00.(25% off)
Bee and Honey Jar Charcuterie Board Engraving File | PNG Download #007…
$4.00Original price was: $4.00.$3.20Current price is: $3.20.(20% off)
Valentine Love Captions: 6 Charcuterie Board Engraving Files…
$8.00Original price was: $8.00.$5.60Current price is: $5.60.(30% off)
American Eagle Flag Laser Engraving File for Charcuterie & Cutting…
$4.00Original price was: $4.00.$2.80Current price is: $2.80.(30% off)