

 Français
 Deutsch
 Español
 Italiano
A Step-by-Step Guide to Creating Engraved Slate Coasters
Jan
Estimated reading time: 8 minutes
Key Takeaways
- Material Preparation is Crucial: Always start with raw, untreated slate. Clean each coaster thoroughly with isopropyl alcohol and a lint-free cloth to remove dust and oils, ensuring a crisp, clean engraving.
- Master Your Settings: Slate is “bleached” by the laser, not burned. Use lower power and higher speeds (e.g., 20-40% power at 3000-5000 mm/min for a 10W diode laser). Always run a material test grid to find the perfect settings for your specific machine and slate batch.
- Optimize Artwork for Contrast: Convert all designs to high-contrast black and white. For photographs, use a dithering process to simulate shades of gray. Start with a high-resolution file (300 DPI minimum) to avoid pixelation.
- Finishing Makes the Difference: After engraving, clean off all dust and apply a thin coat of food-safe mineral oil. This deepens the slate’s color to a near-black, making the light engraving “pop” with professional-level contrast.
Table of Contents
- Material Prep and Design Selection for Slate
- From Blank Slate to Personalized Art
- Mastering Laser Settings for Perfect Slate Engraving
- Dialing in Power, Speed, and Detail
- Engraving Process and Professional Finishing Touches
- Post-Engraving Cleanup and Contrast Enhancement
- Conclusions
- Frequently Asked Questions
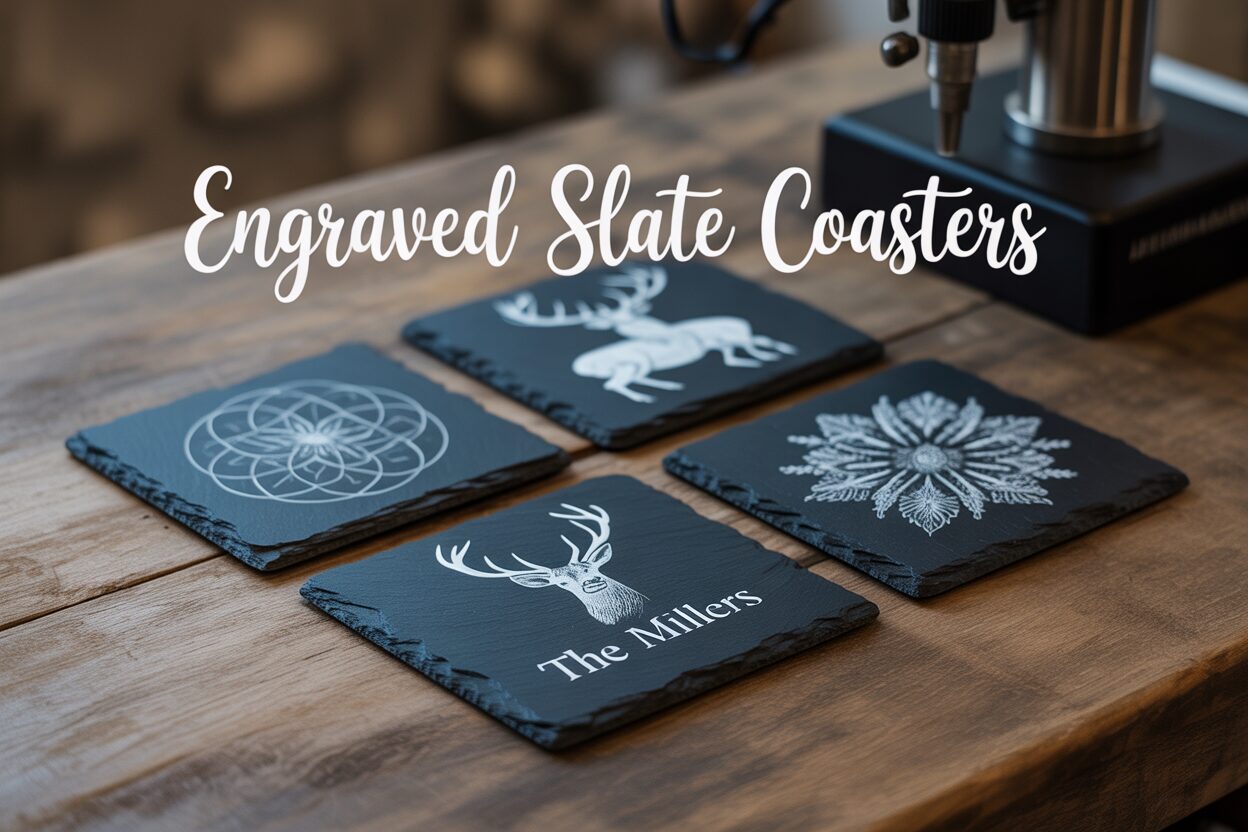
Discover the art of creating beautiful engraved slate coasters, a popular and profitable item for hobbyists and small businesses alike. This guide will walk you through the entire process, providing the essential tips and techniques you need to achieve professional-quality results on slate, a uniquely rewarding material for laser engraving.
Material Prep and Design Selection for Slate
The foundation of any exceptional engraved project lies in the quality of the material and the precision of the design. Before you even power on your laser, taking the time to properly select and prepare your slate will set you up for a flawless result. The first step is sourcing the right coasters. Look for natural, untreated slate. Many commercially available slate products are sealed with mineral oil or a chemical sealant to darken their appearance and make them water-resistant. While useful for dining, these coatings are a significant hindrance to laser engraving. They can cause inconsistent, blotchy engraving, produce unpleasant fumes, and leave a sticky residue on the slate and your laser’s lens. Opt for raw slate, which provides a clean, uniform surface for the laser to interact with. When selecting your pieces, inspect them for uniformity in thickness and a relatively flat surface. Natural slate has a beautiful riven texture, but extreme variations in height across a single coaster can lead to focus issues and an uneven final engraving.
Interested in more Coaster? Check out our Coaster laser file designs: Click here!
Once you have your coasters, the next crucial step is cleaning. Slate, being a natural stone, is often covered in fine dust from the quarrying and cutting process. It also easily picks up oils from fingerprints. These contaminants can interfere with the laser beam, deflecting its energy and resulting in a soft or incomplete mark. The cleaning process is simple but non-negotiable. Take a lint-free cloth, lightly dampen it with water or, for a more thorough clean, isopropyl alcohol (IPA). Gently wipe down the entire surface of the coaster, paying attention to the edges. IPA is an excellent choice as it cuts through any grease or oil and evaporates quickly without leaving a residue. Allow the slate to air dry completely before placing it in your engraver. This simple act of preparation ensures the laser has a pristine canvas to work on, leading to a sharp, high-contrast engraving.
From Blank Slate to Personalized Art
With your coasters clean and ready, you can move on to the creative heart of the project: the design. Slate is a wonderfully versatile medium, and the striking contrast between its dark grey surface and the light, almost white, engraved mark makes a bold statement. The possibilities for laser engraving ideas for slate are nearly endless. Simple, elegant designs like monograms, names, or important dates are incredibly popular and effective. For more intricate work, consider geometric patterns, mandalas, family crests, or company logos. Text-based designs, such as a favorite quote or a witty saying, also engrave beautifully. The key is to choose a design that will be clear and legible. Creating personalized slate coasters is a fantastic entry point into the world of laser engraving because even the most basic designs yield impressive, professional-looking results, making them perfect for gifts, special events, or personal use.
Properly formatting your artwork is just as important as the design itself. Your laser engraver interprets images not in color, but in shades of gray, which correspond to different power levels. For slate coaster engraving, you will achieve the best results by converting your artwork into a high-contrast, black and white format. If your design is a vector file (like an SVG or AI file), this is straightforward. For raster images like photos or complex graphics (JPG, PNG), you must process them first. Convert the image to grayscale, then use a dithering process. Dithering is a technique where your software (like LightBurn or LaserGRBL) converts shades of gray into a pattern of black dots of varying density. This process tricks the eye into seeing tones and gradients, which is essential for engraving photographs. Experiment with different dithering patterns like Jarvis, Stucki, or Floyd-Steinberg to see which best suits your image. Always start with a high-resolution file—300 DPI (dots per inch) is the recommended minimum—to ensure the final engraving is crisp and detailed, not pixelated. For some images, you may also find that inverting the colors (creating a negative) produces a more striking result on the dark slate.
Mastering Laser Settings for Perfect Slate Engraving
Understanding how to laser engrave slate requires a fundamental shift in thinking compared to materials like wood or acrylic. With wood, the laser burns and vaporizes the material, creating depth and char. With slate, the process is entirely different. The laser’s intense, focused heat doesn’t burn the stone but rather causes a chemical and physical change on the surface. It essentially “bleaches” or lightens the dark grey slate, creating a permanent, light-colored mark with minimal depth. This unique interaction is what produces the beautiful, high-contrast effect on engraved slate coasters. Recognizing this principle is key to dialing in your settings; you are aiming for a precise surface reaction, not brute-force material removal. Too much power won’t make the engraving deeper, but will instead overheat the stone, potentially causing it to melt slightly, flake, or turn a muddy brownish-yellow instead of the desired crisp white.
The first universal setting to master is the focal height. Your laser is most effective when its beam is focused to the smallest possible point on the material’s surface. Use your machine’s focusing tool—whether it’s a fixed-focus block, an auto-focus probe, or manual adjustment—to set the correct distance between the laser nozzle and the slate coaster. Because slate has a natural, slightly uneven texture, it’s best to find an average height across the engraving area. An interesting technique some users employ is to slightly de-focus the laser (raising it by about 1mm from the perfect focus point). This makes the laser spot slightly larger, which can sometimes produce a brighter, whiter mark. This is a variable worth exploring on a test piece.
Dialing in Power, Speed, and Detail
When it comes to diode laser slate settings, the mantra is generally less is more. Unlike powerful CO2 lasers, diode lasers operate at a wavelength that is highly effective on slate. You don’t need to max out your machine. A great starting point for a 10W diode laser is often in the range of 20-40% power at a relatively high speed, such as 3000-5000 mm/min. For a 20W laser, you might start at 15-30% power at an even higher speed. These are just starting points. The single most important step in this entire process is to run a material test grid on a scrap piece of slate, ideally from the same batch as your final coasters. Most laser software, like LightBurn, has a built-in feature to create a grid of squares, each engraved with a different combination of power and speed. This test will visually show you the exact settings that produce the cleanest, whitest mark for your specific machine and material. One square might look yellowish (too much power/too slow), another might be too faint (not enough power/too fast), and one will be just right. This ten-minute test saves you from ruining your project pieces and is the secret to repeatable, professional results.
Finally, consider the detail of your engraving, which is controlled by the ‘Scan Interval’ or ‘Lines Per Inch’ (LPI). This setting determines how close together each pass of the laser is.
- For highly detailed graphics or photos, a higher LPI (e.g., 300) or a smaller scan interval (e.g., 0.08mm) is ideal. This ensures the laser passes overlap slightly, creating a solid, filled-in appearance without visible lines.
- For bold text or simple logos, you can often get away with a slightly lower LPI (e.g., 254) or a larger scan interval (e.g., 0.1mm), which will engrave faster.
Running your test grid will help you see how these settings interact, allowing you to find the perfect balance of speed, power, and detail for your design.
Engraving Process and Professional Finishing Touches
With your design finalized and laser settings dialed in, you are ready for the exciting part: the actual slate coaster engraving. Begin by securely placing your clean slate coaster onto the laser bed. Consistency is key, especially when creating a set of personalized slate coasters. To ensure perfect alignment for every piece, it is highly recommended to create a simple jig. You can do this by taking a piece of scrap plywood or MDF, placing it on your laser bed, and cutting out a square exactly the size of your coaster. This creates a pocket that you can drop each subsequent coaster into, guaranteeing it is in the exact same position every time. Once your coaster is in place, use your laser software’s framing function to run a low-power outline. This projects a light box around the engraving area, allowing you to visually confirm that your design is perfectly centered on the coaster before you commit to the final burn. Double-check that your safety glasses are on and your ventilation system is running, then start the job.
Post-Engraving Cleanup and Contrast Enhancement
Once the laser has finished its work, you will notice a fine, light-colored dust covering the engraved area. This is the pulverized stone residue from the engraving process. Before you do anything else, it’s important to clean this off. You can gently blow it off with compressed air or, more simply, use a soft-bristled brush (like a paintbrush) to sweep the dust away. Follow this with a quick wipe from a clean, damp, lint-free cloth to remove any remaining haze. Be gentle during this step to avoid scratching the surface. At this point, your coaster will look good, but the next step is what transforms it into a professional-quality product.
The secret to making your design truly “pop” is applying a finishing oil. This technique dramatically deepens the color of the natural slate, turning it from a medium-dark grey to a rich, near-black tone. This, in turn, makes the light-colored engraving stand out with brilliant contrast. The best choice is a food-safe mineral oil, the same kind used for conditioning wooden cutting boards.
- Apply a small amount of oil onto a clean cloth or paper towel.
- Wipe a thin, even coat over the entire surface of the coaster, including the engraved areas and the edges.
- You will immediately see the slate darken and the engraving become much more vivid.
- Let the oil sit and absorb for a few minutes.
- Using a new, clean cloth, thoroughly buff the coaster to remove all excess oil from the surface. You want to leave the oil in the stone, not on it.
This simple step elevates the finish from good to exceptional. To complete your project, add protective feet to the bottom of the coaster. Small, self-adhesive cork or rubber dots are inexpensive and readily available. They prevent the slate from scratching furniture and stop the clatter when the coaster is placed on a hard surface. If you plan on gifting or selling your coasters, consider your packaging. Tying a set of four together with a rustic piece of twine or creating a simple branded paper sleeve can add a final, polished touch that makes your creation feel truly special.
Conclusions
You now have the knowledge to confidently create your own engraved slate coasters. By preparing your materials carefully, dialing in the correct settings, and applying the right finishing touches, you can produce stunning, high-contrast designs. Experiment with these techniques to craft unique gifts, products, or personal items that are sure to impress.
Frequently Asked Questions
Q: What kind of slate should I use for laser engraving?
A: Use natural, untreated slate. Avoid slate that has been sealed with mineral oil or chemical sealants, as these coatings interfere with the laser and can produce inconsistent results and unpleasant fumes.
Q: Why is my slate engraving turning out brownish or yellow instead of white?
A: This is usually a sign of using too much power or too slow a speed. The laser is overheating the stone. Reduce your power settings or increase your speed and run a material test grid to find the optimal settings for a crisp, white mark.
Q: Do I need a powerful laser to engrave slate?
A: No, even lower-wattage diode lasers are highly effective on slate. The process “bleaches” the surface rather than burning it away, so high power is not necessary or desirable. A 10W diode laser at 20-40% power is often sufficient.
Q: How do I make the engraving stand out more?
A: After cleaning the engraved coaster, apply a thin coat of food-safe mineral oil. This will darken the natural slate to a rich, near-black color, dramatically increasing the contrast with the light-colored engraving. Buff off any excess oil for a professional finish.
Q: What is the best way to prepare my design for slate engraving?
A: Convert your artwork to a high-contrast, black and white format. For photos, use a dithering process (like Jarvis or Stucki in LightBurn) to simulate grayscale tones. Always start with a high-resolution image (300 DPI minimum) for crisp, detailed results.

Subscribe to Our Newsletter
And enjoy FREE Download Files, SALE Alerts and Inspiring TIPS
A Comprehensive Guide to Pricing Your Laser Engraving Services
A Comprehensive Guide on How to Price Laser Engraving Services
How to Price Your Laser Engraving and Cutting Services
Charcuterie Board Engraving File – Wine & Grapes 3D Illusion…
$4.00Original price was: $4.00.$3.00Current price is: $3.00.(25% off)
Bee and Honey Jar Charcuterie Board Engraving File | PNG Download #007…
$4.00Original price was: $4.00.$3.20Current price is: $3.20.(20% off)
Valentine Love Captions: 6 Charcuterie Board Engraving Files…
$8.00Original price was: $8.00.$5.60Current price is: $5.60.(30% off)
American Eagle Flag Laser Engraving File for Charcuterie & Cutting…
$4.00Original price was: $4.00.$2.80Current price is: $2.80.(30% off)