

 Français
 Deutsch
 Español
 Italiano
A Step-by-Step Guide to Crafting a Laser Cut Box
Aug
Estimated reading time: 8 minutes
Key Takeaways
- Design is Paramount: A successful laser cut box starts with a precise vector design. Using software like Inkscape or Fusion 360 and understanding concepts like finger joints and kerf compensation is crucial for a snug fit.
- Material Choice Matters: The material you choose, such as Baltic Birch plywood for strength, MDF for budget projects, or solid hardwoods for aesthetics, significantly impacts the cutting process and the final look of your box.
- Test Before You Cut: Always perform test cuts on a scrap piece of your final material to dial in the perfect power and speed settings. This step prevents wasted material, minimizes charring, and ensures clean, precise cuts.
- Proper Assembly is Key: A professional finish requires a careful assembly process. This includes a “dry fit” to check joints, precise gluing, clamping for a square cure, and wiping away excess glue immediately.
- Finishing Elevates the Product: Sanding and applying a finish like oil or varnish not only protects the wood but also transforms your project from a simple container into a durable, high-quality product.
Table of Contents
- Fundamentals of Laser Cut Box Design
- Designing for Assembly: The Finger Joint and Kerf Compensation
- Choosing Materials and Setting Up Your Laser
- Preparing the Laser for a Perfect Cut
- Assembly and Finishing for a Professional Look
- The Art of Assembly and Gluing
- Conclusions
- Frequently Asked Questions
Creating a laser cut box is a rewarding project for any maker. It combines digital design with hands-on assembly, resulting in a functional and beautiful object. This guide will walk you through the entire process, from creating your initial design and choosing the right materials to assembling the final product, empowering you to craft your own custom boxes.
Fundamentals of Laser Cut Box Design
A successful laser cut box begins not at the laser, but on the screen. The digital design is the blueprint for your physical creation, and a meticulous approach here will prevent wasted material and frustration later. Your first decision is choosing the right design software. The non-negotiable requirement is that it must be a vector graphics program. Unlike raster programs (like Photoshop) which use pixels, vector programs use mathematical equations to draw lines and shapes, allowing for infinite scaling without loss of quality—essential for the precise paths a laser cutter follows. Common choices include:
- Adobe Illustrator: The industry standard for professional vector design. It’s powerful and versatile but comes with a subscription cost.
- Inkscape: A fantastic, free, and open-source alternative to Illustrator. It has all the necessary tools for creating complex box designs and is a popular choice in the maker community.
- CAD Programs (e.g., Fusion 360, Onshape): Computer-Aided Design software is built for engineering and product design. Their key advantage is native support for parametric design, a powerful concept where you define dimensions using variables. For instance, you can set variables for ‘height’, ‘width’, and ‘material_thickness’. If you need to change the box size or switch to a different wood thickness, you simply update the variable, and the entire design automatically adjusts. This makes creating a reusable and adaptable laser cut box design incredibly efficient.
Designing for Assembly: The Finger Joint and Kerf Compensation
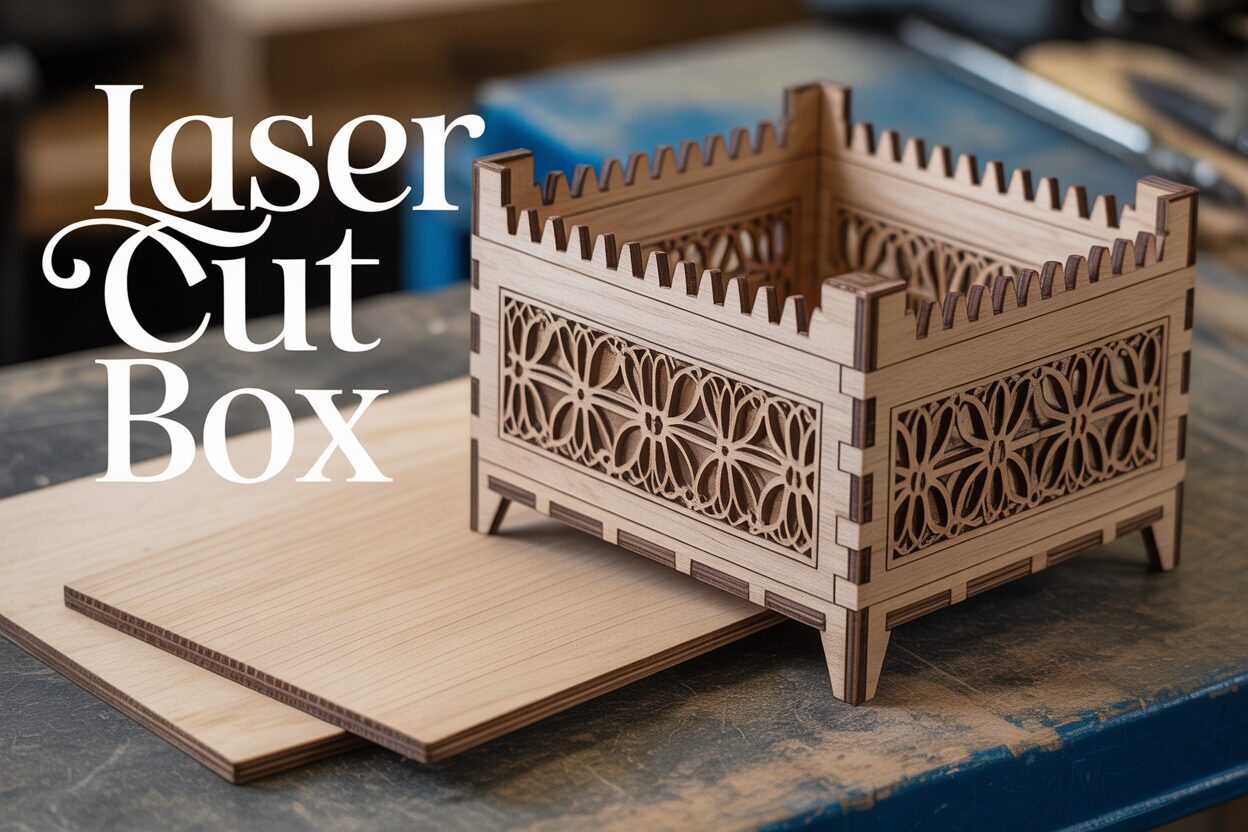
The most common, sturdy, and reliable construction method is the finger joint box laser cut. This technique involves creating a series of interlocking tabs, or “fingers,” along the edges of each panel that slot together, creating strong right-angle connections that can be easily glued. Designing these joints requires precision. The width of each finger and the corresponding slot on the mating piece must be identical. A common practice is to make the finger length equal to the material’s thickness, ensuring a clean, flush corner when assembled. However, simply drawing perfect squares for your joints will result in a loose, wobbly box. This is due to the laser’s kerf—the small amount of material that is vaporized or burned away by the laser beam. The beam has a physical width, and this must be accounted for to achieve a snug fit.
To compensate for kerf, you must intentionally make the slots slightly smaller than the tabs. The exact amount of compensation depends on your specific laser, its settings, and the material you’re using. A typical kerf value might be around 0.1mm to 0.2mm. The most accurate method is to perform a kerf test: cut a small test piece with several slots of slightly different widths (e.g., 2.9mm, 2.95mm, 3.0mm, 3.05mm for a 3.0mm tab) and see which one provides the firmest fit. In your design software, you apply this compensation by slightly offsetting the cut lines. For a slot, you would move the lines inward by half the kerf value; for a tab, you might move them outward. While online box generator tools can automate this process, learning to design from scratch gives you full control over every aspect, from the number and style of the fingers to adding custom engravings or cutouts, which is the key to creating a truly unique laser cut storage box. This attention to detail in the design phase is what separates a flimsy container from a durable, professional-quality product.
Choosing Materials and Setting Up Your Laser
With your digital design complete, the next crucial phase is translating it into a physical object. This begins with selecting the right material for your DIY laser cut box. While many materials can be laser cut, wood remains the most popular choice for its warmth, strength, and aesthetic appeal. Your material choice will significantly impact both the cutting process and the final appearance of your box.
- Baltic Birch Plywood: This is arguably the best all-around material for a laser cut wood box. It is engineered to be void-free, meaning there are no hidden gaps in the internal layers that can disrupt the laser beam and cause incomplete cuts. It’s strong, stable, relatively inexpensive, and has an attractive, light-colored finish. The alternating grain of the plies gives it excellent strength, making it ideal for a sturdy finger joint box laser cut. Its primary downside is the visible layered edge after cutting, which can be a stylistic choice.
- MDF (Medium-Density Fiberboard): MDF is a very budget-friendly option. Since it’s made from compressed wood fibers and resin, it has a completely uniform density and no grain direction. This consistency makes it extremely predictable to cut. However, it is not as strong as plywood, can be prone to swelling with moisture, and the dust produced during cutting is fine and can be more hazardous. Its appearance is utilitarian, making it better suited for functional prototypes or boxes that will be painted.
- Solid Hardwoods (e.g., Cherry, Walnut, Maple): For premium gift boxes or high-end storage, nothing beats the beauty of solid wood. The natural grain and color variations create a unique, high-quality finish. The main challenges are cost and inconsistency. The density can vary even within a single board due to knots or grain patterns, which can lead to uneven cutting. It’s essential to use clear, straight-grained wood and to perform thorough testing.
Preparing the Laser for a Perfect Cut
Before you place your expensive wood in the machine, a few preparation steps are non-negotiable for achieving clean, precise results. First, ensure the laser’s optics are clean. A dirty lens or mirrors will scatter the laser beam, reducing its power and effectiveness, which leads to incomplete cuts or excessive charring. Use the manufacturer’s recommended cleaning solution and wipes to gently clean the lens and all mirrors in the beam’s path. Next, verify the machine’s focus. An improperly focused laser will produce a wider kerf and a beveled edge instead of a straight one, which will ruin the tight fit of your finger joints. Use a focus tool or your machine’s auto-focus feature on the surface of your material. The most critical step is to perform test cuts on a small scrap piece of the exact same material you plan to use for your box. Create a small file with a few squares or a test matrix to dial in the optimal power and speed settings. Your goal is to find the lowest power and highest speed that will reliably cut through the material in a single pass. This minimizes charring on the surface and edges, ensuring your pieces drop out cleanly and are ready for a perfect, snug assembly.
Assembly and Finishing for a Professional Look
With your design finalized and materials tested, it’s time for the most exciting part: bringing your DIY laser cut box to life. Load your design file into the laser cutter’s control software, double-check that the power and speed settings match those you perfected during your test cuts, and ensure the laser is correctly focused on the material’s surface. Secure your wood sheet to the laser bed to prevent it from shifting during the cut. Once you start the job, never leave the machine unattended. Lasers operate with intense heat, and while modern machines have safety features, monitoring the process is the most crucial safety measure to prevent flare-ups and ensure a successful cut. After the laser has finished and the ventilation system has cleared the smoke, carefully remove the cut pieces. You will likely notice a slight smoky residue on the surface, especially around the cut lines. To clean this, gently wipe the surfaces of each part with a soft cloth lightly dampened with isopropyl alcohol. This effectively dissolves the residue without harming the wood, leaving you with clean pieces ready for assembly.
The Art of Assembly and Gluing
The assembly process is where your design precision pays off. Begin with a “dry fit” by assembling your finger joint box laser cut without any glue. This allows you to check the fit of all your joints. If you correctly compensated for the kerf, the fit should be snug and require a bit of force to connect. This is the desired outcome for a strong box. If the joints are tight, use a rubber mallet to gently tap the pieces together. To avoid marring the wood’s surface, place a small scrap piece of wood over the area you are tapping. For maximum durability, especially for a functional laser cut storage box, using wood glue is highly recommended. Disassemble the box after the dry fit. Apply a very thin, even layer of wood glue to the inside faces of the finger joints on one piece. A small brush or a toothpick can help spread the glue precisely. Reassemble the pieces, tapping them into place. The glue will act as a lubricant initially, making assembly slightly easier. Once assembled, use clamps or tightly wrapped masking tape to hold the corners square and tight while the glue cures. Immediately wipe away any excess glue that squeezes out of the joints with a damp cloth, as dried glue will not accept a finish and can be difficult to remove later.
Allow the glue to cure completely according to the manufacturer’s instructions, typically for several hours or overnight. Once the box is solid, you can proceed to the final finishing stage. This step protects the wood and elevates the aesthetic from a simple project to a professional-looking product. Start by lightly sanding all surfaces and edges with a fine-grit sandpaper (220-grit or higher). This will remove any minor imperfections and soften the sharp laser-cut edges for a more pleasant feel. Be careful not to over-sand, which could alter the dimensions and affect the fit of a lid. After sanding and wiping away the dust, apply your chosen finish.
- Oils (like Danish or Tung oil): These penetrate the wood to enhance the natural grain and provide a beautiful, low-sheen finish. They are easy to apply with a clean rag.
- Varnish or Polyurethane: For the best protection against moisture and wear, a film-forming finish is ideal. These create a durable topcoat and are available in matte, satin, or gloss sheens. Apply with a quality brush in thin, even coats.
- Stain: If you want to change the color of your laser cut wood box, apply a wood stain before your protective topcoat. Always test on a scrap piece first to see the final color.
By carefully choosing and applying a finish, you not only protect your creation but also highlight the beauty of the wood and the precision of your work.
Conclusions
You now have the knowledge to create a high-quality laser cut box from scratch. By mastering design fundamentals, material selection, and assembly techniques, you can produce professional-grade boxes for any purpose. This versatile skill opens up a world of creative possibilities, so start experimenting with your own designs and enjoy the satisfaction of building something truly unique.
Frequently Asked Questions
Q: What is the best software for designing a laser cut box?
A: For beginners and hobbyists, Inkscape is an excellent free, open-source choice. For more advanced or reusable designs, a CAD program like Fusion 360 is superior due to its parametric design capabilities, which allow you to easily change dimensions like height, width, or material thickness.
Q: What is laser kerf and why is it important for box making?
A: Kerf is the small amount of material vaporized by the laser beam during a cut. It’s critical because if you don’t account for it, the finger joints on your box will be loose. You must compensate for kerf by making the slots in your design slightly smaller than the tabs, ensuring a tight, press-fit connection.
Q: What is the best wood for a laser cut box?
A: Baltic Birch plywood is often considered the best all-around choice. It’s strong, stable, relatively inexpensive, and cuts very cleanly due to its void-free core. For budget-friendly functional boxes, MDF is a good option, while solid hardwoods like walnut or cherry are best for premium, high-end boxes.
Interested in more Boxes? Check out our Boxes laser file designs: Click here!
Q: How do I prevent excessive charring or burning on my wood pieces?
A: The key is to find the optimal power and speed settings for your specific material. Conduct test cuts to find the highest speed and lowest power that will still cut cleanly through the material in a single pass. Also, ensure your laser’s lens and mirrors are clean, as dirty optics can reduce cutting efficiency and increase charring.

Subscribe to Our Newsletter
And enjoy FREE Download Files, SALE Alerts and Inspiring TIPS
Pricing Your Laser Engraving Work for Profitability
A Comprehensive Guide to Pricing Your Laser Engraving Services
A Comprehensive Guide on How to Price Laser Engraving Services
Charcuterie Board Engraving File – Wine & Grapes 3D Illusion…
$4.00Original price was: $4.00.$3.00Current price is: $3.00.(25% off)
Bee and Honey Jar Charcuterie Board Engraving File | PNG Download #007…
$4.00Original price was: $4.00.$3.20Current price is: $3.20.(20% off)
Valentine Love Captions: 6 Charcuterie Board Engraving Files…
$8.00Original price was: $8.00.$5.60Current price is: $5.60.(30% off)
American Eagle Flag Laser Engraving File for Charcuterie & Cutting…
$4.00Original price was: $4.00.$2.80Current price is: $2.80.(30% off)