

 Français
 Deutsch
 Español
 Italiano
A Practical Guide to Crafting Laser Cut Wood Boxes
Aug
Estimated reading time: 9 minutes
Key Takeaways
- Design is Critical: Use vector software like Adobe Illustrator or Inkscape. The most crucial step is to account for both the precise material thickness and the laser’s ‘kerf’ to ensure strong, tight-fitting joints.
- Choose Materials Wisely: Birch plywood is a cost-effective and stable choice for beginners, while MDF offers uniformity. For premium projects, solid woods like cherry or walnut provide superior aesthetics.
- Calibrate and Test: Always run test cuts on a scrap piece of your final material to find the optimal power, speed, and frequency settings. This minimizes material waste and ensures clean cuts with minimal charring.
- Follow a Process: For best results, engrave your design first, then cut the pieces out. After cutting, clean the parts, perform a dry fit, glue and clamp them securely, and finish with sanding and a protective coat for a professional look.
Table of Contents
Dive into the world of crafting custom laser cut wood boxes. This article provides a comprehensive guide, from initial design concepts to the final assembly. Whether for personal projects or as products to sell, mastering the creation of these boxes is a valuable skill for any laser cutting enthusiast. Let’s explore the process from start to finish.
Interested in more Boxes? Check out our Boxes laser file designs: Click here!
Designing for Success: From Concept to Cut File
The journey from a simple idea to a physical wooden box begins on your computer screen. The design phase is arguably the most critical, as it dictates the final appearance, strength, and ease of assembly. Your primary tool here will be vector graphics software. Unlike raster programs (like Photoshop) that work with pixels, vector software uses mathematical equations to define lines and shapes. This is essential because the laser cutter follows these vector paths precisely to cut or engrave your material. For professional work, Adobe Illustrator is the industry standard, offering a vast array of powerful tools. However, for hobbyists, Inkscape is a fantastic and completely free alternative that is more than capable of handling complex box designs. Whichever you choose, take some time to familiarize yourself with its basic functions, like creating shapes, manipulating paths (nodes), and arranging objects with precision.
Before you draw a single line, it’s wise to seek inspiration. Websites like Pinterest and Etsy are visual treasure troves filled with unique laser cut box designs. Don’t just look for projects to copy; analyze them. How did the designer construct the corners? What kind of lid mechanism did they use? Are there intricate engravings or inlays? Look at how different joinery types create different aesthetics. You can also explore online maker communities like Instructables or Thingiverse, where designers often share their files and provide insights into their design process. Looking beyond the laser-cutting world to traditional woodworking can also inspire new forms and functional ideas that you can adapt to the laser-cutting process.
Understanding Laser Cut Joinery
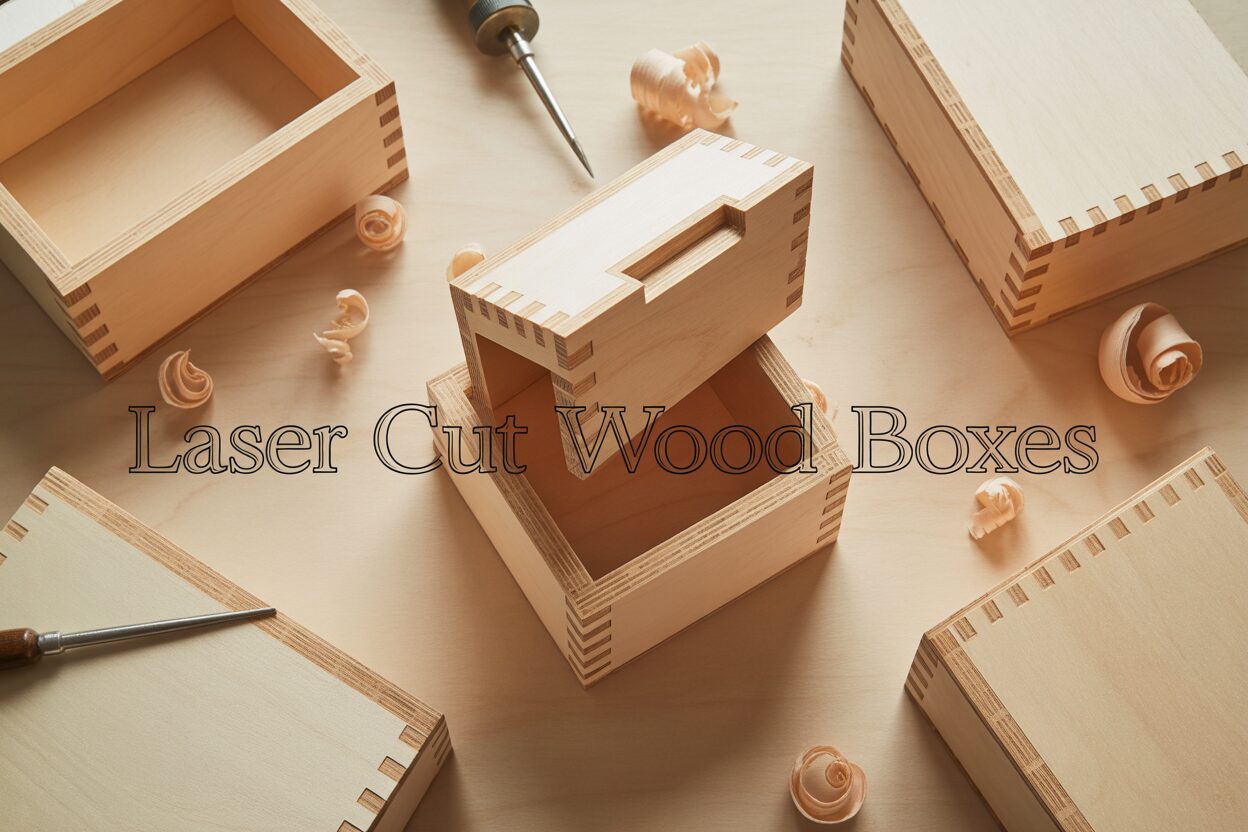
The secret to a strong and beautiful laser cut box lies in its joints. While you could simply butt the edges together with glue, this creates a very weak connection. Laser cutting allows for incredibly precise and complex interlocking joints that are both strong and decorative. The most common and effective type is the finger joint (also known as a box joint). This joint consists of a series of interlocking rectangular “fingers” that slot together at a 90-degree angle. This design dramatically increases the surface area for glue, resulting in a very robust corner. Another versatile option is the tab-and-slot joint. Here, small tabs on the edge of one piece fit into corresponding slots cut into the face of another. This method is excellent for creating internal dividers or for assemblies that might not have 90-degree angles. With careful design, tab-and-slot joints can even create a friction fit that holds together without any glue.
Accounting for Kerf and Material Thickness
The single most common point of failure for beginners is neglecting the laser’s kerf. The laser beam isn’t a line with zero width; it has a physical thickness and vaporizes a small amount of material as it cuts. This burned-away material is the kerf. If you design a 5mm wide tab to fit into a 5mm wide slot, the resulting hole will actually be slightly larger (e.g., 5.1mm) and the tab slightly smaller (e.g., 4.9mm). This will result in a loose, wobbly joint. To achieve a snug fit, you must compensate for the kerf in your design file. This usually means making tabs slightly larger and slots slightly smaller than their nominal size. The exact compensation amount depends on your laser, its power settings, and the material you’re cutting. Always cut a small test piece with a few sample joints to dial in your kerf settings before cutting your entire project. Equally important is accounting for the exact material thickness. A piece of wood labeled as 3mm might actually be 2.8mm or 3.2mm thick. Use digital calipers to measure your material and use that precise measurement in your design for the depth of slots and length of fingers.
With these principles in mind, the design process can be broken down into a few manageable steps:
- Conceptualize the box size and purpose. What will it hold? Will it have a lid? Will it have internal dividers? Define the internal dimensions you need.
- Choose a joinery type. For a simple, strong box, finger joints are a great starting point. For more complex internal structures, consider tab-and-slot joints.
- Draft the box sides as a flat pattern. Lay out all six sides (top, bottom, front, back, left, right) as separate 2D shapes in your software. This is often called “unfolding” the box.
- Adjust for material thickness and laser kerf. Add your chosen joints to the edges of each piece, ensuring the finger/tab lengths match your precise material thickness. Then, apply your kerf compensation to ensure a tight fit upon assembly.
Material Selection and Laser Calibration
The character of your finished box is defined not only by its design but profoundly by the material you choose. Your choice of wood affects aesthetics, durability, and how it behaves under the laser beam. For beginners, birch plywood is an excellent starting point. It’s relatively inexpensive, structurally stable due to its cross-laminated layers, and provides a clean, bright surface that’s perfect for engraving or painting. However, be aware that plywood can contain hidden glue pockets or voids between layers, which may cause the laser to cut inconsistently in small spots. MDF (Medium-Density Fiberboard) is another popular option. It is exceptionally uniform, with no grain or knots, resulting in perfectly consistent cuts and smooth engraved surfaces. Its main drawbacks are its utilitarian appearance and its tendency to absorb moisture, plus it creates a very fine dust when cut. For a more premium product, solid woods like cherry, walnut, or maple offer unparalleled beauty. The natural grain and rich color create stunning, high-end boxes. The trade-offs are higher cost and less predictability. Solid wood can warp, and its density can vary across a single board, which may require adjustments to laser settings for a consistent cut. Before you even think about cutting, you must accurately measure your material’s thickness. Never trust the label; a sheet sold as 3mm plywood could be anywhere from 2.8mm to 3.3mm thick. Use a pair of digital calipers to take several measurements across the sheet and use the average for your design file, as this precision is vital for the tight-fitting joints we discussed in the previous chapter.
Dialing in Your Laser Settings
With your design finalized for your specific material thickness, the next step is to calibrate the wooden box laser cutter. Every combination of laser machine and material has a “sweet spot” of settings that produces a clean, efficient cut. The three primary settings you will control are power, speed, and frequency. Power, expressed as a percentage, dictates the intensity of the laser beam. More power cuts deeper but also increases charring and the width of the kerf. Speed is how fast the laser head moves across the material. A faster speed exposes the wood to the laser for less time, reducing charring but also decreasing cut depth. Frequency (often measured in Hz or PPI – Pulses Per Inch) controls how many times the laser beam pulses as it moves. A higher frequency can result in a smoother edge on some materials, while a lower one might be better for reducing scorching on resinous woods. Finding the right balance is key: you want the lowest power and fastest speed that will reliably cut all the way through your material in a single pass.
This is why performing a test cut is the most crucial step before running your main job. Never skip this step. Take a small scrap piece of the exact same material you plan to use for your box. In your software, create a small test file—a 1-inch square with a 0.5-inch circle inside is a common choice. Send this file to the laser with your best guess for the settings. After the cut, evaluate the result. Did the shapes fall out on their own, or did you have to poke them out? If they didn’t fall out, you need to either increase power or decrease speed. Now, examine the edges of the cut piece. Are they a light brown or are they dark and sooty? Excessive charring means your power is too high or your speed is too slow. Adjust your settings iteratively—a small change at a time—and run the test again until you get a piece that drops out cleanly with minimal charring. Once you find these ideal settings, write them down! Keeping a log of materials and their corresponding settings will save you enormous amounts of time and material on future projects.
The Final Cut, Engraving, and Assembly
With your design perfected and your laser settings calibrated, it’s time for the exciting step of bringing your creation to life. Before you press the start button, perform one last check. Secure your wood sheet onto the laser bed, ensuring it is completely flat—any warping can lead to inconsistent focus and failed cuts. Focus the laser beam precisely on the surface of your material. In your laser software, organize your cut file by setting different colors for different operations. The universal best practice is to engrave first, then cut. This ensures that the detailed engraving is done while the material is a single, stable piece, before it’s cut into smaller components that could shift slightly. Once you start the job, never leave the machine unattended. While modern lasers are very safe, you are using a focused beam of light to create a controlled burn, and supervision is non-negotiable.
This is also your opportunity to add a layer of deep personalization, transforming your project from a simple container into a custom engraved wooden box. Any surface of your box can be decorated with text, logos, or intricate patterns. This is done by adding raster images (like a .jpg or .png) or filled vector shapes to your design file and assigning them to an “engrave” operation. Just like cutting, engraving has its own power and speed settings that need to be tested to achieve the desired depth and darkness. A fantastic pro-tip is to apply a layer of wide masking tape over the entire surface of the wood before you start the job. The laser will engrave and cut directly through the tape. When the job is finished, you can simply peel the tape off, taking all the unsightly smoke and resin stains with it, leaving a perfectly clean surface and a stunningly crisp engraved image.
Assembling Your DIY Laser Cut Box
Once the laser has finished its work and the exhaust fan has cleared the smoke, carefully retrieve your freshly cut pieces. They will likely have some soot on the edges. The first step is to clean them. If you used the masking tape trick, peel it off. Then, a soft cloth dampened with a bit of isopropyl alcohol works wonders for wiping away any remaining residue. Before reaching for the glue, perform a “dry fit” by assembling the box without any adhesive. This is your final quality check to ensure all the joints slide together as planned. If the fit is good, you can proceed to gluing. Apply a thin, even bead of standard wood glue to the faces of the fingers or tabs on one piece. A small brush or toothpick can help with precise application. Your goal is to use just enough glue to coat the joint surfaces; excess glue will squeeze out and can be difficult to clean, potentially marring the finish.
Methodically join the sides together, ensuring all corners are seated squarely. To hold your laser cut wood boxes together while the glue cures, you have several options. For small boxes, simply wrapping masking tape tightly around the corners can provide enough pressure. For a more robust hold, small corner clamps or even rubber bands can be used. The key is to apply firm, even pressure to close any gaps in the joints. Let the glue dry completely according to the manufacturer’s instructions, typically for several hours or overnight. Once the glue has cured, you can remove the clamps or tape. For a truly professional result, lightly sand the entire box with fine-grit sandpaper (220-grit or higher) to smooth the edges and faces. Finally, apply a finish like tung oil, danish oil, or a clear polyurethane varnish. This final step not only protects the wood but also makes the grain pop, turning your functional DIY laser cut box into a beautiful handcrafted object.
Conclusions
You now have the foundational knowledge to create beautiful and functional laser cut wood boxes. By experimenting with different woods, joints, and engraving options, you can produce unique items. Don’t be afraid to start your own DIY laser cut box project today, and consider using pre-made designs to streamline your workflow and guarantee a great result.
Frequently Asked Questions
Q: What is the best software for designing laser cut boxes?
A: For professional results, Adobe Illustrator is the industry standard. However, Inkscape is a powerful and completely free alternative that is perfect for hobbyists and capable of handling complex designs.
Q: Why is accounting for ‘kerf’ so important?
A: Kerf is the small amount of material vaporized by the laser beam. If you don’t account for it, your joints will be loose and wobbly. You must compensate for kerf in your design file (e.g., making tabs slightly larger and slots smaller) to achieve a snug, strong fit.
Q: What’s the best wood for a beginner making a laser cut box?
A: Birch plywood is an excellent starting material. It’s affordable, structurally stable, and has a clean surface ideal for engraving or painting. It is more forgiving for beginners than solid woods.
Q: Should I engrave or cut first, and why?
A: You should always engrave first, then cut. This ensures that detailed engravings are perfectly positioned on a single, stable piece of material. If you cut first, the individual pieces could shift slightly during the process, leading to misaligned engravings.

Subscribe to Our Newsletter
And enjoy FREE Download Files, SALE Alerts and Inspiring TIPS
Pricing Your Laser Engraving Work for Profitability
A Comprehensive Guide to Pricing Your Laser Engraving Services
A Comprehensive Guide on How to Price Laser Engraving Services
Charcuterie Board Engraving File – Wine & Grapes 3D Illusion…
$4.00Original price was: $4.00.$3.00Current price is: $3.00.(25% off)
Bee and Honey Jar Charcuterie Board Engraving File | PNG Download #007…
$4.00Original price was: $4.00.$3.20Current price is: $3.20.(20% off)
Valentine Love Captions: 6 Charcuterie Board Engraving Files…
$8.00Original price was: $8.00.$5.60Current price is: $5.60.(30% off)
American Eagle Flag Laser Engraving File for Charcuterie & Cutting…
$4.00Original price was: $4.00.$2.80Current price is: $2.80.(30% off)