

 Français
 Deutsch
 Español
 Italiano
A Guide to Flawless Photo Engraving on Wood
Oct
Estimated reading time: 7 minutes
Key Takeaways
- Wood Choice is Foundational: The best results come from light-colored woods with a tight, minimal grain and low resin content, such as Basswood, Maple, or Cherry. The wood’s properties directly impact the contrast and detail of the final engraving.
- Image Preparation is Non-Negotiable: A high-quality engraving starts with a well-prepared digital file. This involves converting the image to grayscale, adjusting brightness and contrast for a full tonal range, applying a subtle sharpen, and using a dithering algorithm to simulate shades of gray.
- Test Grids Are Essential: There are no universal laser settings. Always run a material test grid on a scrap piece of the same wood to find the perfect balance of power, speed, and DPI for your specific machine and material before engraving your final piece.
Table of Contents
- Choosing the Best Wood for Photo Engraving
- How to Prepare Your Photo for Laser Engraving
- Perfecting Your Laser Engraving Settings
- Conclusions
- Frequently Asked Questions
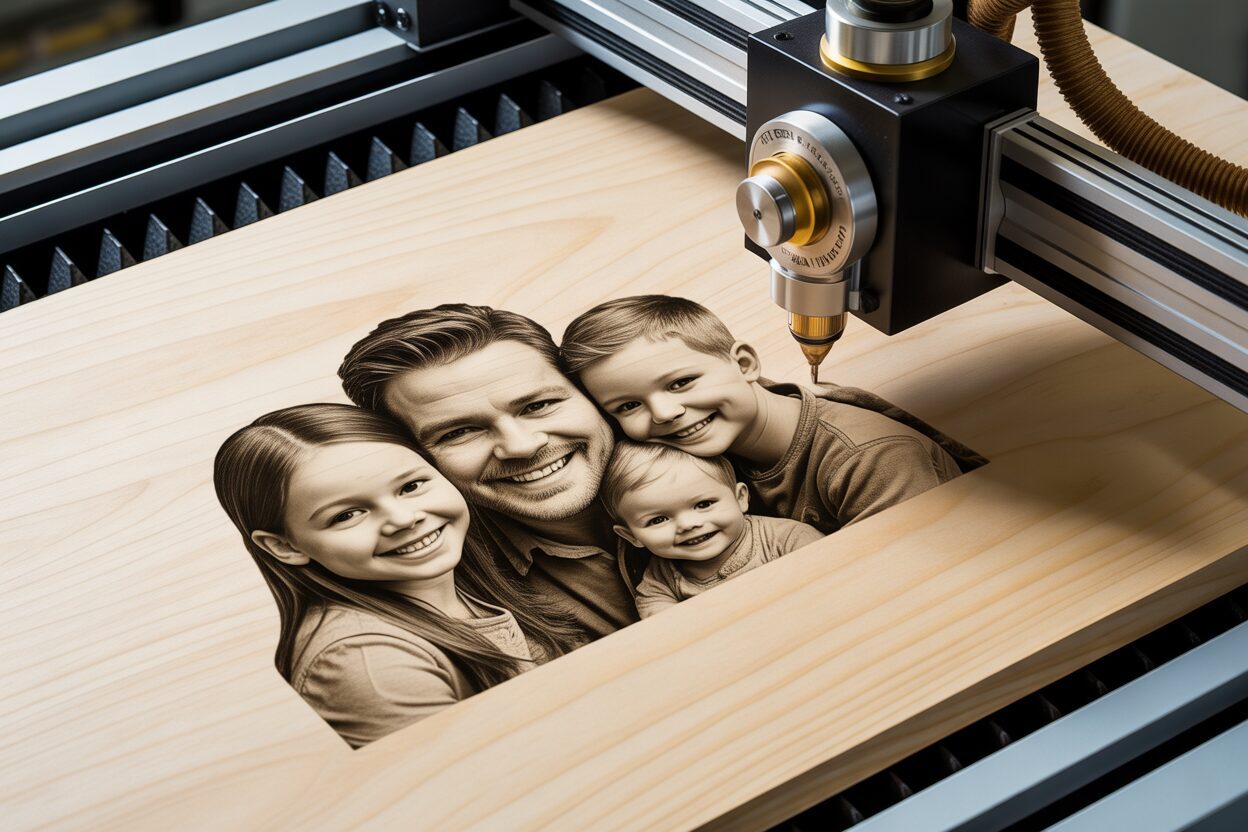
Transform your favorite memories into timeless keepsakes by learning to engrave a photo on wood. This intricate process combines technology and artistry to create stunning, personalized gifts and decor. This guide will walk you through every step, from image preparation to the final touches, ensuring you achieve professional-quality results with your laser engraver.
Choosing the Best Wood for Photo Engraving
The foundation of a breathtaking wood photo engraving is, quite literally, the wood itself. While the previous chapter detailed how to prepare your digital image for perfection, that effort can be wasted if the canvas you choose is working against you. The material is not just a passive surface; it’s an active variable that profoundly influences the final contrast, detail, and overall aesthetic of your piece. Selecting the right wood is as critical as calibrating your laser, as its inherent properties will either enhance or obscure the nuances of your photograph. The goal is to find a wood that acts like a high-quality sheet of photo paper: consistent, clean, and capable of displaying a wide range of tones.
The best woods for photo engraving share three key characteristics: a light, uniform color, a tight, minimal grain pattern, and low sap or resin content. A light-colored wood provides the highest possible contrast, allowing the dark, burned-in details of your photo to stand out sharply against the un-lasered background. Woods with a tight, straight, and unobtrusive grain are paramount. A prominent, swirling, or dark grain pattern acts as visual noise, competing with the details of your photograph. It can create distracting lines across a person’s face or make subtle shadows disappear entirely. Finally, woods with low resin content engrave more predictably. Resinous woods, like pine, have pockets of sap that burn hotter and darker than the surrounding wood, resulting in blotchy, uneven spots that disrupt the photo’s tonal consistency.
Recommended Woods for Photo Engraving
When selecting your material, certain species consistently deliver superior results. Here are three of the most reliable choices for photo engraving, along with their respective strengths and weaknesses:
- Basswood: (The Professional’s Choice) Basswood is often considered the gold standard for detailed engraving work. Its extremely light, almost white color provides maximum contrast, making it ideal for images with delicate shading. More importantly, its grain is so fine and uniform that it’s virtually invisible, ensuring that the only details seen are the ones you engrave. Pros: Unbeatable detail and contrast, consistent results, and relatively inexpensive. Cons: It is a very soft wood, making the final product susceptible to dents and scratches if not handled carefully.
- Maple: (The Durable Beauty) Maple is another excellent light-colored option. It is a much harder and denser wood than Basswood, which results in incredibly sharp, crisp engraved lines. Its durability makes it perfect for items that will be handled, like coasters or plaques. The grain is typically fine and subtle, though some pieces can have “figure” like curl or bird’s-eye patterns that could interfere with a photo. Pros: Produces very sharp details, highly durable and premium feel. Cons: Its density requires more laser power or slower engraving speeds, and you must carefully select pieces to avoid prominent grain figuring.
- Cherry: (The Warm Classic) While slightly darker than Maple or Basswood, Cherry offers a unique, rich aesthetic. It has a beautiful, warm reddish hue and a very smooth, fine grain that engraves cleanly. The contrast is softer than on Basswood, but the result is a warm, classic look that is highly sought after. A unique characteristic of Cherry is that it darkens over time with exposure to light, developing a rich patina that can further enhance the engraved image. Pros: Beautiful, warm color; engraves with excellent detail; ages beautifully. Cons: Lower initial contrast compared to lighter woods; it is generally more expensive.
Beyond the Species: Grain and Resin Nuances
Understanding why grain and sap affect the engraving process will help you make better choices. A tree’s grain is composed of annual growth rings, with the lighter, less dense “earlywood” from spring growth and the darker, denser “latewood” from summer growth. Your laser will burn these two densities differently. Even with the same power setting, the laser will burn the less dense earlywood more deeply and darkly than the denser latewood. On a wood with a prominent grain, this creates an unintended banding effect that is completely independent of your photo’s data, disrupting the image’s integrity. This is why a wood with minimal variation in density, like Basswood, is ideal. Similarly, high resin or sap content in woods like pine acts as a fuel. When the laser hits a pocket of resin, it ignites, creating a much darker and deeper burn than intended. This unpredictability makes high-resin woods entirely unsuitable for the controlled shading required for photo-realism.
How to Prepare Your Photo for Laser Engraving
A laser engraver is not a simple printer; it cannot interpret a standard color photograph and magically reproduce it. Instead, it translates shades of gray into varying levels of laser power. Therefore, preparing your digital image file is arguably the most critical hands-on step in the entire process. The principle of “garbage in, garbage out” applies perfectly here. Starting with a high-resolution image that has good lighting and clear contrast between the subject and background is non-negotiable. A blurry, poorly lit photo will only result in a muddy, indistinct engraving, no matter how perfectly you tune your laser settings. This preparation stage is where you take a good photo and transform it into an optimal blueprint for the laser to follow.
The conversion process from a standard photo to a laser-ready file involves several key steps, which can be accomplished using dedicated graphic design software like GIMP or Photoshop, or often directly within your laser control software like LightBurn, which has powerful built-in image processing tools.
- Crop and Resize: The first step is to frame your image. Crop out any unnecessary background noise to focus attention on the main subject. Once cropped, resize the image to the exact physical dimensions of your final engraving. During this step, set the resolution, measured in Dots Per Inch (DPI). For most wood photo engravings, a resolution between 250 and 300 DPI provides a great balance of detail and engraving time. A higher DPI isn’t always better, as it can cause the laser burns to overlap, resulting in a darker, less detailed image.
- Convert to Grayscale: Since the laser works with power levels, not colors, you must convert your image to grayscale (black and white). This step removes all color information, leaving only the luminance values—the lightness and darkness of each pixel. This gives you a true representation of what you are asking the laser to engrave and allows you to make more accurate adjustments.
- Adjust Brightness, Contrast, and Levels: This is the most artistic part of the preparation. Standard photos often have a compressed range of tones, especially in the mid-grays. For engraving, you want a full range of tones from pure white (which will not be engraved) to solid black (which will receive the most power). Use the Levels or Curves tool in your software to adjust the tonal range. A common technique is to slightly “clip” the blacks and whites—meaning you make the very darkest parts of the image pure black and the very lightest parts pure white. This creates strong anchor points for contrast. Then, adjust the mid-tones to bring out details in the subject that might otherwise be lost.
- Apply a Sharpening Filter: A subtle sharpening can make a significant difference. Use a tool like an “Unsharp Mask” to slightly enhance the edges within your photo. This creates crisper lines that help the details stand out after engraving. Be careful not to over-sharpen, which can create an unnatural “halo” effect around objects.
The Crucial Role of Dithering
After editing, the final step before sending the file to the laser is converting the grayscale image into a format the laser can execute. A laser can only do two things at any given point: turn on or turn off. It cannot create a “true” shade of gray. To simulate these tones, the software uses a process called dithering. Dithering uses patterns of tiny black dots to create the illusion of different shades of gray, much like the photographs in a newspaper. The density of the dots in a given area determines how light or dark it appears. Your laser software will offer several dithering algorithms, with Jarvis and Stucki being two of the most popular for photos. Jarvis dithering tends to produce smoother, more photographic results, making it an excellent starting point for portraits. Stucki often produces a slightly sharper, more contrasted result. The choice of dithering algorithm is a critical final touch that directly translates your carefully edited grayscale image into the on-off commands that will burn your stunning photo into the wood.
Perfecting Your Laser Engraving Settings
With your digital image meticulously prepared, the next step is to translate that file into a physical object by dialing in the correct laser settings. This is where the digital plan meets the physical medium. Think of your laser settings—Power, Speed, DPI, and Focus—as the fundamental variables that control the darkness, detail, and clarity of your engraving. They are interconnected, and a small change in one can dramatically alter the final result. Achieving the perfect balance is a process of understanding and testing, turning a technical exercise into an art form. There is no single “magic number” for all projects; these settings must be tuned for your specific laser, wood type, and desired outcome.
The core of photo engraving lies in the interplay between power and speed.
- Power: This setting controls the energy output of the laser beam. For photo engraving, you will typically use a variable power mode (often called Grayscale). Instead of a single power setting, you define a range, for example, from 0% power (for pure white in the image) to 70% power (for pure black). The laser software then modulates the power within this range based on the shade of gray of each pixel. The key is to find a maximum power setting that produces a rich, dark brown color without charring the wood into a deep black, which destroys detail and creates excess soot.
- Speed: This determines how quickly the laser head moves across the wood. Speed has an inverse relationship with power’s effect: the slower the speed, the longer the laser lingers on a single spot, resulting in a darker burn. For photos, a moderate to high speed is usually preferred. This allows for finer control over the shading, as the laser can make quick adjustments to its power output to create subtle gradients. Engraving too slowly can lead to over-burning and a loss of delicate details.
- DPI (Dots Per Inch): As discussed in the previous chapter, you set a DPI for your image file. Your laser setting, often called Line Interval or Scan Gap, must correspond to this. DPI determines how many lines the laser will engrave per inch. A higher DPI (like 300) creates more lines packed closely together, yielding higher detail but also increasing engraving time and the risk of heat buildup and over-burning. A lower DPI (like 250) is faster and can sometimes produce better results on softer woods by preventing the burns from bleeding into one another.
- Focus: This is a simple but absolutely critical setting. The laser beam is cone-shaped, and it is at its finest, most powerful point at a specific distance from the lens. An improperly focused laser will produce a wider, less-defined beam, resulting in fuzzy, blurry details, completely negating all your careful image preparation. Always use your machine’s focusing tool or gauge before every single engraving to ensure the laser is perfectly focused on the surface of the wood.
The Indispensable Test Engraving
Before you commit your final, prepared piece of wood, you must run tests. The most effective way to dial in your settings is by using a material test grid, a feature available in most laser software like LightBurn. This grid allows you to engrave a series of small squares at varying combinations of speed and power. By examining the grid, you can pinpoint the exact combination that produces the best tonal range for your specific wood—from a light tan to a dark brown, without any deep, ashy charring. This five-minute test will save you from wasting valuable material and countless hours of frustration.
Here is a very rough starting point for a material test on 3mm Basswood. Always perform your own test grid, as every machine and piece of wood is slightly different.
Sample Starting Settings for 3mm Basswood Photo Engraving
| Laser Type | Speed | Max Power | DPI / Line Interval |
|---|---|---|---|
| 10W Diode Laser | 3000 mm/min | 80% | 300 (0.085mm) |
| 60W CO2 Laser | 350 mm/s | 25% | 300 (0.085mm) |
*Note: For grayscale photo engraving, Min Power is typically set to 0%.
Conclusions
You now have the knowledge to successfully engrave a photo on wood, creating beautiful and lasting mementos. By carefully selecting your materials, preparing your image, and dialing in your settings, you can produce incredible results. Embrace the craft, experiment with different photos and woods, and start creating your own personalized masterpieces today.
Frequently Asked Questions
Q: What are the best types of wood for engraving photos?
A: The best woods are light-colored with a tight, uniform grain and low sap content. Top recommendations include Basswood for its maximum contrast and fine detail, Maple for its durability and crisp lines, and Cherry for a rich, warm aesthetic that ages beautifully.
Q: Why is it necessary to convert my photo to grayscale before engraving?
A: A laser engraver doesn’t see colors; it interprets shades of gray as different power levels. Converting to grayscale removes all color data, leaving only the luminance values (lightness and darkness). This gives you an accurate preview of the engraving and allows you to precisely adjust the tonal range for the best results.
Q: What is dithering, and which type should I use?
A: Dithering is a process that uses patterns of tiny black dots to simulate shades of gray, as a laser can only be either on or off. This creates the illusion of a continuous-tone image. The Jarvis dithering algorithm is highly recommended for photos and portraits as it tends to produce smoother, more photographic results.
Q: Do I really need to run a test engraving every time?
A: Yes, absolutely. Running a material test grid is a critical step. It allows you to find the ideal combination of power and speed for your specific piece of wood and laser machine. This quick test prevents wasting your final material and ensures you achieve the best possible tonal range, from light tans to dark browns, without charring.

Subscribe to Our Newsletter
And enjoy FREE Download Files, SALE Alerts and Inspiring TIPS
Pricing Your Laser Engraving Work for Profitability
A Comprehensive Guide to Pricing Your Laser Engraving Services
A Comprehensive Guide on How to Price Laser Engraving Services
Charcuterie Board Engraving File – Wine & Grapes 3D Illusion…
$4.00Original price was: $4.00.$3.00Current price is: $3.00.(25% off)
Bee and Honey Jar Charcuterie Board Engraving File | PNG Download #007…
$4.00Original price was: $4.00.$3.20Current price is: $3.20.(20% off)
Valentine Love Captions: 6 Charcuterie Board Engraving Files…
$8.00Original price was: $8.00.$5.60Current price is: $5.60.(30% off)
American Eagle Flag Laser Engraving File for Charcuterie & Cutting…
$4.00Original price was: $4.00.$2.80Current price is: $2.80.(30% off)