

 Français
 Deutsch
 Español
 Italiano
A Guide to Crafting the Perfect Personalized Charcuterie Board
Aug
Estimated reading time: 8 minutes
Key Takeaways
- Select the Right Wood: Always use a closed-grain hardwood like Maple, Cherry, or Walnut for your charcuterie board. These woods are dense, durable, and hygienic, preventing bacteria from getting trapped. Avoid porous open-grain woods (like Oak) and all softwoods (like Pine).
- Prepare Your Design and Surface: Use a scalable vector file (SVG) for a crisp engraving. Before engraving, apply a layer of transfer tape or painter’s mask over the wood to prevent smoke staining and ensure clean lines.
- Test Your Laser Settings: Never engrave your final piece without first running a test grid on a scrap piece of the exact same wood. This allows you to dial in the perfect combination of power, speed, and DPI for your desired result.
- Finish with a Food-Safe Sealant: The final step is crucial for safety and durability. Apply a food-safe finish like mineral oil, a beeswax blend, or a specialized board cream to protect the wood and make it safe for contact with food. Never use varnish, lacquer, or polyurethane.
Table of Contents
Discover how to transform a simple piece of wood into a stunning, personalized charcuterie board. This guide will walk you through every step, from choosing the right materials and design files to the final food-safe finishing touches. Perfect for creating unique gifts or a beautiful addition to your own kitchen, let’s start crafting a functional work of art.
Interested in more Charcuterie Board? Check out our Charcuterie Board laser file designs: Click here!
Choosing the Best Wood for Your Board
The foundation of any stunning and long-lasting engraved wood charcuterie board is the wood itself. Your choice impacts not only the final aesthetic and the quality of the laser engraving but, most importantly, its safety for serving food. The single most critical factor is selecting a closed-grain hardwood. Closed-grain woods have very small, dense pores that are not visible to the naked eye. This tight grain structure prevents bacteria, moisture, and food particles from getting trapped within the wood, making the board easier to clean and significantly more hygienic. This is a non-negotiable feature for any surface that will have direct contact with food.
Recommended Hardwoods for Charcuterie Boards
When selecting your material, three domestic hardwoods consistently stand out for their beauty, durability, and food-safe properties. They are the gold standard for creating functional works of art with your laser cutter.
- Maple: Specifically Hard Maple (Acer saccharum), is the quintessential choice for cutting boards and charcuterie boards. It’s incredibly durable, dense, and has a very fine, uniform grain. Its light, creamy color provides a high-contrast canvas, making laser engravings appear crisp, dark, and exceptionally detailed. Maple is tough enough to resist knife marks better than other woods, ensuring your engraved design remains the star of the show for years to come.
- Cherry: Known for its warm, reddish-brown hue, Cherry adds a touch of elegance and richness. While slightly softer than hard maple, it is still very durable and perfectly suitable for a serving board. Its smooth, satiny texture and fine grain engrave beautifully, producing a deep, tone-on-tone marking that darkens with the wood as it ages. A board made from cherry will develop a beautiful patina over time, deepening in color with exposure to light.
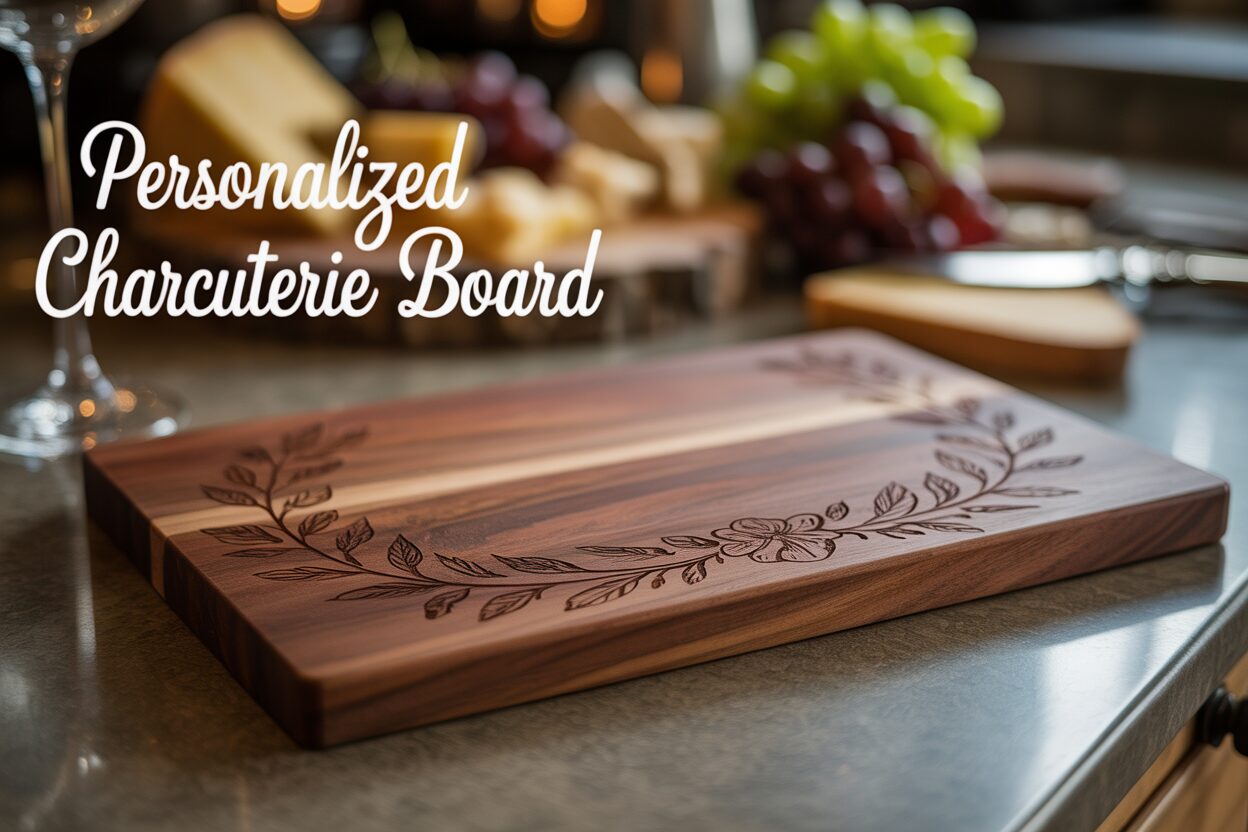
- Walnut: For a luxurious and dramatic look, Walnut is an unbeatable option. Its deep, chocolate-brown colors, often highlighted with lighter sapwood streaks, create a stunning backdrop for cheeses and fruits. The laser engraving on walnut is more subtle and sophisticated than on maple, often resulting in a dark, clean mark that is just a few shades darker than the surrounding wood. This creates a high-end, elegant aesthetic. Despite its premium look, walnut is a durable hardwood that holds up well to use.
Woods to Steer Clear Of
Just as important as knowing which woods to use is knowing which to avoid. Using the wrong type of wood can lead to a board that is unsafe, difficult to maintain, or simply doesn’t last.
- Open-Grained Woods: Woods like Red Oak and Ash have large, porous grains. These pores are notorious for trapping food particles and bacteria, making them nearly impossible to sanitize properly. They can also absorb moisture and odors, leading to a smelly, stained, and unhygienic board. While beautiful for furniture, they are a poor choice for food surfaces.
- Softwoods: Avoid all softwoods, such as Pine, Fir, Cedar, and Spruce. They are not dense enough to withstand regular use and will easily scratch and dent. Furthermore, many softwoods, particularly pine, contain resinous sap that can impart a strong, unpleasant flavor to your food.
- Exotic or Potentially Toxic Woods: Be cautious with exotic woods unless you can verify their food-safe properties. Many tropical woods contain toxins or oils that can cause allergic reactions or leach into food. It is always best to stick with trusted domestic hardwoods known for their culinary applications.
When sourcing your wood, look for quality blanks from a local lumberyard or a reputable online supplier specializing in hardwoods for culinary use. Ask for kiln-dried, unsurfaced (if you can mill it yourself) or S4S (surfaced on four sides) stock. Ensure the board is perfectly flat, as any warping will cause inconsistencies in the laser’s focus and result in a blurry or uneven engraving. Selecting a board free from large knots or cracks will give you a clean, uninterrupted canvas for your design.
Designing Your Custom Engraving
With your perfect wooden canvas chosen, it’s time to infuse it with personality. The design phase is where a simple piece of wood transforms into a cherished, one-of-a-kind custom charcuterie board. Whether you’re aiming for minimalist elegance or an intricate centerpiece, a thoughtful approach to design is crucial for a professional result. Your first decision is whether to create a design from scratch or start with a pre-made file. For those looking for a quick and beautiful result, countless marketplaces offer downloadable files specifically for this purpose. When searching, using a term like charcuterie board svg will yield thousands of options. SVG (Scalable Vector Graphic) is the ideal format because it can be resized to any dimension without losing quality, ensuring your lines remain perfectly crisp for the laser. These files often include elegant monograms, kitchen-themed quotes, or decorative frames that you can easily customize with a family name or special date.
Choosing Your Design Software
Whether you’re creating a design from the ground up or simply modifying a pre-made file, you’ll need the right software. The options range from professional-grade applications to user-friendly, free alternatives.
- Vector Graphics Editors: For maximum control, professional software like Adobe Illustrator or CorelDRAW are the industry standards. They provide powerful tools for drawing custom shapes, manipulating text, and preparing complex files for laser engraving. For those on a budget, Inkscape is a fantastic and free open-source alternative with a similar professional-level feature set. Affinity Designer is another excellent, low-cost option that is gaining popularity.
- Laser Control Software: Many laser cutters come with their own software, like LightBurn or the Glowforge UI, which often include basic design capabilities. These are perfect for simple tasks like typing out a name in a chosen font, arranging pre-made design elements, or creating basic geometric shapes directly within the interface you’ll use to run the laser.
Mastering Composition and Placement
The placement and scale of your design are just as important as the design itself. A poorly placed engraving can make a beautiful engraved charcuterie board look awkward and unbalanced. Before you even turn on the laser, take time to consider the board’s unique characteristics. Consider the overall shape—a long, rectangular board might suit a design running along the handle or a corner, while a round board often looks best with a central monogram or a wreath-style design around the edge. A key consideration is how the board will be used. Do you want the engraving to be the star, or a subtle accent? A large central engraving is dramatic but will likely be covered by food when the board is in use. Placing a design in a corner or near the handle ensures it remains visible even when the board is laden with delicious treats. Always measure your board and create a digital template in your software. Place your design on this template to visualize its size and position accurately. As a final check, print your design on paper at a 1:1 scale and place it on the physical board. This simple step allows you to see exactly how it will look and make any necessary adjustments before committing to the permanent engraving.
The Laser Engraving Process
With your design finalized, you are ready to bring it to life on the wood. This stage is where precision and preparation pay off, transforming a digital file into a permanent, tactile feature on your engraved charcuterie board. Before placing your board in the laser cutter, proper surface preparation is essential for a clean, professional result. If your board is not perfectly smooth, give it a final light sanding with a high-grit sandpaper (220-grit or higher) and wipe it clean with a tack cloth or a slightly damp rag to remove all dust. The most valuable preparation step, however, is to apply a layer of transfer tape or low-tack painter’s mask over the entire engraving area. This mask acts as a protective shield, preventing smoke and wood resins from staining the surface of the wood around your design—a common issue known as scorching. It will burn away cleanly where the laser hits but protect the surrounding areas, making cleanup dramatically easier and ensuring crisp, sharp edges.
Dialing In Your Laser Settings
There is no universal “magic number” for laser settings; they vary based on your specific laser’s wattage, the type of wood, and its thickness. Therefore, conducting a test run is not just recommended, it is a critical step. Always use a scrap piece of the exact same wood from your project to perform a test grid. A test grid engraves a series of small squares at different combinations of speed and power, allowing you to visually identify the settings that produce your desired effect.
- Power: This setting controls the intensity of the laser beam. Higher power results in a deeper and darker burn. For dense hardwoods like maple, you will likely need higher power to achieve a dark, high-contrast mark. For darker woods like walnut, less power is often needed to avoid creating an overly deep engraving.
- Speed: This dictates how quickly the laser head moves across the wood. Slower speeds allow the laser to dwell on one spot for longer, resulting in a deeper, darker mark similar to increasing power. The interplay between speed and power is key: a fast speed with high power can produce a similar result to a slow speed with low power. Testing will help you find the balance that minimizes charring while achieving the right depth.
- DPI (Dots Per Inch) / LPI (Lines Per Inch): This determines the resolution of your engraving. A higher DPI will create a more detailed and darker image by placing the engraved lines closer together. However, a very high DPI can also increase heat buildup and charring, potentially muddying fine details. For most wood engraving, a DPI between 250 and 400 is an excellent starting point.
Once you’ve identified your ideal settings from the test grid, secure your masked charcuterie board in the laser bed, ensuring it is perfectly level. Use a jig or heavy weights to prevent it from moving. Set the laser’s focus precisely to the surface of the masked board. Double-check that your design is positioned correctly in the laser software, then run the job. When the engraving is complete, leave the board in place for a minute to allow the smoke to clear. Remove the board and, while the mask is still on, use a brush or compressed air to remove any loose char. Finally, peel away the masking tape to reveal your clean, sharp, and beautifully engraved design.
Applying a Food-Safe Finish
The laser engraving process is complete, and the intricate details of your design are now permanently etched into the wood. However, the project is not finished yet. The final, and arguably most important, step is to apply a finish. This is not merely for aesthetic purposes; it is a critical measure to protect the wood, enrich its natural color, and ensure your personalized charcuterie board is hygienic and durable. Sealing the wood prevents it from drying out and cracking, while also creating a barrier that resists moisture and food stains. Crucially, you must use a food safe wood finish. Finishes like lacquers, varnishes, or polyurethane are toxic and absolutely unsuitable for a surface that will come into direct contact with food. Stick to natural, non-toxic options designed specifically for culinary use.
Choosing Your Food-Safe Finish
There are several excellent, readily available options for finishing your board. Each offers slightly different benefits, but all are safe and effective.
- Food-Grade Mineral Oil: This is the most common and straightforward choice. Mineral oil is an inert, non-drying oil that soaks deep into the wood fibers, hydrating and protecting them from within. It is inexpensive, easy to apply, and brings out the natural depth and color of the wood. Look specifically for “food-grade” or “white” mineral oil, which is purified and safe for consumption. Do not use vegetable or olive oil, as they will go rancid over time, creating an unpleasant smell and taste.
- Beeswax: Often used in conjunction with mineral oil, beeswax adds a layer of protection on top of the wood’s surface. While mineral oil penetrates, beeswax seals. It provides a greater degree of water resistance and gives the board a soft, satin luster. You can apply it after oiling the board or use a pre-made mixture.
- Specialized Board Creams: The most convenient option is often a product marketed as “cutting board cream” or “wood conditioner.” These products are typically a blend of food-grade mineral oil and waxes (like beeswax and carnauba wax). They offer the dual benefit of penetrating the wood and sealing its surface in a single application, making the process simple and effective.
Application and Long-Term Care
Proper application and maintenance will keep your board looking its best for years. Start by giving the entire board, including the engraved area, a final inspection. If there’s any slight roughness, a quick hand-sanding with 320-grit or 400-grit sandpaper will make it perfectly smooth. Wipe away all dust with a clean, lint-free cloth. Generously apply your chosen oil or cream, using the cloth to work it into the wood in the direction of the grain. Be sure to coat every surface, including the edges and the engraved design itself. The wood, especially on its first conditioning, will be very thirsty. Let the finish soak in for at least four to six hours, or ideally, overnight. The next day, use a new clean cloth to wipe off any and all excess oil. You don’t want a sticky or oily surface. Buff the board vigorously until it feels smooth and dry to the touch. To maintain your board, hand wash it with mild soap and warm water, and dry it immediately. Never put it in the dishwasher. When the wood starts to look dull or dry, simply repeat the finishing process to restore its protection and beauty.
Conclusions
You now have the knowledge to create a beautiful and functional personalized charcuterie board. By carefully selecting your wood, preparing your design, and applying a food-safe finish, you can craft a lasting piece that’s perfect for gifting or personal use. Get creative with your laser engraver and enjoy the satisfying process of making something truly unique.
Frequently Asked Questions
Q: Can I use olive oil to finish my charcuterie board?
A: No, you should not use cooking oils like olive or vegetable oil. They will go rancid over time, creating an unpleasant smell and taste. Stick to food-grade mineral oil or specialized board conditioners that are designed to protect the wood without spoiling.
Q: Why can’t I use a wood like Oak for my board?
A: Oak is an open-grained wood. Its large, visible pores can easily trap food particles and bacteria, making the board difficult to clean and potentially unhygienic for surfaces that have direct contact with food. Always choose a closed-grain hardwood like Maple, Cherry, or Walnut.
Q: What’s the best file format for a laser engraving design?
A: The ideal format is SVG (Scalable Vector Graphic). SVGs can be resized to any dimension without losing quality, which ensures the laser engraves crisp, clean lines for a professional finish. Raster files like JPEGs or PNGs can also work but may not produce as sharp a result.
Q: Do I really need to do a test run before engraving my board?
A: Yes, a test run is a critical and non-negotiable step. Laser settings vary greatly depending on the laser’s wattage and the specific density and thickness of the wood. A test grid on a scrap piece of the same wood is the only way to find the perfect power and speed settings for a clean, dark engraving without excessive charring.

Subscribe to Our Newsletter
And enjoy FREE Download Files, SALE Alerts and Inspiring TIPS
Pricing Your Laser Engraving Work for Profitability
A Comprehensive Guide to Pricing Your Laser Engraving Services
A Comprehensive Guide on How to Price Laser Engraving Services
Charcuterie Board Engraving File – Wine & Grapes 3D Illusion…
$4.00Original price was: $4.00.$3.00Current price is: $3.00.(25% off)
Bee and Honey Jar Charcuterie Board Engraving File | PNG Download #007…
$4.00Original price was: $4.00.$3.20Current price is: $3.20.(20% off)
Valentine Love Captions: 6 Charcuterie Board Engraving Files…
$8.00Original price was: $8.00.$5.60Current price is: $5.60.(30% off)
American Eagle Flag Laser Engraving File for Charcuterie & Cutting…
$4.00Original price was: $4.00.$2.80Current price is: $2.80.(30% off)