

 Français
 Deutsch
 Español
 Italiano
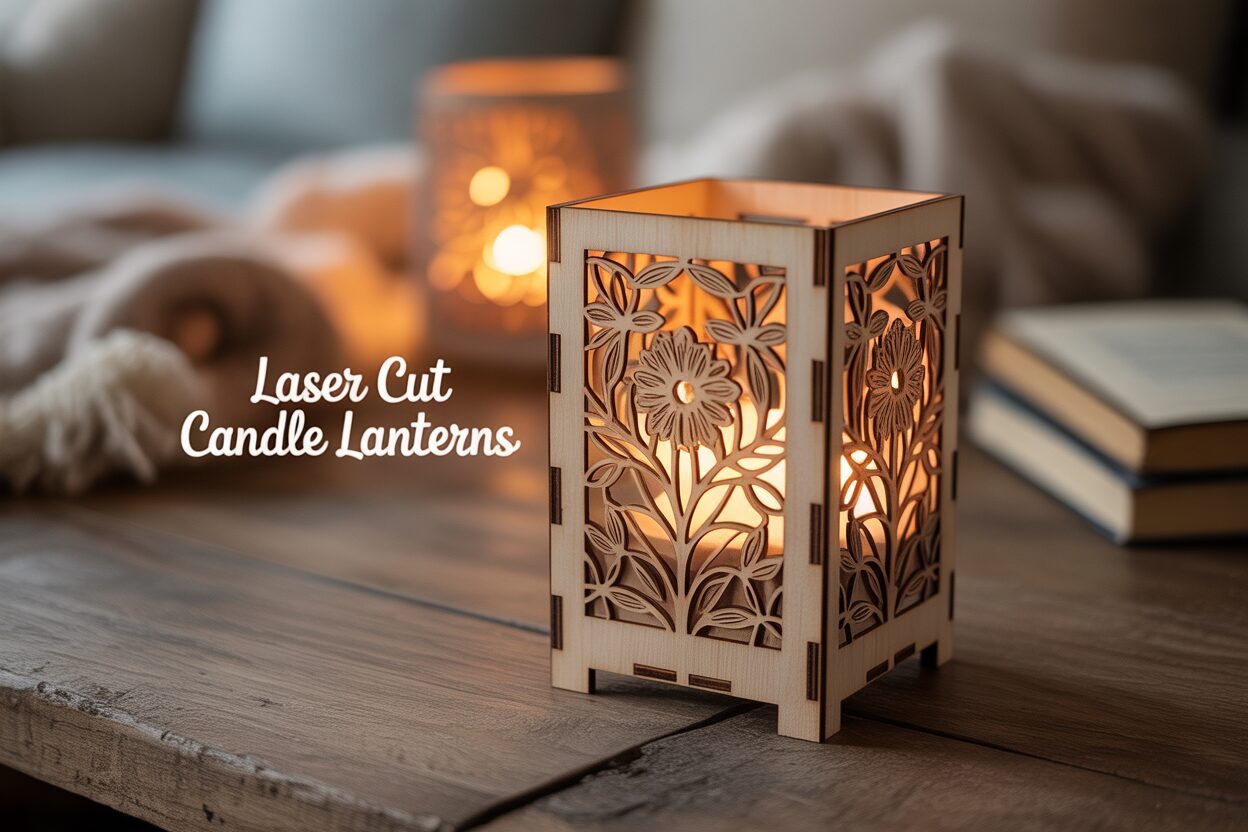
A Guide to Crafting Luminous Laser Cut Candle Lanterns
Oct
Estimated reading time: 8 minutes
Key Takeaways
- Design and Material are Key: Start with a high-quality wood lantern svg file. Choose between birch plywood for its strength and natural look or MDF for its smooth, paintable surface, matching the material to your design’s complexity.
- Preparation Prevents Problems: Before cutting, always clean your laser’s optics, perfectly focus the beam, and run a test cut on a scrap piece of your chosen material to dial in the ideal power and speed settings.
- Assembly Requires Patience: Perform a ‘dry fit’ before gluing to ensure all pieces align. Use wood glue sparingly and consider adding a vellum or frosted acrylic diffuser to soften the light.
- Safety First: Never use a real flame or wax candle in a wooden lantern. Always use a battery-operated LED candle to prevent fire hazards and safely enjoy your creation.
Table of Contents
- Choosing Your Lantern Design and Materials
- Preparing Your Laser Cutter and Software
- Assembling and Finishing Your Lantern
- Conclusions
- Frequently Asked Questions
Discover the enchanting world of laser cutting with our detailed guide to creating beautiful wooden candle lanterns. This tutorial will walk you through the entire process, from selecting the perfect design and materials to assembling your finished piece. Whether you’re a seasoned maker or new to the craft, you’ll find all the inspiration and guidance you need to get started on your next project.
Choosing Your Lantern Design and Materials
The journey to your luminous lantern begins with two fundamental choices: the design that will shape the light and the materials that will give it form. These decisions are intertwined, as the complexity of your chosen pattern will influence the best material to use, and vice versa. Taking the time to consider these elements carefully will ensure your final creation is not only beautiful but also structurally sound.
Selecting a Design That Speaks to You
The soul of your lantern lies in its design. The intricate cutouts are what will transform a simple box into a captivating art piece, casting mesmerizing patterns of light and shadow. The digital blueprint for this is a high-quality wood lantern svg file. An SVG (Scalable Vector Graphic) is the ideal format for laser cutting, as it contains precise paths the laser will follow, ensuring clean, sharp lines regardless of the project’s scale. When selecting your SVG, consider the aesthetic you wish to achieve:
- Geometric Patterns: Featuring clean lines, repeating shapes, and symmetrical motifs, geometric designs lend a modern and sophisticated air. They create bold, defined shadows and are an excellent choice for contemporary or minimalist decor. For beginners, a simpler geometric pattern is often more forgiving and results in a sturdy final product.
- Organic and Floral Designs: If you prefer a softer, more romantic feel, look for patterns inspired by nature. Intricate designs with flowing vines, delicate flowers, or swirling leaves cast a gentle, whimsical glow. These designs can be more challenging to cut and assemble due to their fine details, so ensure your chosen wood can handle such intricacy.
- Thematic and Narrative Scenes: Personalize your lantern with a design that tells a story. This could be a seasonal theme with snowflakes for winter, a celestial scape of stars and moons, or a serene forest scene. These thematic lanterns make wonderful gifts and can be tailored to specific holidays or events.
A well-crafted SVG file will have clean, connected lines, avoiding tiny, isolated pieces that might burn away or break off. It should also ideally specify the material thickness it was designed for, ensuring the interlocking tabs and slots fit together perfectly.
Choosing the Right Wood
While many materials can be laser cut, wood remains the classic choice for lanterns, offering warmth and natural beauty. Your two primary options will be birch plywood and MDF.
- Birch Plywood: Often considered the premier choice for laser-cut projects, birch plywood (typically 3mm or 1/8″) is strong, lightweight, and has an attractive, subtle grain. It cuts cleanly with minimal charring and holds fine detail exceptionally well. The natural wood finish is beautiful on its own, but it also takes stain or paint wonderfully. Its main downside is the potential for hidden voids or knots within the internal layers, which can create an incomplete cut.
- MDF (Medium-Density Fiberboard): MDF is a composite material made from wood fibers, resulting in a perfectly uniform sheet with no grain or knots. This consistency guarantees a smooth, predictable cut every time. It’s an excellent choice if you plan to paint your lantern, as its surface is incredibly smooth. However, MDF is heavier and less resilient than plywood, and the dust it creates during cutting is very fine. Its cut edges resemble cardboard and lack the aesthetic appeal of real wood grain.
Incorporating Diffusers for a Softer Glow
To elevate your lantern from a simple shadow caster to a source of ambient light, consider lining the inside of the panels with a diffusing material. This will soften the light from your candle, creating an ethereal glow rather than sharp patterns.
- Vellum Paper: A traditional and cost-effective choice, vellum is a translucent paper that provides a warm, soft, and classic diffusion. It is lightweight and easy to install with a bit of glue, but it is delicate and should be placed carefully to avoid direct contact with the heat source.
- Frosted Acrylic: For a more modern and durable solution, frosted acrylic is an excellent option. It offers a clean, even diffusion and is rigid enough to add structural integrity. You can even laser cut the acrylic panels using the same SVG file for a perfect fit, though this adds to the project’s cost and complexity.
Preparing Your Laser Cutter and Software
With your design chosen and materials in hand, the next step is to translate your digital vision into a physical reality. This is where precision and preparation are paramount. Properly setting up your laser cutter and software is the key to achieving crisp, clean cuts that will allow your lantern pieces to fit together seamlessly. Taking the time to calibrate your machine and dial in your settings will save you from frustration and wasted materials.
Calibrating Your Machine for a Perfect Cut
Before you even think about hitting the ‘start’ button, a quick machine check-up is in order. First, ensure your laser’s optics—the mirrors and the lens—are perfectly clean. Any dust or residue can diffuse the laser beam, reducing its cutting power and resulting in incomplete cuts or messy edges. Next, and most critically, is focusing the laser. An unfocused beam is wide and weak; a perfectly focused beam is a pinpoint of intense energy that vaporizes the material cleanly. Whether your machine has an auto-focus feature or requires manual adjustment with a focus gauge, this step is non-negotiable for achieving a thin kerf (the width of the material removed by the laser) and professional results. For cutting 3mm (1/8″) wood, a standard 2.0-inch focal length lens is an excellent all-around choice.
Preparing Your Digital Blueprint in Software
Now, it’s time to import your laser cut lantern patterns into your control software, such as LightBurn, RDWorks, or the specific interface for your machine. Once the SVG file is loaded, perform a few crucial checks:
- Verify the Scale: Ensure the design has imported at the correct size. The interlocking tabs and slots of a lantern are designed for a specific material thickness, so any accidental scaling will prevent the pieces from fitting together.
- Check for Unwanted Elements: Sometimes, SVG files contain hidden layers or double lines. Use your software’s ‘preview’ or ‘wireframe’ mode to look for lines that are stacked on top of each other. A double line will cause the laser to cut the same path twice, leading to excessive charring and a wider kerf.
- Assign Colors for Operations: A best practice is to assign different colors to different types of laser operations. For instance, make all the outlines you want to cut one color (e.g., black) and any decorative lines you want to score or engrave another color (e.g., blue). This allows you to assign different power and speed settings to each operation. Lanterns are among the most popular glowforge project ideas partly because its software simplifies this process, but the underlying principle of separating cuts from scores remains vital on all machines.
Dialing in Your Laser Settings
The final step is to determine the optimal settings for your specific material. The three main parameters are Power, Speed, and Frequency (or PPI for some machines). These settings vary wildly between different laser cutters and even between different sheets of the same wood. There is no single magic number. However, a good starting point for cutting 3mm birch plywood on a 60W CO2 laser might be around 60% power at a speed of 18mm/s. The most important rule is to always perform a test cut on a small scrap piece of the exact material you plan to use. Cut a small shape, like a one-inch square, and see if it drops out cleanly without being pushed. Examine the edge: is it light brown and clean, or dark and sooty? Adjust your power and speed accordingly—slower speed or higher power for a cut that didn’t go through, faster speed to reduce charring—until you achieve the perfect result. This small test will ensure the success of your entire project.
Assembling and Finishing Your Lantern
The hum of the laser has faded, and before you lies a sheet of wood, transformed from a simple panel into a collection of precisely cut components. This final stage is where your project truly comes to life, moving from a two-dimensional pattern to a three-dimensional object of beauty. With a little patience and attention to detail, you will assemble and finish a lantern that looks professionally crafted. The first step is to gently liberate your pieces. Carefully press them out from the main sheet. If any sections are clinging by a tiny sliver, resist the urge to force them. Instead, use a small craft knife to carefully sever the connection. Once all pieces are free, inspect them for smoke residue, a common occurrence on the surface of the wood. This can often be removed with a microfiber cloth lightly dampened with isopropyl alcohol or by gently wiping with a magic eraser. For the edges, a small, stiff brush can dislodge any cutting debris.
The Art of Assembly
Before reaching for the glue, perform a ‘dry fit’ of your lantern. This involves assembling the entire structure without any adhesive to ensure all the tabs and slots align correctly. This test run allows you to understand how the pieces interlock and identify any tight spots that might need a whisper of sanding with a small file. Once you are confident with the fit, you can begin the final assembly. Wood glue is the ideal adhesive for this task. The key to a clean result is to use it sparingly. Apply a very thin bead of glue to the inside faces of the slots or directly onto the tabs using a toothpick or a fine-tipped brush. This prevents excess glue from squeezing out and marring the surface of your lantern. As you connect the panels, use painter’s tape or small clamps to hold the structure together securely while the glue sets. If you are incorporating a diffuser like vellum paper, now is the time to attach it to the inside of each panel before you assemble the final side.
Achieving a Professional Finish
A beautiful finish not only enhances the look of your lantern but also protects the wood. Before applying any coating, lightly sand all surfaces and edges with fine-grit sandpaper (220-grit or higher) to smooth out any roughness. Be gentle, especially around the intricate cutouts. After sanding, wipe away all the dust with a clean cloth. Now you have several options:
- Natural Finish: To celebrate the natural beauty of the wood, apply a few coats of clear varnish or a polyurethane spray. This will protect the wood from moisture and dust while deepening the color and making the grain pop.
- Stained Finish: A wood stain can give your lantern a richer, darker look, from a warm oak to a deep walnut. Apply the stain according to the manufacturer’s directions and seal it with a clear topcoat once it’s dry.
- Painted Finish: For a modern or colorful aesthetic, paint is an excellent choice. Spray paint provides the most even coverage, especially for intricate designs. Apply several thin coats rather than one thick one to avoid drips and preserve the crispness of the cut edges.
Always apply your finish in a well-ventilated area and allow it to cure completely before its first use.
Finally, and most importantly, is the matter of safety. Never use a real flame or wax candle in your wooden lantern. Wood is a combustible material, and the heat from a real candle poses a significant fire hazard. Instead, use a battery-operated LED candle. These modern alternatives provide a warm, flickering glow that is indistinguishable from a real flame but is completely safe, allowing you to enjoy your creation with peace of mind. With your project complete, you now possess the skills to create an endless variety of diy laser cut wood lanterns. Don’t be afraid to experiment with different designs and explore other laser cutting materials like colored acrylic or bamboo to see how they can change the character and glow of your next luminous creation.
Conclusions
With the right materials, a creative design, and a little patience, you can craft a stunning wooden candle lantern that adds a warm, personal touch to any room. This project is a fantastic way to explore the possibilities of laser cutting and create a beautiful piece of home decor. We encourage you to experiment with different designs and materials to make a lantern that’s uniquely yours.
Frequently Asked Questions
Q: What is the best wood for a beginner’s laser-cut lantern project?
A: For beginners, 3mm (1/8″) birch plywood is an excellent choice. It’s strong, cuts cleanly, and is more forgiving than MDF. Choose a design with simpler geometric patterns, as they are easier to assemble and result in a sturdier final product.
Q: Can I use a real candle in my wooden lantern?
A: No, you should never use a real flame or wax candle in a wooden lantern. Wood is flammable, and this poses a serious fire risk. Always use a battery-operated LED candle for a safe, beautiful glow.
Q: How do I clean the smoke stains off my laser-cut pieces?
A: Smoke residue can often be removed by gently wiping the surface with a microfiber cloth lightly dampened with isopropyl alcohol. A magic eraser can also be effective. For the cut edges, a small, stiff brush can help remove debris.
Q: My lantern pieces are fitting together too tightly. What should I do?
A: If your joints are too tight during the ‘dry fit’ stage, use a small file or a piece of fine-grit sandpaper to gently sand the inside edges of the slots or the sides of the tabs. Remove a very small amount of material at a time and test the fit frequently until the pieces slide together snugly but without force.

Subscribe to Our Newsletter
And enjoy FREE Download Files, SALE Alerts and Inspiring TIPS
Pricing Your Laser Engraving Work for Profitability
A Comprehensive Guide to Pricing Your Laser Engraving Services
A Comprehensive Guide on How to Price Laser Engraving Services
Charcuterie Board Engraving File – Wine & Grapes 3D Illusion…
$4.00Original price was: $4.00.$3.00Current price is: $3.00.(25% off)
Bee and Honey Jar Charcuterie Board Engraving File | PNG Download #007…
$4.00Original price was: $4.00.$3.20Current price is: $3.20.(20% off)
Valentine Love Captions: 6 Charcuterie Board Engraving Files…
$8.00Original price was: $8.00.$5.60Current price is: $5.60.(30% off)
American Eagle Flag Laser Engraving File for Charcuterie & Cutting…
$4.00Original price was: $4.00.$2.80Current price is: $2.80.(30% off)