

 Français
 Deutsch
 Español
 Italiano
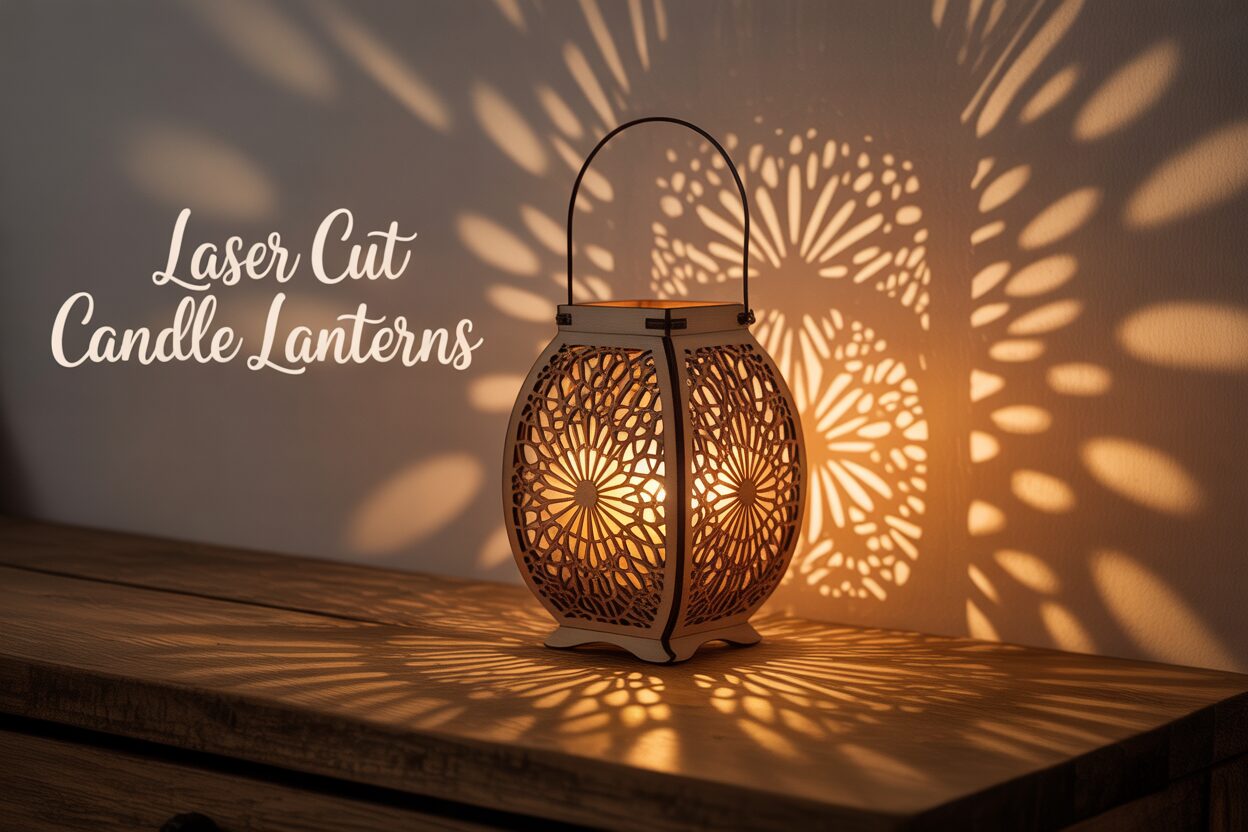
A Guide to Crafting Beautiful Laser Cut Candle Lanterns
Aug
Estimated reading time: 8 minutes
Key Takeaways
- Material Choice is Key: For best results, use 3mm (1/8 inch) Birch Plywood for a natural aesthetic or MDF for a smooth, paintable surface. This thickness is standard for most commercial designs.
- Invest in a Quality Design: Purchase a professional laser cut file from a marketplace like Etsy. A good file includes precise interlocking tabs, clear instructions, and color-coded layers for cutting, scoring, and engraving.
- Calibrate with a Test Grid: Never skip a test cut. Use a material test grid to find the optimal power and speed settings for your specific laser and material, preventing waste and ensuring clean cuts.
- Assemble with Precision: Always perform a “dry fit” before gluing to ensure everything fits. Clean the soot from cut edges and use CA (super) glue for a fast, strong bond on intricate joints.
Table of Contents
- Choosing Your Materials and Design
- Calibrating Your Laser for Perfect Cuts
- Step-by-Step Assembly and Finishing
- Conclusions
- Frequently Asked Questions (FAQ)
Dive into the world of laser crafting with this comprehensive tutorial on creating your own laser cut candle lanterns. We’ll guide you from selecting the perfect laser cut files to the final steps of assembly. This project is perfect for adding a warm, decorative touch to any space and is an excellent way to hone your laser cutting and engraving skills.
Choosing Your Materials and Design
The foundation of a stunning laser cut lantern lies in two key choices: the material you cut and the design you use. Making the right decisions here will save you time, prevent frustration, and ensure your final piece is both beautiful and structurally sound. Let’s explore the best options for your project. For wooden lanterns, the most common and beginner-friendly choices are Birch Plywood and MDF (Medium-Density Fiberboard). Birch Plywood is prized for its attractive, natural wood grain, which gives the finished lantern a rustic and warm feel. It’s relatively strong and light, making it ideal for decorative items. However, be aware that plywood quality can vary; cheaper versions may contain internal voids or knots that can result in an incomplete cut. For best results, seek out high-quality, laser-specific B/BB grade Baltic Birch. In contrast, MDF is an engineered wood product with a perfectly uniform density and a smooth surface. This consistency guarantees a clean, predictable cut every time. MDF is also the perfect canvas for painting, allowing you to customize your lantern in any color imaginable. Its main drawbacks are its plain appearance when left unfinished and the fine dust and distinct odor it produces during cutting, which requires good ventilation.
Material Thickness: The 3mm Sweet Spot
For most decorative lanterns, a material thickness of 3mm (approximately 1/8 inch) is the industry standard, and for good reason. This thickness strikes the perfect balance between structural integrity and cuttability. It’s sturdy enough to create a durable lantern that won’t easily break, yet thin enough that most hobbyist diode and CO2 lasers can cut through it cleanly in a single pass. Using thinner material, like 2mm plywood, can result in a fragile final product, while thicker materials (e.g., 6mm or 1/4 inch) require significantly more laser power or multiple slow passes, increasing the risk of charring and prolonging the cutting time. Critically, almost all commercially available lantern designs are specifically created for 3mm material, as the interlocking slots and tabs are measured precisely for this thickness.
Finding and Vetting Your Digital Blueprint
Your laser cutter is only as good as the file it’s told to cut. A high-quality digital design is paramount. While you can find free files on sites like Thingiverse, the quality can be unpredictable. For a guaranteed good experience, especially as a beginner, it’s wise to invest a few dollars in a professionally made design from marketplaces like Etsy, Design Bundles, or dedicated laser file websites. A well-crafted lantern file will have several key features:
- Precise Interlocking Tabs: The design should rely on finger joints or tabs that allow the lantern’s sides, top, and bottom to slot together snugly. A good designer has accounted for kerf—the tiny amount of material vaporized by the laser beam—to ensure these joints fit perfectly.
- Clear Instructions: Look for designs that include a PDF assembly guide, numbered parts, or even a video tutorial. This is invaluable and removes the guesswork from putting your lantern together.
- Logical File Organization: The best files come in multiple formats (SVG, DXF, AI) and often use color-coding. For example, red lines might indicate cut paths, blue lines for scoring decorative details, and black for engraving patterns.
Before you press ‘start,’ open your chosen design file in your laser software, such as LightBurn or RDWorks. First, confirm the design is scaled for your 3mm material; resizing it will alter the tab dimensions, causing assembly to fail. Next, check the color-coding. Your task is to assign the correct laser operation and settings to each color. Select all the red lines and assign your ‘cut’ parameters, select the blue lines and assign your ‘score’ settings, and so on. Finally, arrange the pieces on your virtual work area to fit your piece of wood, placing them close together to minimize material waste. This careful preparation is the final step before bringing your beautiful design to life.
Calibrating Your Laser for Perfect Cuts
With your material selected and your design file prepared, the next critical phase is calibrating your laser cutter. This process, often called “dialing in your settings,” is the difference between a box of charred, unusable pieces and a perfectly cut kit ready for assembly. Every laser, every sheet of wood, and even the ambient humidity can slightly alter the ideal settings. Therefore, you must never assume the default settings will work. The golden rule is: always perform a test cut on a scrap piece of the exact same material you’ll be using for your lantern. This small, upfront time investment will prevent costly mistakes and immense frustration. Your goal is to find the “sweet spot” for three distinct operations your lantern design will likely require: cutting, scoring, and engraving.
The Material Test Grid: Your Key to Success
The most efficient way to find your perfect settings is by creating a material test grid. Most laser software, like LightBurn, has a built-in feature for this, or you can easily find test grid files online. This grid consists of a matrix of small squares, where each square is cut or engraved with a different combination of Power and Speed. For your 3mm plywood or MDF, you would create a grid to test your cutting parameters. You’ll set a range of speeds (e.g., 10mm/s to 25mm/s) against a range of power levels (e.g., 60% to 100%). After running the test grid, examine the results. The ideal cutting setting is the one with the highest speed and lowest power that allows the square to fall out cleanly from the material with a gentle push. This combination minimizes charring on the edges and reduces cutting time. For any decorative patterns in your design, you’ll need to find the correct laser engraving settings. You’ll run a similar test grid, but this time with much higher speeds and lower power. You aren’t trying to cut through, but rather to create a mark on the surface. Look for the setting that gives you the color and depth you desire without excessive burning. Scoring, used for fine decorative lines, is a middle ground—a very fast, low-power cut that doesn’t go all the way through.
Before you press the start button on your main project, let’s talk about safety. A laser cutter is a powerful tool and must be treated with respect. Adhering to these precautions is not optional; it is essential for protecting yourself and your equipment.
- Never leave the laser unattended while it is operating. Fires can start in an instant, and you must be present to react immediately.
- Keep a C02 or ABC fire extinguisher within arm’s reach of the machine. Be sure you know how to use it.
- Ensure your ventilation system is running and is adequate for the job. The smoke produced, especially from MDF, contains harmful chemicals that should be exhausted directly outside.
- Always wear the correct safety glasses rated for your laser’s specific wavelength. The laser beam can cause permanent eye damage, even from a reflection.
Once you’ve run your tests and identified the optimal power and speed settings for cutting, engraving, and scoring, you can confidently return to your prepared lantern file in your software. Assign these proven values to the corresponding color-coded layers you set up in the previous step. With your machine calibrated and safety checks complete, you are now truly ready to begin cutting your decorative laser cut project.
Step-by-Step Assembly and Finishing
Once the hum of the laser fades, you’ll be left with a sheet of wood containing the precisely cut components of your lantern. This is where your project transitions from a digital file to a tangible work of art. The wood lantern assembly process is incredibly satisfying, but a little preparation and patience will ensure a professional result. First, carefully pop out all the cut pieces from the main sheet. Lay them out on your work surface, grouping them by type—sides, base, top, and any decorative inserts. Before you reach for the glue, perform a “dry fit.” This means assembling the entire lantern without any adhesive. This crucial step allows you to understand how the interlocking tabs work together and confirms that your laser settings produced the correct kerf for a snug fit. Follow the assembly guide provided with your design file. Typically, you will start by inserting the side panels into the slots on the base piece one by one, then carefully fitting the top structure over the tabs of the side panels.
Cleaning and Gluing for a Flawless Build
After a successful dry fit, disassemble the lantern. You’ll likely notice some dark soot or residue along the cut edges. Cleaning this now is much easier than after assembly. A simple and effective method is to use a cotton swab or microfiber cloth lightly dampened with isopropyl alcohol to wipe the edges clean. For stubborn marks, a melamine foam sponge (often sold as a “magic eraser”) works wonders. Now, you’re ready for the final assembly. For a strong, permanent bond, a quality wood glue is essential. While standard PVA wood glue (like Titebond II) is excellent, it requires clamping and time to dry. For the intricate joints of a lantern, a faster option is often better. CA (cyanoacrylate) glue, or super glue, is a fantastic choice, especially a medium-viscosity or gel formula that won’t run. Apply a very thin bead of glue to the inside faces of the slots or on the tabs themselves. A toothpick is a great tool for this precise application. Work one joint at a time, press the pieces together firmly, and hold for a few seconds. To make the process nearly instant, you can use a CA glue activator spray, which sets the bond in seconds. If using PVA glue, use painter’s tape or small rubber bands to hold the joints tightly together while the glue cures.
Finishing Techniques to Elevate Your Lantern
With your lantern fully assembled and the glue cured, you can take your DIY wooden lantern to the next level with finishing touches. A final light sanding with a fine-grit sandpaper (220 or 320 grit) will smooth any rough edges and remove any remaining glue squeeze-out, but be careful not to damage any delicate engraved details. If you used Birch Plywood and love the natural look, you can enhance it with a wood stain. Apply the stain with a clean rag, let it penetrate for a few minutes, then wipe off the excess. For a truly professional finish, applying a pre-stain wood conditioner before staining will ensure an even, blotch-free result. If you chose MDF or simply want a custom color, painting is your best option.
- Prime First: Always start with a coat of primer. A spray-on shellac-based primer is ideal as it seals the porous edges of the wood and prevents the paint from soaking in unevenly.
- Apply Thin Coats: Whether using spray paint or acrylics with a brush, apply several thin, even coats rather than one thick one. This prevents drips and preserves the fine details of your design.
- Protect Your Work: Once your stain or paint is completely dry, apply a final clear coat. A spray-on matte or satin acrylic sealer will protect the finish from dust and handling without adding too much shine, preserving the lantern’s elegant appearance for years to come.
Conclusions
You’ve now learned the essential steps to create stunning laser cut candle lanterns. By following these guidelines on settings and assembly, you can turn simple wood sheets into intricate art. We encourage you to experiment with different designs and finishes to make each DIY wooden lantern uniquely yours, transforming it into a cherished decorative laser cut project.
Frequently Asked Questions (FAQ)
Q: What is the best material for a beginner making a laser cut lantern?
A: For beginners, 3mm (or 1/8 inch) Birch Plywood and MDF are the top choices. Birch Plywood offers a beautiful, natural wood grain finish, while MDF provides a perfectly smooth surface that is ideal for painting in any color.
Q: Why don’t my lantern pieces fit together correctly?
A: The most common reason for ill-fitting parts is a mismatch between the material thickness and the design file’s specifications. Most lantern files are designed for 3mm material. Using a different thickness, or resizing the design file (which alters slot and tab dimensions), will cause assembly to fail.
Q: Do I really need to do a material test cut every time?
A: Yes, absolutely. Laser settings can be affected by the specific machine, variations between batches of wood, and even ambient humidity. A quick material test grid is the only way to guarantee you have the perfect settings for clean cuts, preventing wasted material and frustration.
Q: What is the best glue for assembling a wooden lantern?
A: For speed and ease on intricate joints, a medium-viscosity CA glue (super glue), often used with an activator spray, is excellent. For maximum strength where clamping is possible, a traditional PVA wood glue like Titebond II is a reliable choice.
Q: How can I reduce the dark, sooty burn marks on the edges?
A: Minimize charring by using the highest speed and lowest power that still cuts cleanly through your material—find this sweet spot with a test grid. After cutting, you can easily clean most residue from the edges using a cotton swab dampened with isopropyl alcohol or a melamine foam sponge.

Subscribe to Our Newsletter
And enjoy FREE Download Files, SALE Alerts and Inspiring TIPS
Pricing Your Laser Engraving Work for Profitability
A Comprehensive Guide to Pricing Your Laser Engraving Services
A Comprehensive Guide on How to Price Laser Engraving Services
Charcuterie Board Engraving File – Wine & Grapes 3D Illusion…
$4.00Original price was: $4.00.$3.00Current price is: $3.00.(25% off)
Bee and Honey Jar Charcuterie Board Engraving File | PNG Download #007…
$4.00Original price was: $4.00.$3.20Current price is: $3.20.(20% off)
Valentine Love Captions: 6 Charcuterie Board Engraving Files…
$8.00Original price was: $8.00.$5.60Current price is: $5.60.(30% off)
American Eagle Flag Laser Engraving File for Charcuterie & Cutting…
$4.00Original price was: $4.00.$2.80Current price is: $2.80.(30% off)