

 Français
 Deutsch
 Español
 Italiano
A Guide to Crafting a Personalized Charcuterie Board
Aug
Estimated reading time: 7 minutes
Key Takeaways
- Choose the Right Material: Opt for hard, closed-grain woods like maple, cherry, or walnut for durability, food safety, and excellent engraving results. Slate offers a modern, high-contrast alternative.
- Use Vector Designs: For the sharpest, cleanest engravings, always use vector file formats like SVG. They can be scaled to any size without losing quality, ensuring a professional finish.
- Test Your Settings: Before engraving your final board, always perform a test run on a scrap piece of the same material to perfect your laser’s power, speed, and resolution settings.
- Apply a Food-Safe Finish: Finishing your board with food-grade mineral oil is a critical, non-negotiable step. It protects the wood, ensures food safety, and enhances the natural beauty of the grain and the engraving.
Table of Contents
- Choosing the Best Materials for Your Board
- Designing Your Custom Engraving
- Laser Engraving and Applying a Food-Safe Finish
- Conclusions
- Frequently Asked Questions
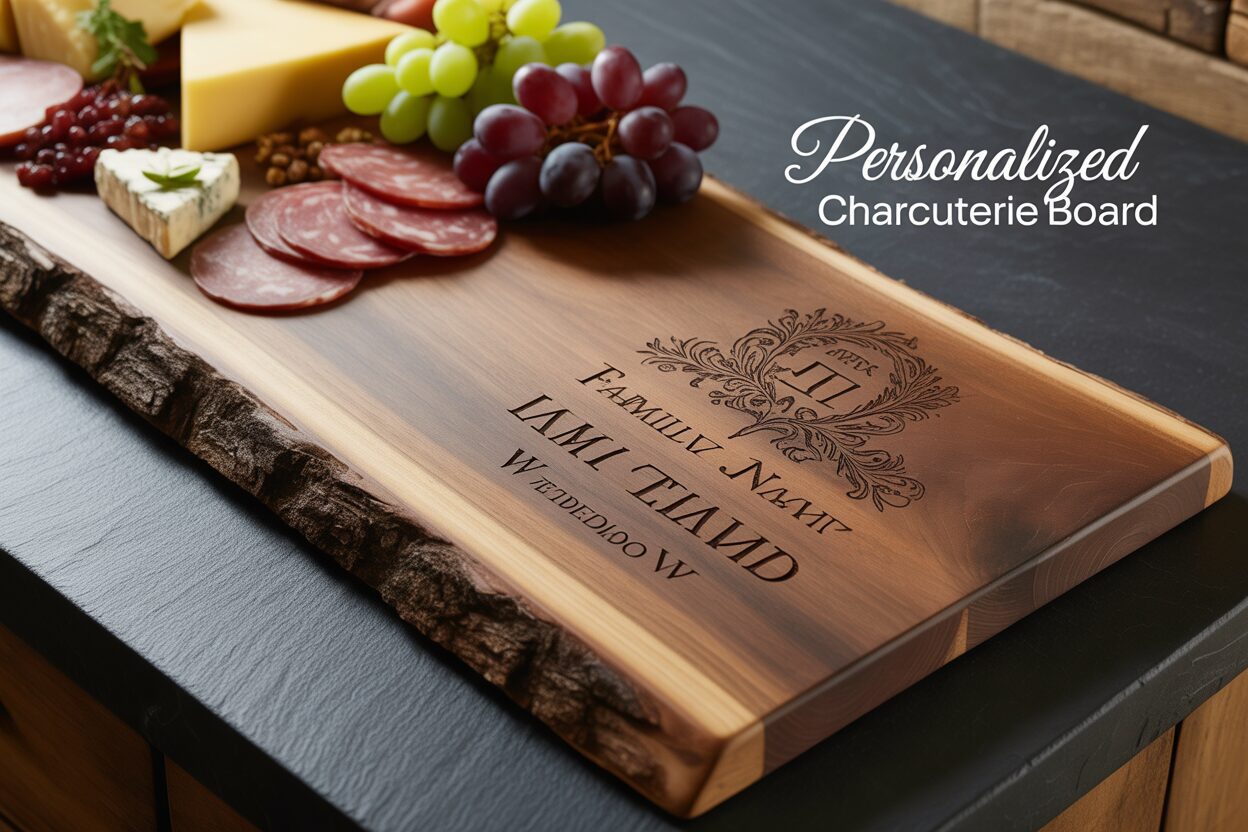
A personalized charcuterie board is more than just a serving platter; it’s a statement piece and a cherished gift. This guide will walk you through the entire process, from choosing the perfect wood to applying a food-safe finish. Whether you’re a hobbyist or a business owner, you’ll learn how to create a stunning and professional-quality engraved charcuterie board.
Choosing the Best Materials for Your Board
The foundation of any stunning charcuterie board is the material itself. Your choice will not only define the board’s aesthetic and durability but also dramatically influence how your laser-engraved design appears. When selecting wood, always opt for a hard, closed-grain species. These woods are less porous, making them more resistant to bacteria and moisture, a critical feature for food safety. They also provide a smoother, more consistent surface for laser engraving, resulting in cleaner and more detailed designs. Let’s explore some of the most popular and effective options.
Choosing Your Wood Canvas
Each type of wood offers a unique character, both in its natural state and as a canvas for your laser art. Understanding their individual properties is key to achieving your desired outcome.
- Maple: A classic and popular choice, maple is prized for its strength, durability, and creamy, light color. Its subtle, straight grain pattern provides a clean, unobtrusive background, making it the perfect canvas for intricate and detailed laser engravings. The laser creates a rich, dark burn that stands out with striking contrast against the pale wood, ensuring your design is the star of the show. While its hardness makes it very durable, it may require slightly more laser power or slower speeds to achieve a deep engraving.
- Cherry: For a warmer, more elegant look, cherry is an excellent option. It features a smooth, satin-like texture and a beautiful reddish-brown hue that deepens and grows richer over time. Laser engraving on cherry produces a beautiful, deep tone-on-tone effect that is sophisticated rather than stark. It is slightly softer than maple, which makes it easier on knives and allows the laser to engrave it with ease, but it also means it can be more susceptible to scratches.
- Walnut: If you’re aiming for a dramatic, luxurious feel, look no further than walnut. Its deep, chocolate-brown color, often accented with complex grain patterns and lighter sapwood, creates an immediate sense of quality. Engraving on walnut results in a subtle, dark-on-dark design that is understated and refined. The low-contrast result is perfect for elegant monograms or logos, but may not be ideal for designs that require high legibility from a distance.
- Acacia: Known for its stunning visual variety, acacia wood boasts dramatic, contrasting grain patterns and a wide range of colors within a single piece. This inherent character means no two acacia boards are ever alike. It is a very hard and durable wood that engraves well, but the results can be unpredictable. The laser’s burn will appear differently on the light and dark sections of the grain, which can either add to the design’s rustic charm or detract from its clarity, depending on your goal.
A special mention must be made for the live edge charcuterie board. A live edge board incorporates the natural, untouched edge of the tree from which it was cut, complete with the unique contours of the bark. This creates a beautifully rustic and organic feel, making each board a true one-of-a-kind piece. The juxtaposition of the raw, natural edge with the precision of a laser-engraved design creates a breathtaking piece of functional art. When working with a live edge, be mindful that the uneven surface near the edge may require careful leveling and focusing of your laser.
A Modern Alternative: Engraving on Slate
If you desire a more modern and minimalist aesthetic, slate is a fantastic alternative to wood. This natural stone provides a sleek, dark gray surface that serves as a dramatic backdrop for cheeses and cured meats. Unlike wood, where the laser burns away the material to create a dark mark, engraving on slate ablates the top layer, leaving a permanent, light gray or off-white mark. This process creates exceptionally high contrast, making text and fine details pop with incredible clarity. Slate is non-porous and easy to clean, and you can even write on it with chalk. However, it is more brittle than wood and can chip or break if dropped. After engraving, it’s best practice to apply a food-safe mineral oil or sealant, which will deepen the slate’s dark color and make your light-colored engraving stand out even more.
Designing Your Custom Engraving
Once you’ve selected the perfect material, the next step is to create the artwork that will transform it into a truly custom charcuterie board. The quality of your digital design is just as important as the quality of the wood or slate, as it directly dictates the final engraved result. For laser engraving, the gold standard is the vector file format. Unlike raster files (like JPEGs or PNGs) which are made of pixels and become blurry when enlarged, vector files are created using mathematical equations to define lines and curves. This means they can be scaled to any size without losing a single bit of sharpness or clarity. The most common and versatile vector format for this purpose is the SVG (Scalable Vector Graphic). Using a charcuterie board svg file ensures your laser follows a perfectly smooth path, resulting in crisp lines and flawless fills.
Inspiration for Your Design
The beauty of personalization lies in its uniqueness. Your design can be as simple or as elaborate as you wish, reflecting a specific style, person, or occasion. Here are some popular ideas to get you started:
- Monograms and Names: A classic and elegant choice. Engrave a single initial, a couple’s monogram for a wedding gift, or a full family name, often accompanied by an “Est.” date to commemorate a special year.
- Important Dates: Celebrate anniversaries, wedding dates, or the year a family moved into a new home. This transforms the board into a cherished keepsake.
- Meaningful Coordinates: Engrave the latitude and longitude of a special place—a first home, a wedding venue, or a favorite vacation spot—for a subtle and personal touch.
- Kitchen Conversions Chart: For a design that is both stylish and functional, consider engraving a handy kitchen conversions chart. This can include measurements like tablespoons to cups or ounces to grams, turning the board into a useful kitchen tool.
- Custom Graphics or Quotes: Engrave a favorite family recipe in a loved one’s handwriting, a witty kitchen-related quote, or simple line art that matches the kitchen’s decor, like botanical illustrations or geometric patterns.
Bringing Your Vision to Life
To create or modify your vector design, you’ll need the right software. For professional-level control, Adobe Illustrator is the industry standard, offering a vast array of tools. A fantastic and free alternative is Inkscape, which is a powerful open-source vector editor perfect for beginners and hobbyists. Many laser users also work directly within their laser control software. LightBurn, for instance, is not only used to operate the laser but also includes robust design and text tools, allowing you to create and lay out your entire project within a single application.
Regardless of the software you choose, pay close attention to layout and composition. Your design should enhance the board, not overpower it. Measure your board precisely and create a digital artboard of the exact same dimensions. This allows you to visualize the final scale and placement accurately. Common placement areas include the bottom corner, the center, or along the handle. For a long, rectangular board, a design that stretches along one edge can look fantastic. For a round board, a centrally located monogram or wreath design is a natural fit. Before you press start, consider creating a simple cardboard template of your board and printing your design on paper to physically test its size and position. This small step can save you from a costly mistake and ensure your final engraved piece is perfectly balanced.
Laser Engraving and Applying a Food-Safe Finish
With your design finalized, you are ready to bring it to life on the laser engraver. This stage combines technical precision with careful finishing to create a beautiful and durable engraved charcuterie board. Proper setup and testing are paramount to avoid mistakes on your final workpiece. First, securely position your board on the laser bed. Even slight movement during engraving can ruin a design, so use honeycomb pins, clamps, or heavy weights along the edges to ensure it is completely immobile. Next, set your laser’s focus precisely to the surface of the board. An incorrect focal height will result in a blurry, weak engraving. Most importantly, always perform a test run. Use a scrap piece of the exact same material and thickness to test your settings. This allows you to dial in the perfect power and speed for the desired depth and color without risking your actual board.
Dialing in Your Laser Settings
Laser settings are a delicate balance of power, speed, and resolution (measured in DPI, or dots per inch). These settings vary significantly between different laser machines, wattages, and materials. The following are general starting points that you must fine-tune through testing:
- Hardwoods (Maple, Cherry, Walnut): To achieve a rich, dark burn, you typically need higher power and slower speeds. For a 20-40W diode laser, a good starting point might be a speed of 1500-2500 mm/min at 70-90% power. A resolution of 254-300 DPI is excellent for capturing detail without over-burning the wood. A slower speed will result in a deeper, darker engraving, while a faster speed will produce a lighter mark.
- Slate: Engraving slate is a process of ablating or fracturing the surface, not burning it. This requires much higher speeds and lower power. A good starting point would be a speed of 4000-8000 mm/min at 30-50% power. The goal is to create a clean, light-gray mark without chipping the material. The high contrast achieved on slate means you can often use a lower DPI, around 200, for excellent results.
Remember, these are baselines. Test small squares or a piece of your design on scrap to see how the material reacts to your specific machine. Adjust one variable at a time until you achieve the look you want.
The Crucial Final Step: Cleaning and Applying a Food-Safe Finish
Once the laser has finished its work, proper finishing is essential for both safety and longevity. For a wooden board, the engraved area will be covered in a fine layer of soot and resin. Let the board air out for a few minutes, then gently clean the residue using a soft cloth or brush. A small amount of isopropyl alcohol on a rag can help lift stubborn resin, but be careful not to scrub too hard, which could smear the soot into the wood grain. For slate, simply wipe away the light dust with a damp cloth.
The final and most critical step is applying a food-safe finish. This is not optional; it protects the wood from drying out and cracking, creates a barrier against bacteria, and dramatically enhances the wood’s natural beauty and the engraving’s contrast. The best choice is food-grade mineral oil. It is non-toxic, flavorless, and will not go rancid. Apply a generous coat of oil over the entire board—top, bottom, and sides. Let it soak into the wood for at least 30 minutes, or ideally, overnight. Then, use a clean, dry cloth to buff off any excess. For an even more robust and water-resistant finish, you can use a board conditioner, which is typically a blend of mineral oil and natural beeswax. Never use cooking oils like olive oil or vegetable oil, as they will spoil over time and cause your board to smell. For slate, a light wipe with mineral oil will also darken the stone and make your white engraving pop with stunning clarity.
Conclusions
You now have the knowledge to create a beautiful personalized charcuterie board that is both a practical serving tool and a piece of art. By carefully selecting your wood, perfecting your design, and using the right finishing techniques, you can produce a high-quality item for yourself, as a gift, or for sale. Experiment with different designs and materials to make each board unique.
Frequently Asked Questions
Q: What is the best type of wood for an engraved charcuterie board?
A: The best woods are hard, closed-grain species. Maple is excellent for high-contrast engravings, cherry offers a warm, elegant look, and walnut provides a luxurious, dark finish. These woods are durable, less porous, and safer for food contact.Interested in more Charcuterie Board? Check out our Charcuterie Board laser file designs: Click here!
Q: Can I use cooking oil like olive oil to finish my board?
A: No. You should never use cooking oils like olive or vegetable oil. They will go rancid over time, creating a sticky surface and an unpleasant smell. Always use food-grade mineral oil, or a conditioner made from mineral oil and beeswax.
Q: Why is a vector file (SVG) recommended for the design?
A: Vector files are made of mathematical paths, not pixels. This means they can be resized to any dimension without losing sharpness or clarity. Using an SVG file ensures your laser engraving will have crisp, smooth lines and a professional appearance, no matter the size of the design.
Q: What is the main difference between engraving on wood versus slate?
A: When engraving wood, the laser burns the material to create a dark mark, with the depth and color depending on power and speed. When engraving slate, the laser ablates (removes) the top surface to create a light gray or off-white mark, resulting in a very high-contrast and permanent design.

Subscribe to Our Newsletter
And enjoy FREE Download Files, SALE Alerts and Inspiring TIPS
Pricing Your Laser Engraving Work for Profitability
A Comprehensive Guide to Pricing Your Laser Engraving Services
A Comprehensive Guide on How to Price Laser Engraving Services
Charcuterie Board Engraving File – Wine & Grapes 3D Illusion…
$4.00Original price was: $4.00.$3.00Current price is: $3.00.(25% off)
Bee and Honey Jar Charcuterie Board Engraving File | PNG Download #007…
$4.00Original price was: $4.00.$3.20Current price is: $3.20.(20% off)
Valentine Love Captions: 6 Charcuterie Board Engraving Files…
$8.00Original price was: $8.00.$5.60Current price is: $5.60.(30% off)
American Eagle Flag Laser Engraving File for Charcuterie & Cutting…
$4.00Original price was: $4.00.$2.80Current price is: $2.80.(30% off)