

 Français
 Deutsch
 Español
 Italiano
A Guide to 3D Illusion Laser Engraving
Aug
Estimated reading time: 9 minutes
Key Takeaways
- The Illusion of Depth: 3D laser engraving doesn’t carve in three dimensions. It creates a visual illusion using grayscale depth mapping, where the laser’s power is varied based on shades of gray in a 2D image—black is engraved deepest, white is left untouched, and grays create intermediate depths.
- File Quality is Paramount: The final result is entirely dependent on the quality of the grayscale depth map. This crucial file can be precisely generated from a 3D model or artistically created by manually editing a 2D photograph in software like Photoshop or GIMP.
- Material and Settings Matter: The best results are achieved on hardwoods with a fine, consistent grain like maple, cherry, or basswood. It is essential to run a material test grid to dial in the perfect laser settings for power, speed, and resolution (DPI) for your specific material.
- Finishing is Crucial: Proper post-engraving cleanup with a soft brush and isopropyl alcohol reveals hidden detail. Applying a finish, such as a penetrating oil or a satin clear coat, dramatically enhances contrast and protects the final piece.
Table of Contents
- Understanding the Science Behind the 3D Effect
- Preparing the Perfect Image for a 3D Engraving
- Choosing Materials and Dialing In Laser Parameters
- The Engraving Process and Professional Finishing Touches
- Conclusions
- Frequently Asked Questions
Dive into the fascinating world of 3D illusion laser engraving. This article guides you through the entire process, from understanding how the visual trick works to preparing your digital files and dialing in the perfect laser settings. We will explore how to create a stunning laser engraved 3D effect that will captivate anyone who sees it.
Interested in more 3D illusion? Check out our 3D illusion laser file designs: Click here!
Understanding the Science Behind the 3D Effect
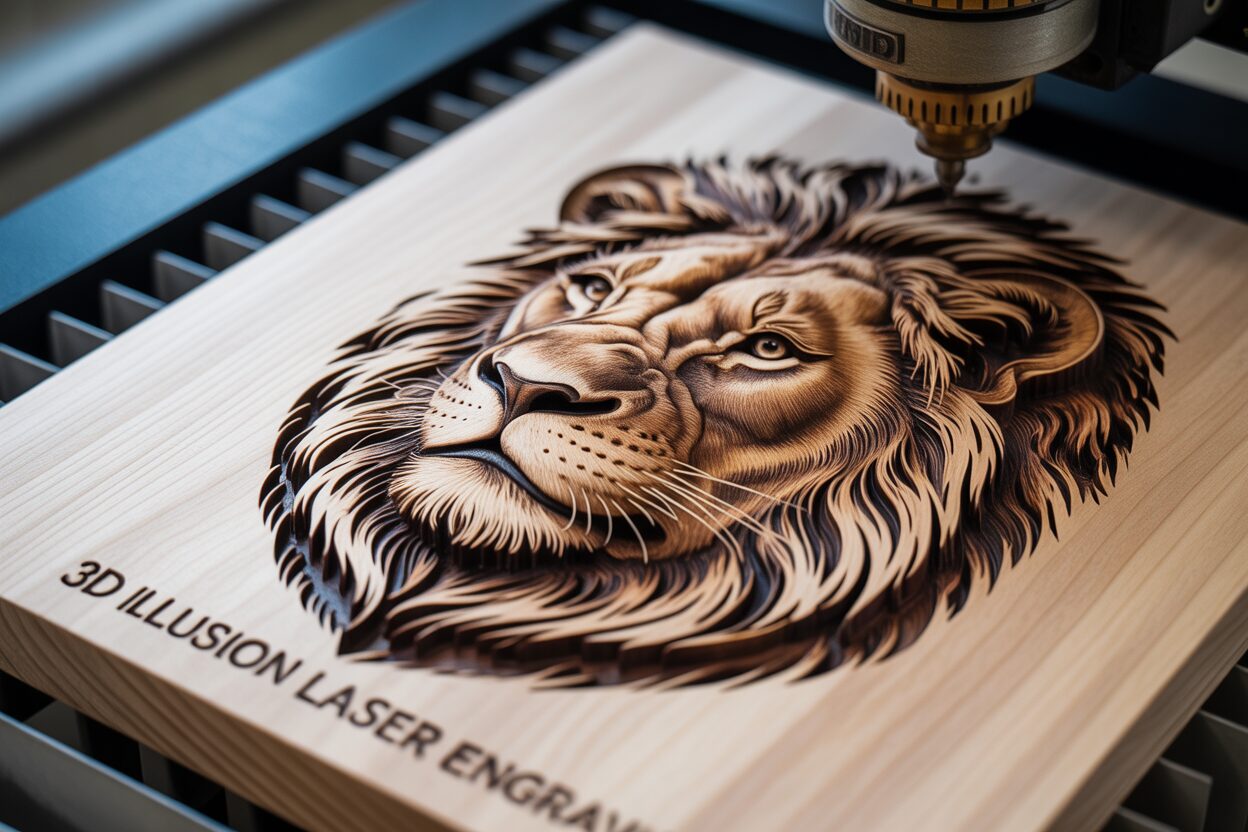
At first glance, a 3D laser engraved piece might seem like it was meticulously carved by a CNC router, with the laser following complex 3D paths. However, the magic of this technique lies not in true three-dimensional carving, but in a brilliant visual illusion powered by a concept called grayscale depth mapping. Your laser engraver doesn’t actually think in 3D; it operates on a 2D plane, moving back and forth in a process known as raster engraving. The “3D” effect is achieved by cleverly manipulating the laser’s power to create varying depths across the material’s surface, tricking the eye into perceiving depth and contour where there is only a textured surface.
The key to this entire process is the design file itself—specifically, a grayscale image that functions as a depth map. Think of this image as a set of instructions for your laser. Each pixel’s shade of gray, from pure white to pure black, corresponds to a specific power level and, consequently, a specific engraving depth. The relationship is direct and intuitive:
- Pure White (#FFFFFF): Represents the highest point of your design. The laser software interprets this as zero power. The laser will either turn off completely or operate at its lowest possible setting, leaving the material’s surface untouched.
- Pure Black (#000000): Represents the lowest or deepest point of your design. This tells the laser to fire at its maximum power setting for that job, vaporizing the most material and creating the deepest pits in the wood.
- Shades of Gray: All the 254 shades of gray in between white and black create the varying depths. A light gray pixel will result in a shallow engraving, while a dark gray pixel will create a much deeper one. This gradient allows for smooth transitions and the creation of complex, curved surfaces.
The Topographical Map Analogy
To better understand this, imagine a topographical map used by hikers. On such a map, contour lines are used to represent elevation. Lines that are close together indicate a steep slope, while lines that are far apart show a gentle incline. A grayscale depth map works on a similar principle, but instead of lines, it uses shades of gray. A rapid transition from white to black in the image file will create a steep, cliff-like edge in the engraved wood. Conversely, a slow, smooth gradient from a light gray to a darker gray will produce a gentle, rolling slope. Your laser reads this “elevation data” from the grayscale image pixel by pixel and adjusts its power in real-time to “excavate” the terrain onto the wood, creating a physical, textured version of the 2D map.
This technique isn’t limited to creating textured reliefs on wood. The core principle of translating grayscale data into laser output is incredibly versatile. A popular application is the creation of a 3D illusion lamp. In this case, a line-art design with clever shading is engraved onto a clear acrylic sheet. While the engraving itself is very shallow, the etched lines catch the light from an LED base, creating a glowing, holographic-like image that appears to float in mid-air. This demonstrates how the same fundamental process—using a 2D design to manipulate light and perception—can be adapted to different materials and applications to produce a wide range of jaw-dropping 3D effects.
Preparing the Perfect Image for a 3D Engraving
The breathtaking quality of a laser engraved 3D effect is almost entirely dependent on the quality of its source file. While the laser does the physical work, the grayscale depth map is the blueprint that dictates every move. Creating a high-quality depth map is an art form in itself, blending technical understanding with creative vision. You can approach this task from two primary angles: using 2D image editing software or generating a map from a 3D model. For direct image manipulation, tools like Adobe Photoshop or the free and powerful GIMP are industry standards. For a more precise and technically accurate approach, 3D modeling software such as Blender (free) or ZBrush allows you to generate a perfect depth map directly from a digital sculpture, offering unparalleled control over the final result.
Creating Your Depth Map: From 3D Models and Photographs
Generating a depth map from a 3D model is the most reliable method. The process involves loading or creating your 3D object, setting up a virtual camera pointing directly at it, and then rendering a “Z-depth pass.” This specialized render automatically creates a perfect grayscale image where each pixel’s brightness value directly corresponds to its distance from the camera. This eliminates guesswork and produces clean, accurate maps. You may need to invert the resulting image, as some programs render close objects as black and distant ones as white. Remember our rule: black areas get engraved deepest, and white areas are left untouched.
Converting a standard 2D photograph is more common for hobbyists but requires more artistic interpretation. Here’s a typical workflow:
- Selection and Preparation: Start with a high-resolution, well-lit photograph. Simple subjects with clear separation from the background work best. The first step is to convert the image to grayscale (desaturate it).
- Manual Depth Painting: Unlike a 3D model, a photo’s light and dark areas are based on lighting, not depth. You must manually define the depth. Using the Dodge (lighten) and Burn (darken) tools in Photoshop or GIMP, you will “paint” the depth. Areas you want to be higher (closer to the surface) should be lightened towards white. Areas you want to be deeper (recessed) should be darkened towards black. For a portrait, you would lighten the tip of the nose and the forehead while darkening the eye sockets, nostrils, and the background.
- Contrast and Levels Adjustment: Once you’ve painted your depth, use the Levels or Curves tools to adjust the overall contrast. Increasing contrast will create more dramatic, steeper changes in depth, while decreasing it will result in a softer, shallower relief carving.
Finally, regardless of your method, image resolution is critical. A low-resolution depth map will result in visible stepping or “banding” on the engraved surface, as the laser has less data to work with. Aim for a resolution of at least 300 DPI (dots per inch) for your final file. For an extra-smooth finish, applying a very subtle Gaussian blur (e.g., 1-2 pixels) can help smooth the transitions between different shades of gray, leading to a more organic and polished final piece. If this process seems daunting, don’t worry. There are countless marketplaces online where you can purchase professionally designed and pre-tested 3D engraving files, which is an excellent and time-saving alternative for guaranteeing a great result.
Choosing Materials and Dialing In Laser Parameters
With your perfectly crafted grayscale depth map in hand, the next stage is where the digital design becomes a physical reality. The success of 3D illusion laser engraving hinges on two interconnected factors: the material you choose and the laser settings you apply. Not all materials are created equal for this technique. Wood is by far the most popular and rewarding medium, but specific types yield far superior results. The best choices are hardwoods with a fine, consistent grain and low resin content. Woods like basswood are exceptionally good for beginners as they are soft and engrave very cleanly with minimal power. Maple and cherry are also prime candidates, offering a beautiful, smooth surface that holds fine detail exceptionally well. Their uniform density ensures the laser vaporizes the material evenly, which is critical for accurately translating the grayscale map into physical depth. Woods to avoid include soft, resinous woods like pine, as the uneven density and high sap content can lead to inconsistent charring and flare-ups, ruining the subtle gradients of the 3D effect.
Dialing in Your Critical Laser Settings
Once you’ve selected your wood, you must calibrate your machine. This is arguably the most critical step in the entire process, as incorrect settings will turn a perfect design file into a charred mess or an indistinct carving. Mastering your laser engraving parameters is key to achieving professional results. While your laser software will have many options, these are the core settings for 3D engraving:
- Power: This is your depth control. Your laser software will use a power range (e.g., 10% to 70%) and apply it to the grayscale image. It will use 10% power on the lightest grays and 70% on pure black. Setting the maximum power too high can lead to excessive charring and loss of detail in the deepest areas.
- Speed: This determines how fast the laser head moves. There is a direct trade-off between speed and detail. A slower speed allows the laser beam more time on each point, resulting in a deeper, darker engraving and capturing finer details. However, this dramatically increases the job time. A faster speed is quicker but may result in a shallower, less detailed engraving.
- Resolution (DPI/LPI): Measured in Dots Per Inch or Lines Per Inch, this setting determines the spacing between each pass of the laser. A higher DPI (e.g., 500-1000) creates more overlap between lines, resulting in a smoother, more refined surface finish, essential for a convincing 3D look. The trade-off is, again, a significant increase in engraving time.
- Engraving Mode/Dithering: For true 3D relief, you must select the “Grayscale” or “3D” mode in your laser software. This tells the machine to directly modulate the laser power based on the image’s gray values. Avoid standard dithering patterns like Jarvis or Stucki for this type of work; they are designed to simulate grayscale with dots for 2D images, which will not produce the desired smooth, contoured depth.
There is no single “magic” setting. Every laser and every piece of wood is different. Therefore, running a material test grid is not just recommended—it’s essential. Create a small grid file with squares that test various combinations of speed and power. Engrave this on a scrap piece of your chosen material. This small investment of time will allow you to see exactly how your material reacts and will help you dial in the perfect settings for your main project, saving you from costly mistakes. As a very rough starting point for a 60W CO2 laser on maple, you might begin testing around 300 mm/s speed, a power range of 15-65%, and a resolution of 600 DPI.
The Engraving Process and Professional Finishing Touches
After meticulously preparing your file and calibrating your settings, it’s time to bring your creation to life. The engraving process for a 3D relief is often a long one, sometimes taking several hours, but it’s not a “set it and forget it” operation. Diligent monitoring is key. Before you press start, double-check that your material is secure and your laser is properly focused. Once the job begins, pay close attention to smoke management. Your exhaust fan should be running at full capacity, and your air assist should be properly dialed in. Effective air assist is crucial not just for preventing flare-ups, but for blowing smoke and debris out of the engraving path. If smoke is allowed to linger, it can be redeposited onto the wood, causing ugly stains, and can even interfere with the laser beam itself, reducing its effective power and compromising the detail in your deepest areas. Periodically check the engraving to ensure it’s progressing as expected, with no excessive charring or unexpected issues.
Cleaning and Preparing the Surface
Once the laser has finished its work and the piece has cooled down, it will be covered in a layer of soot and resinous residue. Cleaning this off correctly is essential for revealing the true detail and achieving a professional look. The goal is to remove the surface residue without damaging the delicate, freshly engraved peaks and valleys. Start with the gentlest method: use a soft-bristled brush, like a clean paintbrush or a soft toothbrush, to whisk away all the loose dust and debris. For the more stubborn residue stuck to the surface, your best tool is high-concentration isopropyl alcohol (90% or higher) and a lint-free cloth or the same soft brush. Dampen the brush or cloth with the alcohol and gently scrub the surface, working in the direction of the wood grain whenever possible. The alcohol is an excellent solvent for wood resins but evaporates quickly, preventing it from raising the wood grain or warping the piece as water would. You will be amazed at how the vibrant texture of the wood reappears from beneath the grime. Take care not to scrub so hard that you wear down the sharp edges of your engraving.
Applying the Final Protective Finish
The final step, and the one that truly makes the laser engraved 3D effect pop, is applying a finish. An unfinished piece can look dry and muted, but the right finish will dramatically enhance the contrast and provide a protective layer. For maximizing depth and contrast, a penetrating oil finish like mineral oil, tung oil, or Danish oil is an outstanding choice. Apply a liberal amount and watch as the oil soaks into the wood, darkening the raw material and creating a stark, beautiful contrast with the charred, dark recesses of the engraving. Let it penetrate for 15-20 minutes, then wipe away all the excess with a clean cloth, ensuring no oil pools in the deep crevices. For a more durable, sealed surface suitable for items that might be handled, a spray-on clear coat is ideal. Choose a satin or matte varnish rather than gloss. A glossy finish can create reflections and glare that obscure the intricate details of the 3D surface, while a satin finish provides protection without compromising the visual effect. This final touch not only safeguards your work but elevates it from a simple engraving to a finished piece of art.
Conclusions
You now have the foundational knowledge to create your own 3D illusion engravings. By carefully preparing your design and fine-tuning your machine’s parameters, you can produce incredible pieces. Don’t be afraid to experiment with different materials and settings. Start a project today and bring your most creative 3D illusion laser engraving ideas to life.
Frequently Asked Questions
Q: What is grayscale depth mapping?
A: It’s the core concept behind 3D laser engraving where a grayscale image acts as a map for the laser. Pure black corresponds to maximum laser power for the deepest engraving, pure white corresponds to zero power for an untouched surface, and shades of gray create the varying depths in between.
Q: What is the best material for 3D laser engraving?
A: Hardwoods with a fine, consistent grain and low resin content are ideal. Basswood, maple, and cherry are excellent choices because they engrave cleanly and hold fine detail well. You should generally avoid soft, resinous woods like pine that can char unevenly.
Q: How do I clean a 3D engraved piece after the job is done?
A: First, use a soft-bristled brush to gently remove all loose soot and debris. For stubborn residue, use a cloth or brush lightly dampened with high-concentration (90%+) isopropyl alcohol and gently scrub the surface, which cleans the resin without damaging the wood.
Q: Do I need a 3D model to create a 3D engraving file?
A: No. While generating a depth map from a 3D model is the most accurate method, you can also create one by manually editing a 2D photograph in software like Photoshop or GIMP. This involves “painting” the depth by lightening areas you want higher and darkening areas you want deeper.

Subscribe to Our Newsletter
And enjoy FREE Download Files, SALE Alerts and Inspiring TIPS
Pricing Your Laser Engraving Work for Profitability
A Comprehensive Guide to Pricing Your Laser Engraving Services
A Comprehensive Guide on How to Price Laser Engraving Services
Charcuterie Board Engraving File – Wine & Grapes 3D Illusion…
$4.00Original price was: $4.00.$3.00Current price is: $3.00.(25% off)
Bee and Honey Jar Charcuterie Board Engraving File | PNG Download #007…
$4.00Original price was: $4.00.$3.20Current price is: $3.20.(20% off)
Valentine Love Captions: 6 Charcuterie Board Engraving Files…
$8.00Original price was: $8.00.$5.60Current price is: $5.60.(30% off)
American Eagle Flag Laser Engraving File for Charcuterie & Cutting…
$4.00Original price was: $4.00.$2.80Current price is: $2.80.(30% off)