

 Français
 Deutsch
 Español
 Italiano
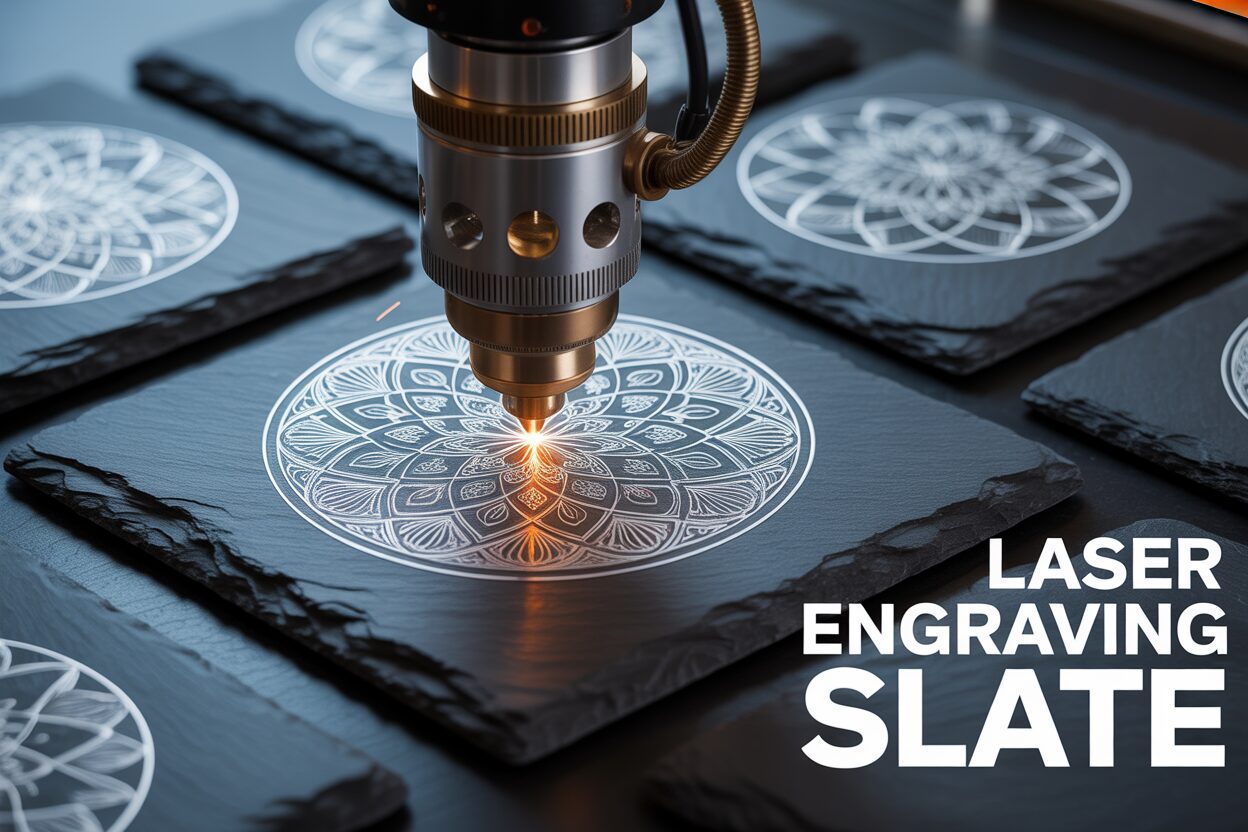
A Comprehensive Guide to Laser Engraving Slate
Dec
Estimated reading time: 11 minutes
Key Takeaways
- Material Selection is Crucial: Opt for smooth, polished, or honed slate over natural riven slate to ensure a consistent focal distance for sharp, detailed engravings. Always inspect for and avoid slate with pyrite (fool’s gold) inclusions, as they can ruin your project.
- Preparation Prevents Problems: Thoroughly clean your slate with isopropyl alcohol to remove dust and oils. For photographic engravings, use high-resolution images and apply a dithering algorithm (like Jarvis or Stucki) to simulate shades of gray effectively.
- Master Counterintuitive Settings: Engraving slate requires a delicate touch. Use low power and high speed on CO2 lasers to lightly ablate the surface, creating a bright mark. Too much power will melt the stone and ruin the effect.
- Testing is Non-Negotiable: Every laser and piece of slate is different. Always run a test grid with varying power and speed settings on a scrap piece to find the optimal combination that produces the brightest, sharpest result before starting your main project.
- Finishing Maximizes Contrast: After engraving, clean off all dust thoroughly. Enhance the final appearance and protect your work by sealing it with food-safe mineral oil for items like coasters or a matte clear acrylic spray for decorative pieces.
Table of Contents
- Choosing the Right Slate for Laser Engraving
- Preparing Your Slate and Artwork for Engraving
- Mastering Slate Laser Engraving Settings
- Your First Project: Step-by-Step Slate Coasters
- Finishing and Sealing Your Engraved Slate Pieces
- Conclusions
- Frequently Asked Questions
Discover the art of laser engraving slate, a material that offers stunning contrast and a premium feel. This guide will walk you through everything from selecting the perfect slate to mastering your laser settings. We’ll explore techniques for creating beautiful, precise engravings on items like coasters and tiles, turning raw stone into personalized works of art for business or pleasure.
Choosing the Right Slate for Laser Engraving
The quality of your engraved slate project is determined long before the laser ever fires. The selection of the slate itself is arguably the most critical step, as the material’s characteristics will directly impact the final appearance, clarity, and consistency of your design. While it may all look like simple dark stone, slate varies dramatically in composition, surface finish, and purity, and understanding these differences is key to achieving professional results.
Natural Riven Slate vs. Polished Slate
Your first major choice is between slate with a natural, riven surface and slate that has been honed or polished to be perfectly flat. Natural slate, often used for rustic coasters and roofing, features an uneven, textured surface created when the stone is split along its natural cleavage planes. While this texture can be aesthetically pleasing, it presents a significant challenge for laser engraving. The core principle of laser engraving is maintaining a precise focal distance between the lens and the material. With an uneven surface, this distance constantly changes. High spots will be closer to the lens, resulting in a crisper, potentially darker mark, while low spots will be further away and out of focus, leading to a blurry, faint, or inconsistent engraving. This makes achieving fine details and uniform text nearly impossible.
Polished or honed slate tiles, on the other hand, offer a perfectly flat and uniform canvas. This consistency ensures that your laser’s focal point remains constant across the entire work area. The result is exceptionally sharp lines, consistent shading, and predictable outcomes from one piece to the next. For any project requiring intricate detail, small text, or repeatable quality for a batch of items like a set of coasters or corporate gifts, using a smooth, uniform slate is highly recommended. It eliminates a major variable and allows you to focus solely on perfecting your laser settings.
The Impact of Density and Color
Beyond the surface texture, the internal composition of the slate plays a vital role. Slate’s density can vary depending on its geological origin. Denser, higher-quality slate tends to produce a much brighter, higher-contrast mark when engraved. The laser ablates the dark surface material, revealing a lighter grey layer underneath; in dense slate, this transition is clean and sharp. Less dense or more porous slate may not react as cleanly. The laser energy can cause a more muted, brownish mark rather than the desirable bright white or light grey, resulting in a low-contrast and less impressive final product. Color variations within a single piece of slate, such as lighter grey veins or mineral deposits, will also affect the outcome. The laser’s mark will always be relative to the base color, meaning an engraved line that crosses from a dark grey area to a light grey vein will appear to change in intensity, which can disrupt the visual harmony of your design.
Sourcing Quality Slate and What to Avoid
When sourcing your material, prioritize suppliers who cater specifically to the laser engraving community, as their slate is often pre-selected for smoothness and consistency. If buying from home improvement stores or other general suppliers, inspect each piece carefully. Look for the following:
- Flatness: Lay the slate on a flat surface to check for any warping or rocking.
- Uniformity: For sets, check that the thickness and color are reasonably consistent.
- Chips and Flaws: Inspect the edges and surface for any pre-existing damage.
Most importantly, you must learn to identify and avoid slate with high pyrite content. Pyrite, often called “fool’s gold,” is an iron sulfide mineral that commonly forms within slate. It appears as small, shiny, metallic gold or brass-colored flecks. When a powerful laser beam hits a speck of pyrite, it does not engrave. Instead, the metallic surface can reflect the laser energy, create a small spark, and leave behind an ugly melted blemish or a complete void in your design. A beautiful engraving can be instantly ruined by a single, unfortunately placed pyrite inclusion. Always inspect your slate under a bright light and reject any pieces with visible metallic flecks, especially if they fall within the area you intend to engrave.
Preparing Your Slate and Artwork for Engraving
Once you have selected the perfect piece of slate, the next step is to prepare both the material and your digital file to ensure a flawless engraving. This preparation phase is not to be rushed; proper groundwork here prevents wasted material and ensures your final design appears crisp, clear, and professional. The process can be broken down into two key areas: conditioning the physical slate and optimizing the digital artwork.
First, the slate itself must be impeccably clean. Slate often arrives with a fine layer of dust from the cutting and shipping process, and may also have oils from handling. These contaminants can interfere with the laser beam, absorbing or deflecting energy and causing inconsistencies in the engraving’s depth and color. The best method for cleaning is to wipe the surface with a lint-free cloth lightly dampened with isopropyl alcohol. The alcohol effectively removes oils and evaporates quickly without leaving any residue. If the slate is particularly dirty, you can wash it with mild soap and water, but you must ensure it is absolutely, bone-dry before placing it in your laser engraver, as any moisture can cause the slate to fracture when heated by the laser. For those seeking enhanced contrast or simplified cleanup, optional surface treatments can be applied. Applying a very thin, even layer of clear matte lacquer before engraving can yield a much brighter, whiter mark, as the laser ablates both the clear coat and the slate surface. However, this produces more fumes and requires perfect application to avoid uneven results. Another technique is to apply a medium-tack paper masking tape over the surface. After engraving, the tape is peeled away, taking all the fine engraving dust with it and leaving a perfectly clean surface.
Optimizing Your Artwork for a Two-Tone World
Preparing your digital file is just as critical as preparing the material. Laser engraving on slate is essentially a binary, one-color process—the laser either leaves the dark slate untouched or it ablates the surface to create a light grey mark. There are no mid-tones. Therefore, your artwork must be carefully processed to translate the nuances of a photo or design into this two-tone medium. For any photographic engraving, the process begins with a high-resolution source image, preferably 300 DPI or higher at the final output size. A low-resolution image will result in a blurry or pixelated engraving.
The most crucial step in preparing photos is converting the image to grayscale and then applying a dithering algorithm. Dithering is a technique that uses patterns of tiny dots to simulate shades of gray. Different dithering patterns can produce vastly different results. Common algorithms found in laser software include:
- Jarvis: Often produces smooth, natural-looking tones, making it a great choice for portraits.
- Stucki: Tends to create a sharper, more detailed result, which can be beneficial for images with intricate textures or landscapes.
- Floyd-Steinberg: A popular algorithm that diffuses error, often resulting in a clean and accurate representation of the original image.
It is highly recommended to create a small test file with your image processed using several different dithering patterns and engrave them on a scrap piece of slate. This test will immediately show you which algorithm best captures the detail and shading of your specific image, as the optimal choice can vary dramatically from one photo to the next. For vector art, such as text and logos, ensure your lines are clean and that any filled areas are set to a solid black for a consistent and uniform engraving.
Mastering Slate Laser Engraving Settings
Achieving the perfect mark on slate is a delicate balance of laser settings. Unlike wood or acrylic where the goal is often to vaporize material to create depth, slate engraving is a process of surface ablation. The laser beam essentially fractures and lightens the dark top layer of the stone to reveal a lighter grey material underneath. This fundamental difference means that the settings you might use for other materials are often entirely wrong for slate. The mantra here is not more power, but the right power, applied with precision and speed. Driving too much energy into the stone will not result in a deeper or better engraving; instead, it can cause the slate to melt, creating a glassy, dark, or uneven finish, and can even fracture the material.
The Interplay of Power, Speed, and Focus
Your three primary variables are power, speed, and focus, and they are inextricably linked. Think of them as a triangle where adjusting one requires compensating with another.
- Power: This setting determines the energy output of your laser beam. For slate, you want just enough power to ablate the surface without overheating it. This often means using surprisingly low power percentages on CO2 lasers and moderate to high percentages on lower-wattage diode lasers.
- Speed: This is the velocity at which the laser head moves across the material. A higher speed means the laser’s energy is applied to any given point for a shorter duration. For slate, higher speeds are generally preferred as they prevent heat buildup and contribute to a cleaner, brighter mark.
- Focus: The laser’s focus is critical. A perfectly focused beam concentrates the energy into the smallest possible point, which is essential for achieving fine details and crisp lines. An out-of-focus beam will spread the energy out, resulting in a weak, blurry mark that lacks contrast. Always ensure your focal distance is set precisely according to your machine’s specifications for the thickness of your slate.
The ideal result comes from a combination of relatively low power and high speed, which delivers a quick, intense burst of energy that lightens the surface without penetrating deeply enough to cause melting or damage.
Starting Parameters and the Power of Testing
Every laser machine is different, and even slate from different quarries can behave uniquely. Therefore, the following settings should be treated as a starting point for your own testing, not as an absolute rule.
- For CO2 Lasers (40W-100W): A good starting range is typically 10-20% Power at a Speed of 300-500 mm/s. For the line interval or DPI (Dots Per Inch), a setting around 250-350 often provides excellent coverage without over-saturating the material.
- For Diode Lasers (5W-20W optical): Due to their lower overall power, you will likely run at a higher power percentage. Start with 80-100% Power at a Speed of 3000-6000 mm/min. Note that diode laser speeds are often measured in mm/min, not mm/s.
To dial in your perfect settings, creating a test grid is non-negotiable. On a scrap piece of slate, create a grid of small squares. Assign a different power setting to each row and a different speed setting to each column. For example, create a 5×5 grid with power ranging from 10% to 18% and speed from 300 mm/s to 500 mm/s. After running the test file, carefully examine the squares. You are looking for the combination that produces the brightest, most consistent light grey color with the sharpest detail. This simple test takes only a few minutes but will save you from ruining a valuable project piece and is the single most effective method for mastering slate engraving.
Your First Project: Step-by-Step Slate Coasters
With your clean slate coaster and optimized digital design ready, it is time to bring them together in the laser. This step-by-step guide will walk you through your first project, transforming a blank stone into a custom-engraved piece. We will use the settings and knowledge from the previous chapters to ensure a successful outcome.
Interested in more Coaster? Check out our Coaster laser file designs: Click here!
Step 1: Position and Secure Your Coaster
Place your slate coaster onto the laser bed. If your coaster has small rubber or felt feet on the bottom, ensure it is sitting perfectly level. These feet can cause a slight tilt, which will throw off your focus across the surface. You can either remove the feet beforehand or place a small piece of material of the same thickness under the opposite corners to level it out. For a single coaster, placing it in the top-left corner (the machine’s “home” position) is often easiest. If you are engraving a set, creating a simple jig from cardboard or thin plywood is highly recommended. Simply cut a square hole the exact size of your coaster into the jig material; this allows you to quickly swap out coasters and guarantee identical placement for every piece in the set.
Step 2: Achieve Pinpoint Focus
Focus is the single most important variable for a crisp result on slate. Use your laser’s specific focusing tool or auto-focus mechanism to set the correct distance between the laser lens and the top surface of the slate. Double-check your focus before every job. An out-of-focus beam will spread its energy over a wider area, resulting in a weak, blurry mark that lacks the bright contrast you are looking for. A perfectly focused beam concentrates all its power into a tiny point, cleanly ablating the surface for a sharp, detailed image. Do not estimate this step; precision is paramount.
Step 3: Frame, Ventilate, and Run the Job
In your laser software, position your design over the coaster’s location. Now, use your machine’s “Frame” function. This will trace the outer boundary of your design with a low-power red dot or by moving the laser head without firing. This is your final chance to verify that the design is perfectly centered and sized correctly for the coaster. Adjust the placement as needed until the frame traces exactly where you want the engraving to be. Ensure your ventilation system and air assist (if available) are turned on. Slate engraving produces a very fine, abrasive dust that must be properly exhausted. Once you are confident in the placement, close the lid, and run the job.
Post-Engraving Cleanup and Fine-Tuning
When the laser has finished, your coaster will be covered in a fine layer of grey dust. Let the exhaust fan run for a minute to clear the air before opening the lid. Remove the coaster and clean it. The easiest way is to rinse it under cool running water and gently wipe the surface with a soft cloth or your fingers. You can also use a damp cloth with a bit of isopropyl alcohol. This will remove all the dust and reveal the final engraving. Now, assess your result.
- If the result is too faint or inconsistent: This usually means your settings were too conservative. The cause is likely either too much speed or not enough power. Refer back to your test grid and choose a setting that is a step slower or a step higher in power. Also, re-verify your focus was perfect.
- If the result is dark, melted, or has a glassy sheen: You have applied too much energy. The laser has overheated the slate, causing it to melt rather than cleanly ablate. The solution is to either increase your speed or decrease your power. Again, your test grid is your best guide for finding the sweet spot.
Once clean and dry, you can enhance the coaster by wiping it with a small amount of food-safe mineral oil. This will deepen the black of the slate, dramatically increasing the contrast and making your engraved design pop.
Finishing and Sealing Your Engraved Slate Pieces
The engraving process is complete, but the work isn’t finished. The final steps of cleaning and sealing are what elevate a good project into a great one, enhancing its appearance, durability, and professional quality. This post-engraving treatment is not optional if you want to achieve the best possible contrast and protect your work for years to come.
The first and most critical step is a thorough cleaning. The laser ablation process leaves behind a significant amount of fine, gritty silicate dust that clings to the surface and dulls the appearance of the engraving. Begin by using a soft-bristled brush (like a paintbrush or a soft toothbrush) to gently sweep away the majority of the loose residue. Do this first to avoid turning the dust into a slurry when you add liquid. Next, take the slate piece to a sink and rinse it under cool, running water. Use your fingertips or a very soft, non-abrasive cloth to gently wipe the entire surface. You will feel the last of the grit wash away. For any stubborn residue or oils from handling, a quick wipe with a lint-free cloth dampened with isopropyl alcohol works wonders and evaporates without a trace. Once clean, allow the slate to air dry completely or pat it dry with a soft, lint-free towel. It must be 100% dry before you proceed to sealing.
Choosing Your Sealant: Function Defines Form
Sealing your engraved slate serves two primary purposes: it dramatically enhances the contrast and it provides a layer of protection. Unsealed slate is porous and will readily absorb oils from fingerprints and moisture, leading to stains and discoloration over time. The sealant darkens the raw slate, turning it a deep, rich black or dark grey, which makes the light-colored laser engraving stand out brilliantly. The type of sealant you choose depends entirely on the intended use of the final product.
- Food-Safe Mineral Oil: This is the go-to choice for items that will come into contact with food or moisture, such as coasters, serving trays, or charcuterie boards. Mineral oil is non-toxic, penetrates the stone, and gives it a beautiful, lustrous, semi-matte finish. It is not a permanent, hard-shell coating, so it may need to be reapplied periodically to maintain its look and protective qualities.
- Clear Acrylic Spray (Matte or Satin): For purely decorative items like wall tiles, plaques, or signs, a clear acrylic spray provides a more permanent and durable seal. It creates a hard protective layer over the slate. It is crucial to choose a matte or satin finish rather than gloss. A glossy finish can create glare that makes the engraving difficult to see and can cheapen the natural look of the stone.
Application for a Professional Finish
Proper application is key to avoiding a sticky or uneven result.
To apply mineral oil: Ensure your slate is clean and completely dry. Apply a small amount of food-safe mineral oil to a clean, lint-free cloth. Wipe a thin, even coat over the entire surface of the slate, including the engraved areas and the edges. Let the oil sit and penetrate the stone for about 15-20 minutes. Afterward, take a separate clean, dry cloth and thoroughly buff the entire piece to remove any excess oil. The surface should feel smooth and conditioned, not wet or greasy.
To apply acrylic spray: Work in a well-ventilated area and protect your work surface from overspray. Shake the can well. Hold the can approximately 10-12 inches from the slate and apply a very light, sweeping mist coat. It is much better to apply two thin coats than one heavy coat, which can pool and obscure detail. Let the first coat dry completely according to the manufacturer’s instructions (usually about 20-30 minutes) before applying a second light coat if desired. This will provide a durable, long-lasting, and beautiful finish to your custom slate creation.
Conclusions
You now have the foundational knowledge to confidently start laser engraving slate. By selecting the right material, preparing it properly, and fine-tuning your settings, you can achieve professional results. Don’t be afraid to experiment with different designs and settings. With practice, you’ll be creating breathtaking custom slate pieces that are sure to impress your friends, family, or customers.
Frequently Asked Questions
Q: What is the best type of slate for laser engraving?
A: The best slate for laser engraving is a smooth, polished, or honed variety. This provides a perfectly flat surface, which is essential for maintaining a consistent laser focus and achieving sharp, detailed results. Avoid natural riven slate with a textured surface, as it causes inconsistent and blurry engravings.
Q: Why is my engraved slate turning out dark, melted, or glassy?
A: This is a classic sign of using too much laser power or too slow a speed. Slate does not need deep engraving; it requires a quick burst of energy to lighten the surface. To fix this, decrease your power setting or increase your speed to prevent overheating and melting the stone.
Q: What is pyrite and why must I avoid it in slate?
A: Pyrite, also known as “fool’s gold,” is a metallic iron sulfide mineral that appears as shiny, gold-colored flecks in slate. When a laser beam hits a pyrite inclusion, it reflects the energy instead of engraving, leaving an unengraved spot or a melted blemish. A single fleck in a critical area can ruin an entire design.
Q: How can I make the engraving contrast on my slate project “pop”?
A: The best way to dramatically increase contrast is to apply a sealant after cleaning the engraved piece. Wiping the slate with food-safe mineral oil or applying a matte clear acrylic spray will darken the un-engraved slate to a rich black, making the light grey engraved areas stand out brilliantly.

Subscribe to Our Newsletter
And enjoy FREE Download Files, SALE Alerts and Inspiring TIPS
A Comprehensive Guide on How to Price Laser Engraving Services
How to Price Your Laser Engraving and Cutting Services
The Ultimate Guide to Crafting a Laser Cut Box
Charcuterie Board Engraving File – Wine & Grapes 3D Illusion…
$4.00Original price was: $4.00.$3.00Current price is: $3.00.(25% off)
Bee and Honey Jar Charcuterie Board Engraving File | PNG Download #007…
$4.00Original price was: $4.00.$3.20Current price is: $3.20.(20% off)
Valentine Love Captions: 6 Charcuterie Board Engraving Files…
$8.00Original price was: $8.00.$5.60Current price is: $5.60.(30% off)
American Eagle Flag Laser Engraving File for Charcuterie & Cutting…
$4.00Original price was: $4.00.$2.80Current price is: $2.80.(30% off)