

 Français
 Deutsch
 Español
 Italiano
A Beginner’s Guide to Creating a Laser Cut Box
Feb
Estimated Reading Time: 7 minutes
Key Takeaways
- Material Choice is Key: For beginners, Baltic Birch plywood is the recommended starting material for a laser cut box due to its strength, affordability, and consistent cutting performance compared to MDF or solid wood.
- Start with a Simple Design: Choose a basic laser cut gift box design with finger joints. Ensure the design file is made for your specific material thickness and is “kerf-corrected” to guarantee a snug fit.
- Master Foundational Techniques: Understand how finger joints create strong, interlocking corners and how living hinges can be used to create flexible, curved surfaces on rigid materials like wood.
- Follow a Methodical Process: Success lies in a step-by-step approach: prepare the digital file with correct settings, operate the laser cutter safely, and finish by cleaning, dry-fitting, gluing, and sanding your project for a professional result.
Table of Contents
- Essential Materials and Designs for Your First Laser Cut Box
- Mastering Key Construction Techniques
- From Digital File to Finished Product: A Step-by-Step Assembly Guide
- Conclusions
- Frequently Asked Questions
Dive into the world of laser cutting with our comprehensive guide to creating your very own laser cut box. Whether you’re a hobbyist looking to make a personalized laser cut gift box or a professional crafting intricate storage solutions, this article will walk you through the essential steps, from selecting the right design and material to the final assembly of your beautiful creation.
Essential Materials and Designs for Your First Laser Cut Box
Choosing the right combination of wood and design is the cornerstone of a successful laser cut box project. Your material will dictate the box’s final look, feel, and durability, while the design determines its complexity and function. Let’s explore the best options to ensure your first project is a rewarding one.
Choosing Your Wood: Plywood, MDF, and Solid Wood
The material you feed into your laser cutter is just as important as the digital file. For a beginner, starting with wood specifically sold for laser cutting is highly recommended, as it is manufactured to be flat and consistent. The three most common choices each have distinct characteristics.
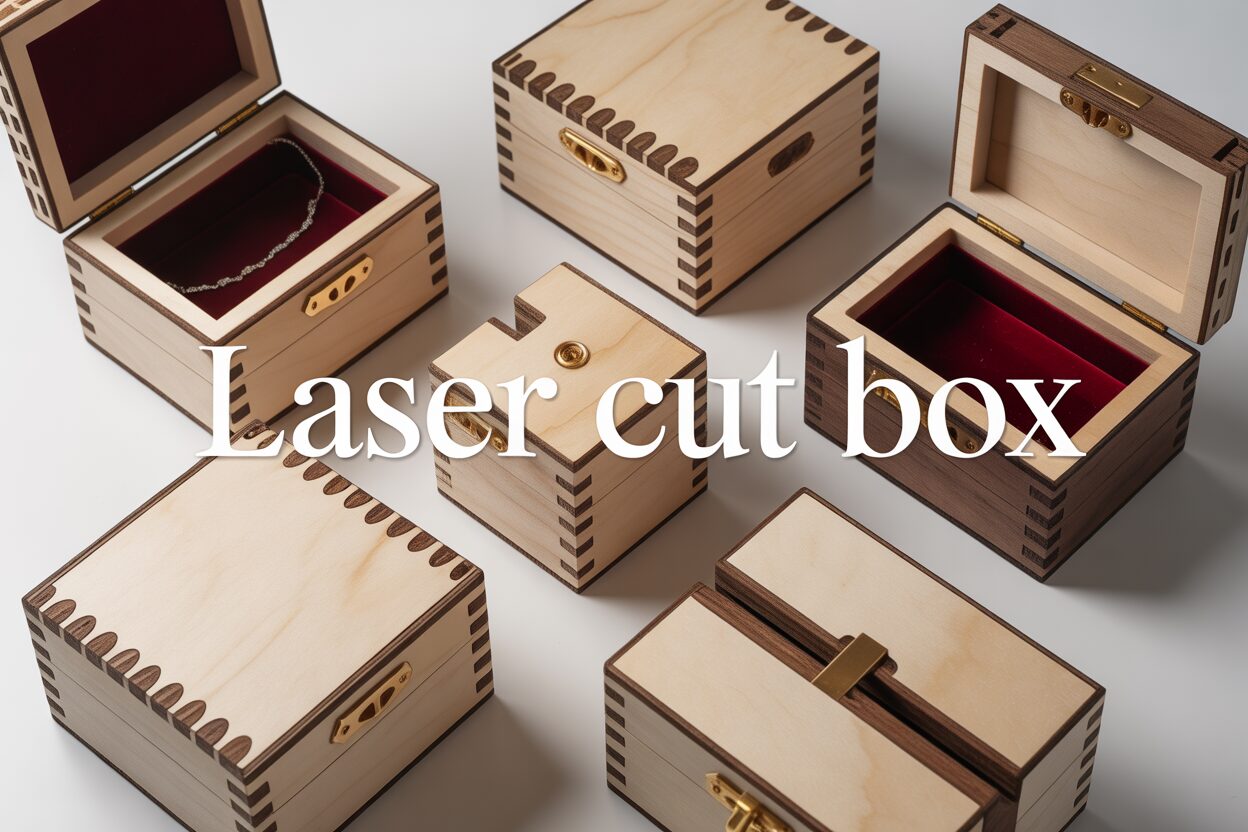
- Plywood: This is often the best starting point for a laser cut wood box. Baltic Birch plywood, in particular, is a favorite in the laser community. Pros: It’s strong, relatively inexpensive, and has an attractive wood grain finish. The cross-laminated layers give it structural integrity, and it’s less prone to warping than solid wood. Cons: Cheaper plywood can have hidden voids or glue pockets in the inner layers, which can cause incomplete cuts or small flare-ups. The layered edge is also a distinct aesthetic that may not be suitable for all projects.
- MDF (Medium-Density Fiberboard): MDF is an engineered wood product made from compressed wood fibers and resin. Pros: It is incredibly uniform, with no grain or knots, which means your laser will cut it with perfect consistency every time. It’s also cheap and has a smooth surface that is ideal for painting. Cons: MDF is essentially wood dust and glue. It creates a lot of fine dust when cut and the smoke can be more acrid than natural wood. It’s also less durable, susceptible to water damage, and lacks the aesthetic appeal of real wood. Use it for prototyping or for projects you intend to paint.
- Solid Wood: For a premium look, nothing beats solid wood. Lighter woods like basswood, alder, and cherry are excellent for laser cutting. Pros: They offer a beautiful, authentic finish and can look incredibly high-end. Engravings on solid wood are often sharp and rich in contrast. Cons: Solid wood is the most expensive option and can be unpredictable. Variations in density, internal stresses, and grain direction can lead to inconsistent cuts. It is more suited for experienced users, but if you want to try it, start with a thin (e.g., 3mm) piece of a laser-friendly wood like basswood.
Selecting Your First Box Design
With your material chosen, it’s time to pick a design. As a beginner, your goal is to build confidence with a successful first project. The most common joint style you’ll encounter is the finger joint, where interlocking tabs create strong, 90-degree corners. Start with a design file that is simple, functional, and specifically made for beginners. A basic laser cut gift box with a simple friction-fit lid is a perfect entry point. These designs typically consist of just six pieces and assemble like a simple puzzle. Look for files that clearly state the material thickness they were designed for (e.g., “3mm Plywood Box”). Using a file designed for 3mm material with 5mm material will result in joints that don’t fit. You should also look for designs that mention being “kerf-corrected.” Kerf is the tiny amount of material vaporized by the laser beam. A good design file accounts for this, ensuring your box pieces fit together snugly rather than loosely. As you gain experience, you can move on to more complex projects like a laser cut jewelry box featuring internal dividers, living hinge lids, or intricate engravings. For now, prioritize simplicity and a clear assembly process.
Mastering Key Construction Techniques
Once you have your design and material, understanding the construction techniques is the next step to bringing your box to life. The precision of a laser cutter unlocks joinery methods that are difficult or impossible to achieve by hand. Let’s delve into two foundational techniques that every maker should master: the robust finger joint and the magical living hinge.
The Classic Finger Joint Box
The finger joint box is the quintessential laser-cut project and for good reason. It’s strong, visually appealing, and showcases the incredible accuracy of laser technology. This technique works by creating a series of interlocking rectangular tabs, or “fingers,” along the edge of each panel.
- How it Works: Imagine lacing the fingers of your two hands together. That’s the principle behind a finger joint. The edge of one panel has protruding tabs, and the edge of the adjoining panel has corresponding slots cut to the exact same dimensions. When you bring the two pieces together at a 90-degree angle, the tabs from one panel slide snugly into the slots of the other, creating a perfect corner.
- Why it’s Strong: The strength of this joint comes from two factors. First, the interlocking nature of the tabs provides a mechanical lock that resists pulling and twisting forces. Second, the design vastly increases the surface area for glue. Instead of just a thin line of contact along a butt joint, you have glue on the face of every single finger, resulting in an exceptionally strong and durable bond once it cures. The precision of the laser ensures these joints fit together with minimal gaps, making them both functional and aesthetically clean.
The Innovative Living Hinge Box
One of the most impressive techniques unique to laser cutting is the creation of a living hinge. This method allows you to take a rigid, flat material like wood and make it bendable, opening up possibilities for curved lids, rounded corners, and other organic shapes. A living hinge box often uses this technique to create a single piece that forms the box’s sides and lid.
- The Concept: A living hinge isn’t a mechanical hinge with a pin; it’s an area of the material that is made flexible by cutting a specific pattern of lines into it. These cuts remove just enough material to allow the remaining wood to flex along the pattern. The cuts are typically a series of parallel lines with small gaps, creating a sort of “springy” lattice within the wood sheet.
- Tips for Success: Creating a successful living hinge requires careful attention to your design and laser settings.
- Pattern Density: The flexibility of the hinge is determined by the spacing of the cut lines. The closer the lines are to each other, the more flexible the hinge will be, allowing for a tighter curve. Lines spaced further apart will create a stiffer hinge. The length of the cuts also matters; longer relief cuts within the pattern can increase flexibility.
- Laser Settings: Your laser must cut cleanly through the material. If the power is too low or the speed is too high, the cuts won’t go all the way through, and the hinge won’t bend. If the power is too high, you risk excessive charring, which weakens the delicate wood “springs” and can cause them to snap when bent. Always run a small test cut of your hinge pattern on a scrap piece of your chosen material to perfect your settings before cutting the final piece.
- Material Choice: Plywood is often a better choice than MDF for living hinges, as the wood grain layers provide some tensile strength along the bend. Be sure to orient your design so the grain of the wood runs parallel to the cut lines of the hinge, not across them, to minimize the chance of snapping.
From Digital File to Finished Product: A Step-by-Step Assembly Guide
With your material selected and design file in hand, you’re ready to bridge the gap between the digital and physical worlds. This stage is where your project truly comes to life. Following these steps carefully will ensure a smooth process from laser cutting to final assembly, resulting in a beautiful, finished laser cut box.
Preparing Your Digital File for the Cut
Before you press ‘start,’ your digital file needs a final check-up within your laser cutter’s software. First, import your design and verify that all lines intended for cutting are assigned the correct color or layer designated for “cut” operations. A common beginner mistake is leaving lines set to “engrave” or having duplicate lines stacked on top of each other, which can cause the laser to over-burn the material. Next, confirm the design’s dimensions are correct for your material thickness. The most critical step is dialing in your laser settings. Power and speed are a balancing act: too much power or too little speed will result in excessive charring and a wider kerf, while too little power or too much speed will fail to cut through the material. Always perform a small test cut on a scrap piece of the exact same material you’ll be using for your laser cut wood box. This allows you to fine-tune the settings for a clean, crisp cut with minimal char.
The Cutting Process: Safety and Precision
With your file prepped, it’s time to cut. Place your wood sheet onto the laser bed, making sure it lies completely flat. Any warping can cause focus issues and lead to incomplete cuts. Use hold-down pins or weights on the corners if necessary. Next, perform the machine’s focusing procedure; correct focus is essential for a clean, efficient cut. Before you begin the job, double-check that your ventilation system is on and running correctly. Fumes from cutting wood and especially MDF can be harmful. Once you start the cut, never leave the machine unattended. While modern laser cutters have safety features, the risk of a flare-up is always present, so constant monitoring is non-negotiable. Watch as the laser precisely traces your design, and once it’s finished, wait a minute for the smoke to clear before opening the lid to retrieve your freshly cut pieces.
Assembly and Finishing Touches
Your pieces are cut, but the work isn’t done yet. The journey from flat parts to a beautiful laser cut gift box requires careful assembly and finishing.
- Clean and Dry Fit: The edges of your cut pieces may have a light layer of soot. Gently wipe this away with a cloth, isopropyl alcohol, or a baby wipe. Before reaching for the glue, perform a “dry fit.” Carefully press the pieces of your finger joint box together without any adhesive. This crucial step confirms that everything fits as expected. If the joints are too tight, a little light sanding may be needed. If they are too loose, you may need to adjust the kerf settings in your design file for the next project.
- Gluing: Once you’ve confirmed the fit, disassemble the box. Apply a thin, even bead of wood glue to the faces of the fingers on one panel at a time. A small brush can help spread it evenly. Assemble the box, using rubber bands, painter’s tape, or small clamps to hold the joints tightly together while the glue cures. Use a damp cloth to wipe away any excess glue that squeezes out of the joints before it dries.
- Finishing: After the glue has fully dried, the final touches will elevate your project. Lightly sand all surfaces and edges with fine-grit sandpaper (220 grit is a good choice) to create a smooth, professional feel. This step also helps remove any lingering smoke stains. Finally, apply a protective finish. A clear spray varnish, a coat of Danish oil, or a simple wax polish will protect the wood from moisture and fingerprints while beautifully enhancing the natural grain.
Conclusions
You now have the foundational knowledge to create stunning and functional laser-cut boxes. By understanding design principles, material choices, and assembly techniques, you can confidently tackle any project, from a simple finger joint box to a complex decorative piece. We encourage you to experiment with different designs and materials to unlock your full creative potential and start building your own collection of custom boxes today.
Interested in more Boxes? Check out our Boxes laser file designs: Click here!
Frequently Asked Questions
Q: What’s the best wood for a beginner’s first laser cut box?
A: Baltic Birch plywood is highly recommended for beginners. It’s strong, relatively inexpensive, has an attractive finish, and is less prone to warping than solid wood, making it a reliable and forgiving material for your first project.
Q: What is “kerf” and why is it important for a laser cut box design?
A: Kerf is the small amount of material vaporized by the laser beam during a cut. A good design file is “kerf-corrected,” meaning it accounts for this material loss to ensure the box’s finger joints fit together snugly and are not loose.
Q: Can I bend wood with a laser cutter?
A: Yes, using a technique called a “living hinge.” This involves cutting a specific pattern of lines into a rigid material like wood, which removes just enough material to allow the remaining wood to flex and bend, creating curved lids and rounded corners.
Q: Is it safe to leave my laser cutter unattended while it’s cutting?
A: No, you should never leave a laser cutter unattended during operation. There is always a risk of flare-ups, and constant monitoring is a non-negotiable safety precaution to prevent fire and ensure a successful cut.

Subscribe to Our Newsletter
And enjoy FREE Download Files, SALE Alerts and Inspiring TIPS
Pricing Your Laser Engraved Products for Profit
A Comprehensive Guide on How to Price Laser Engraving Jobs
Pricing Your Laser Engraving Work for Profitability
Charcuterie Board Engraving File – Wine & Grapes 3D Illusion…
$4.00Original price was: $4.00.$3.00Current price is: $3.00.(25% off)
Bee and Honey Jar Charcuterie Board Engraving File | PNG Download #007…
$4.00Original price was: $4.00.$3.20Current price is: $3.20.(20% off)
Valentine Love Captions: 6 Charcuterie Board Engraving Files…
$8.00Original price was: $8.00.$5.60Current price is: $5.60.(30% off)
American Eagle Flag Laser Engraving File for Charcuterie & Cutting…
$4.00Original price was: $4.00.$2.80Current price is: $2.80.(30% off)