

 Français
 Deutsch
 Español
 Italiano
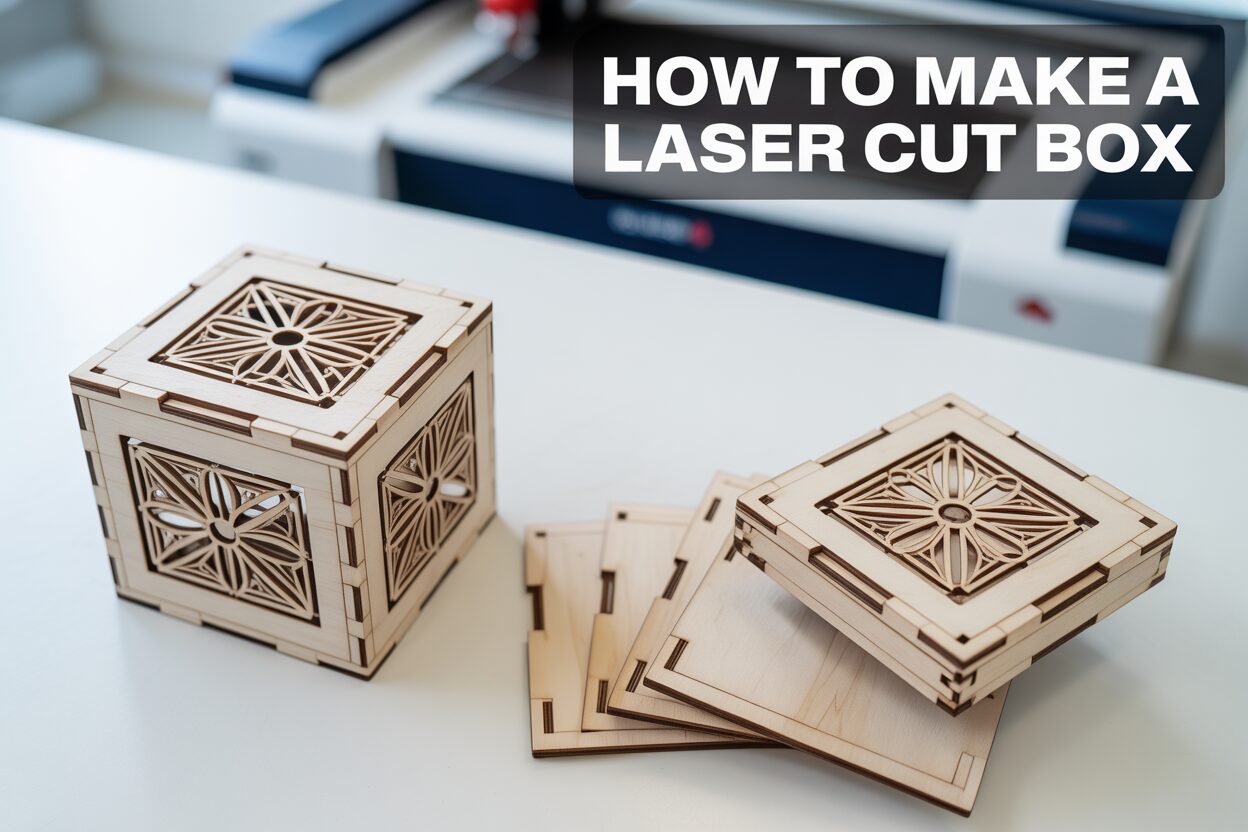
A Beginner’s Guide to Crafting a Custom Laser Cut Box
Mar
Estimated reading time: 7 minutes
Key Takeaways
- Material Matters: Choosing the right wood, like Baltic Birch Plywood for its strength and aesthetic or MDF for its smooth, paintable surface, is the foundation of a quality laser cut box.
- Digital Design is Crucial: A precise vector file created in software like Adobe Illustrator or the free alternative Inkscape is essential for guiding the laser cutter accurately.
- Assemble with Precision: Always perform a “dry fit” before gluing to ensure all pieces interlock correctly. Use high-quality wood glue and clamps for strong, square joints.
- Finishing Elevates Your Project: Proper sanding, followed by staining, painting, and a protective clear coat, transforms a basic box into a polished, professional piece. Adding hardware like hinges and clasps adds both function and style.
Table of Contents
Welcome to the world of laser cutting, where precision meets creativity. This guide will teach you how to make a laser cut box, a perfect project for beginners and seasoned crafters alike. We’ll explore everything from the initial laser cut box design to the final assembly, providing you with the skills to create stunning and functional pieces for any occasion.
Essential Tools and Materials for Your Laser Cut Box
Before you can bring your custom box to life, you need to gather the right tools and materials. Your choices at this stage will directly impact the quality, appearance, and durability of your final product. This chapter breaks down everything you’ll need, from the digital canvas to the final drop of glue.
Choosing the Right Wood
The foundation of your project is the wood itself. For laser cutting, not all wood is created equal. The ideal material is uniform in thickness and density, ensuring the laser cuts through it cleanly and consistently. The two most popular choices for beginners are Plywood and MDF.
- Baltic Birch Plywood: This is a top choice for laser cutting projects due to its strength and aesthetic appeal. Unlike standard plywood, Baltic Birch has more layers (plies) and fewer internal voids, which means the laser is less likely to hit an air pocket and fail to cut through. It has a beautiful, light-colored grain that looks great with a clear finish or can be stained. For most small to medium-sized boxes, a thickness of 3mm (approximately 1/8 inch) is perfect.
- MDF (Medium-Density Fiberboard): MDF is an engineered wood product made from compressed wood fibers. Its main advantage is its complete uniformity. It has no grain or knots, so the laser cuts it with perfect predictability. This results in incredibly smooth edges. MDF is an excellent choice if you plan to paint your box, as it provides a flawless canvas. However, it is heavier than plywood and can be damaged by moisture.
The Digital Toolkit: Design Software
Your laser cutter needs a digital blueprint, a vector file, to know where to cut and engrave. Vector graphics use mathematical equations to draw shapes, allowing them to be scaled to any size without losing quality. You’ll need vector design software to either create your box design from scratch or modify a pre-existing template.
- Adobe Illustrator: As the industry standard for vector graphics, Illustrator is a powerful and versatile tool. It offers a vast array of features for creating intricate designs, patterns, and text. While it comes with a subscription fee, its capabilities are unmatched for professional results.
- Inkscape: For those on a budget, Inkscape is a fantastic free and open-source alternative. It contains all the essential tools needed to create a laser-ready box design, including functions for precise measurements, path manipulation, and exporting in common formats like SVG and DXF. While its user interface may be less polished than Illustrator’s, it is fully capable and supported by a large online community.
The Laser Cutter
The star of the show is the laser cutter itself. If you don’t own one, many local makerspaces, fab labs, or even public libraries offer access for a membership or hourly fee. When selecting a machine, you need to consider a few key specifications. For cutting wood up to 3mm thick, a CO2 laser with a power of at least 40 watts is recommended. This ensures a clean cut in a single pass without excessive charring. Also, check the machine’s bed size—the physical cutting area. Your design, when laid flat, must fit within these dimensions.
Assembly and Finishing Supplies
Once the pieces are cut, you’ll need a few more items to assemble and finish your box.
- Wood Glue: A high-quality wood glue, such as Titebond II, is crucial for creating strong, permanent bonds.
- Sandpaper: Keep a few different grits on hand. A medium grit (around 120) is great for gently sanding away any smoke residue or “flash” from the laser-cut edges, while a fine grit (220 or higher) is perfect for smoothing the surfaces before applying a finish.
- Clamps: Small spring clamps, corner clamps, or even rubber bands and masking tape are essential for holding the box pieces together tightly while the glue cures, ensuring your box is square and its joints are seamless.
- Applicators and Wipes: A small brush or cotton swab can help you apply glue precisely into the finger joints, and a damp cloth is useful for immediately wiping away any excess glue that squeezes out.
Step-by-Step Guide to Assembling a Laser Cut Box
With your materials gathered and design chosen, it’s time to transition from the digital realm to a tangible creation. This chapter provides a detailed walkthrough of the cutting and assembly process, transforming a flat sheet of wood into a three-dimensional box. Precision and patience are your best friends here.
From Digital to Physical: Preparing and Cutting Your Pieces
Before sending your file to the laser cutter, a final check is essential. Open your design in your vector software (like Inkscape or Illustrator). Most laser cutter software distinguishes between operations using line color and thickness. A common convention is to set all cut lines to a specific color, like pure red (RGB 255, 0, 0), with a hairline thickness (often 0.001 inches or 0.025 mm). Any engravings, like a logo or pattern, would be set to black. Double-check that all your shapes are closed paths and there are no overlapping lines, as these can confuse the laser. Once your file is prepared, transfer it to the laser cutter’s computer.
At the machine, secure your wood sheet to the cutting bed, ensuring it is perfectly flat. Use the laser’s focusing tool to set the correct height between the laser head and the material surface—this is critical for a clean cut. The most important step is determining the correct power and speed settings. Always perform a small test cut on a scrap piece of the same material before running the full job. You are looking for a setting that cuts cleanly through the wood in a single pass with minimal charring on the edges. Once you’ve dialed in your settings, position your design on the material in the software, turn on the ventilation system, and start the cut.
The Dry Fit: A Crucial First Step
After the laser has finished, carefully remove your pieces. You may notice a light residue of smoke on the surface; this can be gently wiped away or lightly sanded later. Before you even open the wood glue, perform a “dry fit.” This means assembling the entire box without any adhesive. This step is invaluable for several reasons: it familiarizes you with how the pieces interlock, confirms that everything was cut correctly, and reveals if any joints are too tight or too loose. The finger joints should slide together with a snug, satisfying friction. If they are too tight, you can very gently sand the inside edges of the fingers. If they are too loose, it may indicate your design’s kerf setting was off, but a good quality wood glue can still create a strong bond.
The Main Assembly: Gluing and Clamping
Once you are confident with the dry fit, disassemble the box and lay the pieces out. The key to a clean and strong assembly is to apply the right amount of glue. Too much will squeeze out and create a mess, while too little will result in weak joints. Apply a very thin, even bead of wood glue to the inside faces of the finger joints on one of your side pieces. A small brush or toothpick can help spread the glue into the nooks. Start by attaching the four side walls to the base piece one by one. As you connect them, ensure each corner forms a perfect 90-degree angle. Once the sides and base are together, apply glue to the top edges and carefully place the lid (if your design has an integrated one).
Immediately after assembly, use clamps to hold everything tightly in place while the glue cures. Spring clamps are excellent for applying pressure to specific joints. For ensuring the entire box is square, corner clamps are ideal. If you don’t have clamps, you can use masking tape, stretching it tightly across the corners to pull the joints together. Use a damp cloth to wipe away any excess glue that has squeezed out of the joints. It’s much easier to remove wet glue than dried glue. Let the box sit undisturbed for the time recommended by your glue’s manufacturer, typically at least one hour, but allowing it to cure overnight is best for maximum strength.
Creative Finishing Touches for Your Laser Cut Box
Your box is assembled, the glue has cured, and you now have a sturdy, functional container. But the journey isn’t over. This is where you transform your project from a well-made wooden box into a personalized work of art. The finishing touches are what infuse character and a professional polish into your creation.
Surface Preparation: The Foundation of a Great Finish
Before you can apply any color or finish, you must prepare the surface. This single step is the difference between a good result and a great one. Start by lightly sanding all exterior surfaces. Use a medium-grit sandpaper, around 120-grit, to level any slightly misaligned joints and remove any dried glue squeeze-out or smoke stains from the cutting process. Always sand with the direction of the wood grain to avoid scratching the surface. After the initial sanding, switch to a fine-grit sandpaper, like 220-grit, to create a silky-smooth finish. Once you are satisfied, wipe the entire box down with a tack cloth or a slightly damp microfiber towel to remove every speck of sanding dust.
Applying Color: Stains and Paints
With a clean, smooth surface, you can now add color. Your choice will depend on the wood you used and the look you want to achieve.
- Staining: If you used a beautiful wood like Baltic Birch plywood, a stain is an excellent choice to enhance its natural grain. Apply the stain evenly with a clean cloth or foam brush. Let it penetrate for a few minutes, then wipe off any excess with another clean cloth. The longer you leave the stain on, the darker the color will be.
- Painting: For MDF, or if you simply desire a solid, opaque color, paint is the way to go. It’s highly recommended to apply a coat of primer first, especially on MDF, as it seals the porous material and ensures your paint color applies evenly and vibrantly. Spray paint can provide a flawless, even coat, while acrylic craft paints applied with a brush offer more control for detailed work.
- Protective Clear Coat: Whether you stain or paint, finishing with a protective clear coat is essential. A few light coats of spray-on polyurethane or lacquer will protect the surface from scratches and moisture and give your box a durable, professional sheen, available in finishes from matte to high gloss.
Personalization and Hardware
This is where your box becomes truly unique. Personalization can be done by engraving a design directly onto the wood. While it’s easiest to add engravings to your digital file before cutting the pieces, you can also engrave the lid of your assembled box. To do this, you would need to create a simple jig to hold the lid level inside the laser cutter and carefully align your design. Consider engraving a name to create a perfect laser cut gift box, a meaningful date, a favorite quote, or an intricate geometric pattern.
Adding hardware elevates both the form and function of your box. Small, decorative hinges allow a separate lid to open and close smoothly, while a simple clasp or latch will keep it securely shut. When installing hardware, precision is key. Measure and mark your screw locations carefully. To prevent the thin wood from splitting, it’s crucial to pre-drill pilot holes for the screws using a drill bit that is slightly smaller than the screw’s diameter. These small metallic accents add a touch of elegance and transform a simple storage box into a keepsake chest.
Conclusions
You’ve now learned the fundamentals of creating a beautiful laser cut storage box. From selecting materials to the final assembly, you’re equipped to tackle your own projects. Whether you’re making a laser cut gift box or a personalized keepsake, the possibilities are endless. Continue experimenting with different designs and techniques to further refine your skills and bring your creative visions to life.
Frequently Asked Questions
Q: What is the best wood for a beginner to use for a laser cut box?
A: For beginners, both Baltic Birch Plywood and MDF are excellent choices. Baltic Birch offers a beautiful natural wood grain and strength, while MDF provides a perfectly uniform surface that is ideal for painting.
Q: Do I need to buy my own laser cutter to make a box?
A: Not at all! Many local makerspaces, fab labs, and even some public libraries offer access to laser cutters for a membership or hourly fee. This is a great way to get started without a large initial investment.
Q: Why is a “dry fit” necessary before gluing the box together?
A: A dry fit is a crucial step where you assemble the box without glue. It allows you to confirm that all pieces were cut correctly, check for joints that are too tight or loose, and familiarize yourself with the assembly process before the pressure of a fast-drying adhesive is involved.
Q: How can I add hinges or a clasp to my box without splitting the thin wood?
A: The key is to pre-drill pilot holes for the screws. Use a drill bit that is slightly smaller in diameter than the screws you are using. This removes material and prevents the screw from forcing the wood fibers apart, which causes splitting.

Subscribe to Our Newsletter
And enjoy FREE Download Files, SALE Alerts and Inspiring TIPS
A Comprehensive Guide to Pricing Your Laser Engraving Services
A Comprehensive Guide on How to Price Laser Engraving Services
How to Price Your Laser Engraving and Cutting Services
Charcuterie Board Engraving File – Wine & Grapes 3D Illusion…
$4.00Original price was: $4.00.$3.00Current price is: $3.00.(25% off)
Bee and Honey Jar Charcuterie Board Engraving File | PNG Download #007…
$4.00Original price was: $4.00.$3.20Current price is: $3.20.(20% off)
Valentine Love Captions: 6 Charcuterie Board Engraving Files…
$8.00Original price was: $8.00.$5.60Current price is: $5.60.(30% off)
American Eagle Flag Laser Engraving File for Charcuterie & Cutting…
$4.00Original price was: $4.00.$2.80Current price is: $2.80.(30% off)